Category: Members and Communities

  • Laur3k-3D Printer by OpenBuilds

    Laur3k-3D Printer by OpenBuilds

    By Omair Tariq

    (Information on the Laur3K can be found here)

    Advantages:

    • A lot of documentation (Pictures, Videos Parts list)
    • Without belts
    • Skechups of parts for printer also available

    Disadvantages:

    • Print beds moves in y and z directions
    • Uses a lot of 3d printed pieces
    • Costs about $700. (Without printed parts, wiring, and controller)
  • How Does BioPrinting Work?

    How Does BioPrinting Work?

    By Omair Tariq, Systems and Test Engineer

    How bioprinting works:

    In order for cells to survive and grow, they need a certain environment. This environment is provided in gel scaffolds, referred to as biopaper in laymen’s term. There are several ways of 3D bioprinting. One of these ways is to print a layer of gel and then a layer of cell in a repetitive manner until the desired structure is obtained. Another method of 3-D bioprinting is to first print a gel scaffold and then facilitate cell growth in the gel scaffold by injecting in cells.

    There are various types of gels that can be used as biopaper to meet this purpose: agar, agarose , polyacrylamide gel etc. Due to a lack of availability of funds and equipment, it will be very difficult for us to verify at the cellular level whether the cells have grown correctly or not. Therefore, this semester, we will concentrate on utilizing the 3D bioprinter for the generation of 3D gel scaffolds. 

    bio


    Organovo NovoGen MMX Bioprinter

    Untitled-1


    HowUntitled-1

  • MendelMax 2.0

    MendelMax 2.0

    By Ali Etezadkhah, Project Manager

     Advantages:

    • Open and rigid frame
    • Can be built using hand tools or CNC machine
    • Extruded and flat plate aluminum
    • Linear rail-based x and y axes with smooth and quiet operation and less maintenance
    • Faster printing possible due to increased rigidity
    • Second generation solves problems with the first generation
    • Heavy and stable
    • Aesthetically pleasing

     Disadvantages:

    • Expensive at around $1500
    • Single-axis head and single-axis bed means the bed is not stationary
    • Heavy and difficult to move around

    More information at:

    http://reprap.org/wiki/MendelMax_2

    http://www.mendelmax.com/

    This model would be a good choice for our project due to its resolution, speed, and printing area.  However, the printing bed moves along y and z directions.  It’s a mature model with plenty of documentation online from the creator as well as multiple forums dedicated to it and previous models.  There aren’t many cons to this printer except the price.  At around $1500, it is more than our proposed budget.

  • Rover Level 1 Requirements

    By Maxwell Nguyen

    Level 1 Requirements:

    Our top mission requirements are derived from the specifications of the standard Arxterra Rosco.  The requirements will include speed, power consumption, cost, and time.

    Speed:
    Our rover is expected to move at a speed of 0.200277 m/s.  This is calculated using the standard wheel diameter of 45mm and RPM of the motor. 

    Wheel diameter = 45 mm

     wheel

    3D model of wheel


    Motor Specs:
    120:1 Plastic Gearmotor 90-Degree Output

     motorspic

    Free-run speed @ 6V: 85 rpm

    Velocity calculation:
    Radius = d/2
    R = 0.045/2
    R = 0.0225 mm
    Circumference = 2*pi*r
    C = 2*pi*0.0225
    C = 0.141372 m

    Velocity = RPM*C

    V = (85 rot * 0.141372 m)/60 sec
    V = 0.200277 m/s

    Cost:
    Must have a lower cost compared to the standard RoSco of $284.13.  The BOM for the standard RoSco can be found in the two links below.  The first one lists the parts and links to find the parts while the second link provides a sum of all the costs of each part.

    Parts list and where to purchase them.

    Rover Projected Cost List

    Time:
    The rover must be completed by May 12.  This takes into account CSULB’s final exam schedule and deadline for the project.

  • Acetone Vapor Bath

    Acetone Vapor Bath

    By Mustafa Alkhulaitit – Project Manager

    After researching some of the techniques for smoothing the surface of a printed object, we made a conclusion that acetone vapor bath is one of the simplest ways for achieving the desired goal. Up to this point, we do not have the 3D printer to perform this experiment, so some simple equipment and materials will be used for now.

    The Process:
    The way the acetone vapor bath works is very simple. First of all, the reason of this process is to get rid of the horizontal lines of a printed object.

    BLOGFig.1 (2)
    Fig.1

    A smoother surface is a lot better looking than those horizontal lines, and smoother surface means stronger shine and therefore, higher resolution. The acetone bath works only on ABS plastic.

    BlLOGig2
    Fig.2

    The process is as follows:

    Screenshot (15)

    The time to leave any object in the bath varies because bigger objects may need extended times.

    The Tools:

    • Acetone – when heated to a boiling state, it melts out the plastic
    • Electric Hot plate – easier to maintain heat
    • Aluminum foil – so object doesn’t stick to the base
    • Glass jar or glass teapot – to put the object inside
    • Food can – make base out of any aluminum food can so object doesn’t have direct contact with acetone; a hook can also be made out of an aluminum hanger

     1_HOTPLAT1


    blog2)


    blog3


    LAST

  • Cost Schedule Version 1.0

    Cost Schedule Version 1.0

    By Mustafa Alkhulaitit – Project Manager


    #

    Part

    Price Range

    1.

    Heated Bed Upgrade

    $30 – $50

    2.

    All Metal Hot End

    $100

    3.

    Surface Toning

    TBD

    4.

    LCD Panel

    $50 – $70

    5.

    2x NEMA 17 Stepper-Motor

    $20

    6.

    2x M2.5 x 12mm Bolts

    $0.64

    7.

    M2.5 Nuts

    $0.60

    8.

    TowerPro SG-90 Mini Servo

    $3.49

    9.

    OMRON SS-5 Micro switch

    $1.75


    Total = $270


    The costs above are only an estimate. The table will more likely change in the future, especially as we start to actually build, test, and design the 3D printer and the needed parts.

  • Dual Extruder Head 3D Printer

    By Mustafa Alkhulaitit – Project Manager

     One of our main objectives is to add an additional extruder head to the 3D printer. The dual extruder upgrade will remove any shape restrictions. There are many shapes that the single extruder head will not be able to print. The dual extruder head will allow us to print using dissolvable support structures such as HIPS and PVA. Having multiple extruders allows us to have multiple filaments ‘piped in’ and ready to be used whenever the object being printed requires them, and this is where the saved time comes from. Another advantage of having dual extruders is the ability to print in two different colors by using multiple filaments.

    Fig.1

    Besides the advantage of dual extruders, there is a limitation for dual extruders. According to “3D printer prices” “The limitations of multiple extruders come as a result of the different extruders currently sharing the same print head. Since each extruder is locked to one another and unable to move independently, more material could only be printed if the object required a symmetrical object to be printed the exact distance apart from the original, as the two extruders are positioned.” Until the extruders can move independently, the benefits of duel extruders come only from having multiple materials readily available.

    The dual extruders when operated by the RAMPS card and the Arduino Mega 2560 will result in smoother, higher quality prints. The RAMPS card is dual extruder ready and will not need additional shields or boards. The attached designs and pictures show how the design is going to look like for the dual extruders.

    Our plan for the dual extruder is to make a duplicate copy of the existing extruder head. The stepper motor will not be attached to the nozzle head directly because this will take space and will make heads heavy. Instead, the stepper motors will be held in a specific way, as can be seen in Fig.3; fig.2 shows how stepper motors are put on most designs, which is not the correct way of placing them. This method makes the extruder heads heavier and a lot slower than what Fig.3 demonstrate.

    Fig.2

    Fig.2


    9.IMG_0704_preview_featured
    Fig.3

    There will be a more detailed study regarding dual extruder heads and whether we are going to use support material or an extra color. The future blog will also include more specifications regarding the new dual head.

  • Spring 2014 BioPrinter

    Spring 2014 BioPrinter

    By Ali Etezadkhah, Project Manager

    Team members:
    Ali Etezadkhah – Project Manager
    Mevan Fernando – Sensors, Actuators & Powertrain
    Anh Nguyen – Controls & Image Processing
    Omair Tariq – Systems and Tests

    Our team has chosen to continue the work on the 3D bioprinter that was built last semester.  We explored using different printer designs, but most of the models have a building platform that moves in the horizontal plane as well the vertical plane.  Since we plan to use a heated gel to print, a stationary platform that only moves along the z-axis is preferred.  In the next few blogposts, we will publish our research into different 3D printer models.

    The team from last semester was able to print 3D structures using silicone, but silicone remains fluid until it dries in a few hours.  Our challenge is to design an extruder optimized to print using a biological gel.  When printing with plastics such as PLA or ABS, the extruder temperature is not critical and the structure begins to solidify immediately after extrusion.  This is due to the large temperature differential between molten plastic, which is around 200°C, and the room temperature.  When printing with biological media, the gel must be mixed and kept warm as it is loaded into the extruder.  The temperature of the extruder must be maintained precisely to keep the gel right at the gelling temperature.  As soon as an element is laid out by the print heat, it must be cooled quickly to maintain the structure.

    The printer from last semester does not have a temperature controlled extruder.  It also lacks the capability to cool the structure as it is being printed.  Our challenge is to modify and redesign the printer to be able to print using biological media.

  • Hexapod ADK board

    By Mason Nguyen
    ADK board tested and programmed by Chau To, Tien Dang and Mason Nguyen

    ADK Board
    Based on previous objective, the team is to build a hexapod using the wireless control interface. In order to achieve that goal, we need to use the ADK Mega 2560 board where it has the ability to connect to the Android phone and control it wirelessly.

    mason1
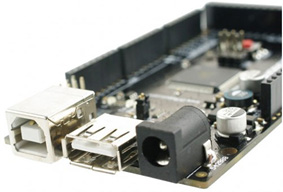
    ADK Microcontroller Mega25 Cappuccino Board

    Description:
    ADK board came with a power jack, a USB connection, an ISCP header, and reset button. Also the board can connect up fifty four outputs/inputs pins. Those pins contained four UARTs with hardware serial ports, sixteen pins inputs, and fifteen pins PWM outputs.

    The team decided to use this board instead of the Uno because it can regulate up to 18 servos without the servo shield controller. Moreover, it’s easier to code compared to the Uno where it required using servo shields controller (2-16 channels Adafruit servo controller board or 1-24 channels) and Uno board also needed to use library provided from the servo controller shield to code as well.

    For each Power HD servo, it has 3 pins. One pin contains a control V+ and the other contains V-. V+ pin goes to the servo and the V- pin will be grounded. Digital Pin 30 to pin 47 of the ADK is use to connect the servos. Furthermore, algorithm test will be performed to test the maximum operation of the servos being used will only be 10 as the same time.

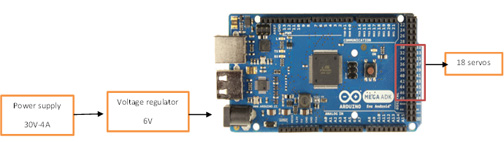
    The efficiency of a voltage regulator, defined as is an important quantity of its performance, especially when comes battery life or heat. In order to protect the board, we will be using a voltage regulator to limit the current spikes.

    We concluded that the Mega2560 can support up 50 digital I/O pins so it will be enough to run our Power HD servos.

    mason2
    ADK Board where the power supply connected to the voltage regulator and from the voltage regulator it connected to 18 servos.

    Here is the video from the servos testing!

  • Spring 2014 Rover Introduction

    Spring 2014 Rover Introduction

    By Maxwell Nguyen

    This new semester brings along a brand new team with inventive and innovative minds. The rover team will be aiming to create a brand new and improved design for the RoSco Rover.

    The Rover Team includes:
    Maxwell Nguyen – Project Manager
    Robert Licari – Communications
    Anthony Vo – Sensors, Actuator, Powertrain
    Suhyun Kim – Image Processing, Computer Systems

    Mission Objective:
    Construct a rover that will be able to navigate through a natural set course shared by the Spiderbot and Hexapod.  The rover must be able to navigate around sprinkler and branches on the course.  The route was determined by the Spiderbot team and can be viewed below.

    map
    course top view

    mapIllo

    Course map view

    The course is located in the East Wind of campus and is about 42 meters long.