By: Tai Nguyen (E&C Engineer)
Verified By: Ernie Trujillo (Project Manager)
Approved By: Miguel Garcia (Quality Assurance)
Table of Contents
Introduction
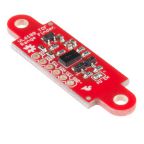
The range finder, upon hearing reviews about it from previous semesters that it was a good choice above the ultrasonic sensor, has an ambient light sensor, range sensor, and IR emitter. Depending on the ambient light in the room, the reflectance from the IR could vary. The range finder has precise and accurate range detection up to 100mm. The SparkFun ToF Range Finder Sensor – VL6180 has an I2C address at 0x29.
How to use the Sensor
It was fairly simple to get a simple test running.
Step 1: Go onto the SparkFun website and locate the part.
Step 2: Under the documents tab, there is a link to the GitHub of the official example code and libraries.
Step 3: Download it all and inside the example code folder, copy over the SparkFun-VL6180 library and .cpp file.
Step 4: Go inside the code and make sure it is setup for I2C use. (ex: include <Wire.h>, Wire.Begin as well as the include for the library).
Step 5: Connect sensor to the I2C pins on the Arduino or ProMicro (pin 2 = SDA, Pin 3= SCL) as well as the VCC and GND pins to corresponding pins.
Step 6: Upload and open the Serial Monitor Ctrl + Shift + M and you’re done!
Test #1
I placed the sensor horizontal and parallel to the table and used a piece of paper and a ruler to test the accuracy of the range detection. In a regular classroom light setting, the sensor was able to accurately detect the paper distance within 1-2mm and constantly displaying the same reading without a 20 point average. Beyond the 120-144mm mark, the accuracy is about 2-3 mm off but still provided a precise reading. If nothing is in the max range of the sensor, the sensor just repeats 255mm. I did think that the 255 was only because the sensor variable was unsigned 8 bits long, but the max is just 255mm.

Strategy for the Range Finder
The choice to use the range finder over the ultrasonic was not only based on accuracy, but also on space and size of the sensor. An ultrasonic sensor would prove too big for the Goliath and would not fit the L1 requirement of looking like a scale model of the Goliath 302 tank.
The first thing I wanted to do was reduce the false positives, since the sensor would always display the max range even when nothing was there. The dimensions of the Spring 2018 400D maze room was announced and confirmed to be 4 x 4 inches. 4 inches translates to 101.6 mm. To solve this issue, I decided to booleanize the readings of the sensor. Anything above 101.6 mm is a 0 and anything below it will be a 1. The booleanizing will help me detect and determine if there is an object in front of the goliath as well and allowing the Goliath 302 tank to navigate the far corners of the maze without detecting the wall of the classroom. 4 inches also fits within the high accuracy range of the sensor and will allow the robot enough room and time to take action by being able to sense an object from a room away.
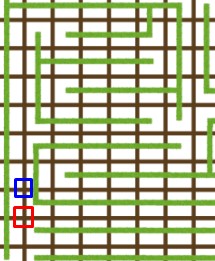
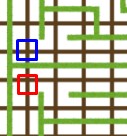
The next task was to also marking the position of the obstacle so that the Goliath would be able to learn that the path that it’s currently on is no longer usable and will need to either wait till the obstacle is gone or turn around and take a different path. Obviously, we will be marking the obstacle virtually. Things we already know: the obstacle is directly in front of the robot and is at least 1 room away. Things we need to know to create the function: direction of the robot, which room number we are in (16 room numbers), as well as row and column. The reason we need to know the room number is because the actual maze has no REAL walls and if we are in a room like Figure 3, it would be unnecessary to abandon the path we are currently taking.
Essentially, the robot will detect an object, and then depending on the direction will take the row/col +1 and change the room that it’s facing to a room number 16 which is a room with 4 walls 0b1111 and also will add a wall to the room that the robot is CURRENTLY in, in the direction it is currently facing as well. This way, the robot will see virtually that there is a wall in front of it and will be forced to make a different decision. However, this case solution will only work for obstacles that are stationary and not moving, as once the obstacle disappears, the path is now available to the robot. The reason why we care about the different cases is because there is also a case where the object is just another robot passing by in front of the Goliath through a T intersection. Depending on the orientation of the passing robot, the path the Goliath is taking may still be available to take.

Conclusion
Overall, the range finder was amazingly accurate and simple to use. A 0-255mm range is well within what we were looking for and suited for our purpose of only needing to detect 4 inches in front of the Goliath. Booleanizing the readings helps to discern when an object enters the range of the sensor and resolved the error of false positives.
References