Arxterra 3DoT Training Telerobotic Mode
Written by Nornubari Kanabolo MST DM and Muhannad Al Mohamed E&C DM
Table of Contents
Arxterra Client-Server “Community” Mode
Training for telerobotic mode included understanding how “Community Mode”works. This can seen by the diagram below
Community mode is communication between several parts of the Arxterra environment. This includes between the ArxRobot mobile app and Arxterra Control panel through a server and between the ArxRobot mobile app and ATmega32U4 microcontroller.
Choosing Community Mode
1. Click on Community Mode in the ArxRobot App. This is
2. Do not change any of these default settings
Creating Name for Project
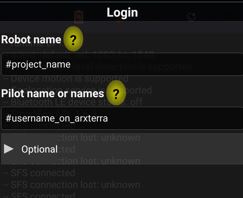
In order to create a name for the project, type in your robot name as seen below. For example, for the Goliath project, you would put “Goliath” in the “Robot name” area. For “Pilot name or names” you would put your individual birth name such as “Nornu”.
Access the Arxterra Desktop Control Panel
To access the Arxterra Control Panel, go to arxterra.com and click on “Launch Now!” in the control icon.
Now you log in to the control panel using your Arxterra username(assuming you already registered for an account) and password for Arxterra.
Communication with your Project
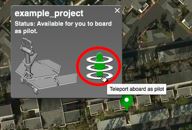
Once in community mode and logged into the control panel you should be able to see your robot on the map. It is signified as a colored location marker. Click this and it will show the name of the robot and a “beam me up, Scottie!” icon. Click this icon to switch to Pilot mode.
Now you should be able to see what your phone camera sees. The interface created through the ArxRobot mobile app should be visible now as can be see below. To change the view of the camera through the app go to the settings>>phone configuration>>camera for streaming video.
Custom Commands and Telemetry
The process of creating Custom Commands & Telemetry in Community Mode is exactly similar to the process in creating them in RC Mode. It has the same 7 options the users can choose from (Boolean, Select, Byte, Unsigned Byte, Short, Unsigned Short, Header/Separator). However, Instead of only enabling the commands to show up in RC Mode the user would enable it to show on the Client Server Mode.
User Interface on the Control Panel
The user interface has 7 windows to show data:
- Lounge: shows the position of the project on a map

- Live Cast: If camera is enabled, it will show live broadcast from the phone that has the ArxRobot App.

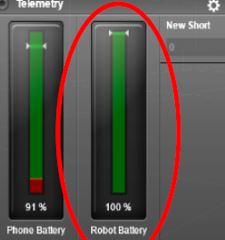
- Telemetry: This window shows whatever commands were set for telemetry. Gauges and values of data packets would be shown in this window.

- Custom Controls: similar to the RC mode, this window shows the custom commands made by the user to interact with 3DoT Board.

- Controls: Also similar to the RC Mode, this window shows the D-pad that can be used to move motors of projects.

- Orientation: this window would show the position of the robot if the motion were enabled in the ArxRobot App.

- Messages: This window would show any emergency messages and notifications enabled by the user through custom commands. For example the user can have an alert message be sent and shown on this window if a Servomotor went to a specific position.

Telemetry
Telemetry is an automated communications process by which measurements and other data are collected at remote or inaccessible points and transmitted to receiving equipment for monitoring data.
The data packets sent from the 3DoT to the ArxRobot App can be displayed in the telemetry window by enabeling either Telemetry State or Telemetry Stream for custom Commands.
Predefined telemetry can also be shown in the window if enable in the Robot Capabilities Configuration.


