Custom Commands – Bluetooth Communication
By: Jordan Smallwood (Project Manager)
Approved by: Miguel Garcia (Quality Assurance)
Table of Contents
Introduction
One of the many benefits of working with the Arxterra App is the ability to create custom commands and communicate with your robot over Bluetooth. Although many of the necessary commands have been predefined there is still plenty of room to create custom user defined commands to make navigating and controlling your robot a breeze.
In this blog post we will examine the MOVE command which will allow the user to control the robots speed and orientation using the D-Pad on the Arxterra App. We will walk through how to set this up step-by-step to ensure that future semesters can focus on other aspects of their project.
Parts Required
- Wheels with electric motors (Pathfinder has 6)
- Motor Driver (Pololu VHN 5019)
- Microcontroller (Arduino Mega2560)
- Bluetooth Device (HM-10)
- Android or iOS Device with Arxrobot App (iPhone 6)
- Power for Electronics (12V Lead Acid Storage Battery)
- Robot3DoT Library
Step 1: Physical Connections
First and foremost, you will need to wire everything up, that is motors to motor driver(s) and motor driver to the microcontroller. This can be done by looking up the data sheet for your specific motor driver and wiring accordingly. Also, you will need to connect your Bluetooth device to the microcontrollers serial port as well ensuring that TXD -> RXn & RXD -> TXn.
Step 2: Downloading the Arxterra App
In order to gain access to the Arxterra App you will need to get in contact with Jeff Gomes. The app is available for both android and iOS devices, however, it is easier to get the app onto an android device. There is one additional step when it comes to installing the app on an iPhone. Since the App store is a little bit more selective as to what they offer, the Arxrobot app is still considered to be in beta testing and you will need your specific Apple user ID to get access.
Step 3: Import the Robot3DoT Library
This is where you will find a lot of the code that will make your life a million times easier. This library can be found here. In order to import this library you will first need to download the library, leaving it in its .zip format. Once you have downloaded it you can import it into the Arduino IDE by opening your computers file folder and dropping that file into the library file within your Arduino folder.
Step 4: Including and using the Robot3DoT Library
After you have imported the library you will need to open a new script within the Arduino IDE. Now you will want to include this library in the sketch you have created and you should see at the top of your code the library include statements. If you would like to get a better understanding of how the code works you can view the libraries by finding them in the Arduino folder under libraries and selecting the libraries .cpp file. This can be very beneficial as you can make sure this code works for your specific purpose and if not then you can make modifications as needed.
Now you will need to insert the following lines of code to be able to use the command handler properly. All of these are entered before your setup code.
- Robot3DoTBoard Robot3DoT; // Instantiate as Robot3DoT at end of class header
- const uint8_t CMD_LIST_SIZE = 1; // total number of custom commands
- void moveHandler(uint8_t cmd, uint8_t param[], uint8_t n);
- Robot3DoTBoard::cmdFunc_t onCommand[CMD_LIST_SIZE] = {{MOVE,moveHandler}};
- Note that for custom commands you will need to define the specific ID for that command. For example, the MOVE command is already associated with ID 0x01 and does not need to be redefined.
Within the setup code you will want to insert the following:
- Serialn.begin(9600); // This opens up the serial port that your Bluetooth device is connected to.
- Robot3DoT.begin(); // This is a predefined setup function within the Robot3DoT Library
- Robot3DoT.setOnCommand(onCommand, CMD_LIST_SIZE);
In the main loop make the call:
- Robot3DoT.loop();
Now you’re ready to write your command handler functions. The MOVE function already has functions that are associated with it but you are able to write your own functions if you’d like. For our purposes we wanted a simple move function to control it’s direction at a specified speed. The directional pad has four buttons: up, down, left and right. They all have their own unique ID associated with them and by processing the data sent to the Arduino we can assign their values accordingly. For example:
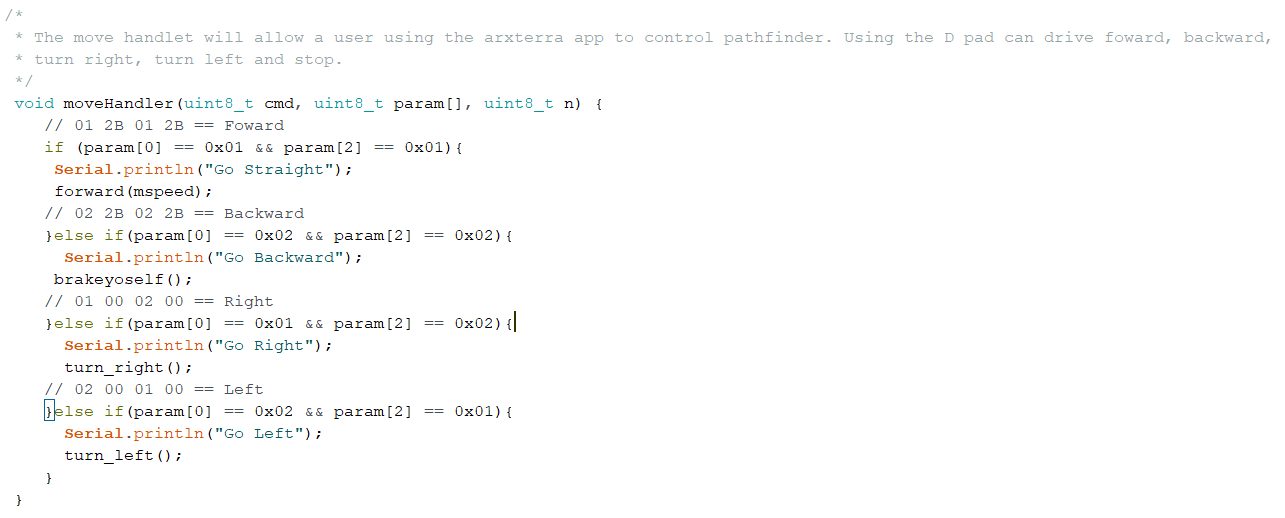
Figure 1: Implementation of a command handling function, Credit: Mark Huffman
Step 5: Verify Bluetooth Connection
This is perhaps the most troublesome step. When I was setting all this up I could not seem to get any sort of communication with the app and the Arduino. After wasting hours of changing serial ports, examining the libraries and looking up troubleshooting methods I discovered three key issues.
- The HC-06 device we had from a previous semester was defective. I discovered this while looking up troubleshooting methods. A simple way to determine if your device is defective is by creating a “transmission loop”. This is done by shorting the RXD and TXD pins on the device and making sure it is turned on (If it doesn’t even turn on that’s your first clue). Download the free app Bluetooth terminal on your iPhone or Android and connect to it. Once you are connected you can send the device ASCII characters and it should send back exactly what you sent. If you are getting no response then your device is most likely defective.
- There are different kinds of Bluetooth technology. iPhones only operate with BLE communication whereas Androids can use a variety. If you plan on using an iPhone to control your robot make sure you have an HM-10 or HM-11 device to connect to. Also, make sure that within the Arxrobot app phone configuration settings you have selected the proper Bluetooth connection.
- For some reason the Arduino Mega will not allow you to upload code if you have Bluetooth connected to the Serial port. In which case I moved the Bluetooth to the Serial1 port. Since I changed the serial port physically and not within the software there was no established communication line. Let this be a reminder to make sure the serial port you are using is being called within the code otherwise this can be a nightmare.
- Hopefully future semesters can learn from my shortcomings and not have to struggle with this aspect of their project.
Step 6: Drive Around or Something
Now that you have setup Bluetooth communication, defined your motor functions and wrote the code to establish communication between the app and your device you can literally do anything you want from blinking an LED to autonomous GPS navigation. Just know that all of your commands are going to be in this type of format and you can extract whatever information you want and do with it what you will.