Software Programming in C++: Introduction
PDF Lecture http://web.csulb.edu/~hill/ee444/Lectures/02%20C++%20Introduction.pdf
READING
The AVR Microcontroller and Embedded Systems using Assembly and C
by Muhammad Ali Mazidi, Sarmad Naimi, and Sepehr Naimi
Sections: 7.1, 7.3, 7.4, 7.6
Here is a fun tool to translate your C++ code into Assembly
https://godbolt.org/
Table of Contents
Assemblers, Compilers, and Interpreters
Language Levels
- Scripting Arduino, Matlab
- High-Level JAVA, PYTHON
- Mid-Level C/C++
- Low-Level Assembly
From Humans to the Machine
Reference: https://en.wikipedia.org/wiki/Interpreted_language
Assembly 1:1
Machine Code
Compilers 1:X
Machine Code
Language examples = C/C++, Python, BASIC
Interpreters 1:1
bytecode
Language examples = C#, Java, Python, BASIC
Examples of Languages which may be Compiled or use an Interpreter
Most interpreted languages use an intermediate representation, which combines compiling and interpreting.
- JavaScript
- Python
- Ruby
VARIABLE PROPERTIES
- Data Type
- Scope
Scope
Scope allows the compiler to help us from making mistakes (overwriting the value of a variable) & allows us to help the compiler optimize the code (manage SRAM resources).
Reference: https://andrewharvey4.wordpress.com/tag/avr/
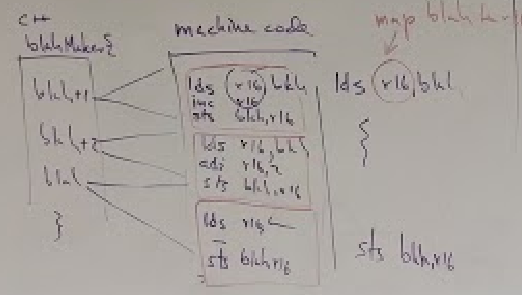
Supplemental figure for Volatile
The key here may be the destruction of the mapping of variables to registers in the interrupted program.
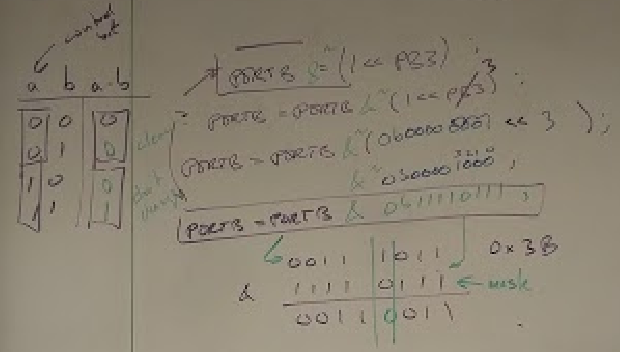
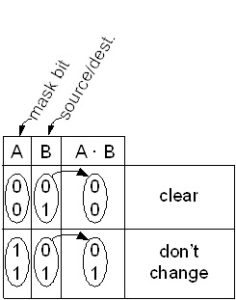
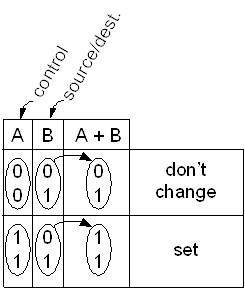
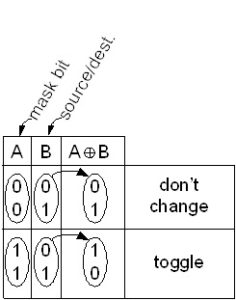
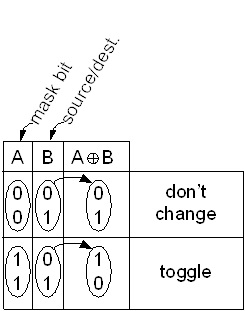
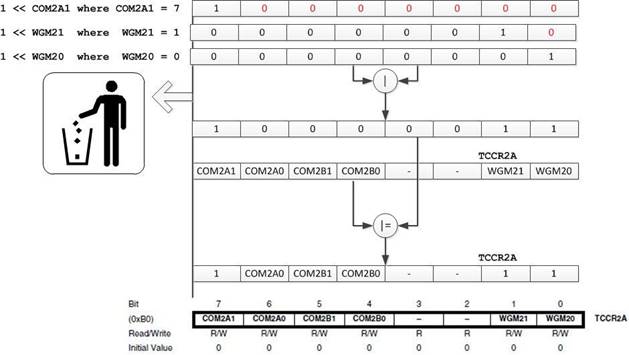
Supplemental figure for setting and clearing bits
Reference: http://web.csulb.edu/~hill/ee346/Lectures/14%20AVR%20Logic%20and%20Shift.pdf
Data Types
Explicit Data Types
source: Wikipedia stdint.h
- The C standard library introduced in the C99 standard library (stdint.h) allows programmers to write more portable code by allowing them to specify exact-width integer types, together with the defined minimum and maximum allowable values for each type.
- This new library is particularly useful for embedded programming which often involves considerable manipulation of hardware specific I/O registers requiring integer data of fixed widths, specific locations and exact alignments.
- The naming convention for exact-width integer types is intN_t for signed integers and uintN_t for unsigned integers. For example
uint16_t revsteps; // # steps per revolution
uint8_t steppernum;
uint32_t usperstep, steppingcounter;
Implicit and Architecture Dependent Data Types
| Data Type | Size in Bits | Data Range / Usage |
|---|---|---|
| void | ||
| boolean | ||
| char | 8 | -128 to +127 |
| unsigned char | 8 | 0 to 255 |
| byte | 8 | 0 to 255 |
| int | 16 | -32,768 to +32,767 |
| unsigned int | 16 | 0 to 65,535 |
| word | 16 | 0 to 65,535 (Arduino) |
| long | 32 | -2,147,483,648 to +2,147,483,648 |
| unsigned long | ||
| float | 32 | +/-1.175e-38 to +/-3.402e38 |
| double | 32 | +/-1.175e-38 to +/-3.402e38 |
| string – char array | ||
| String – object | ||
| array |
Utilities
sizeof()
The sizeof operator returns the number of bytes in a variable type, or the number of bytes occupied by an array.
VARIABLE SCOPE
Variable Scope
- Variables in the C programming language, which Arduino uses, have a property called scope.
- A Global variable is one that you can access anywhere in a program. Local variables are only visible to the function in which they are declared. In the Arduino environment, any variable declared outside of a function.
- Local variables insure that only one function has access to its own variables. This prevents programs from inadvertently modifying variables used by another function.
- A variable declared inside brackets {} can only be accessed within said brackets.
Source: Arduino – Variable Scope
uint gPWMval; // any function will see this variable
void setup()
{
// …
}
void loop()
{
int i; // “i” is only “visible” inside of “loop”
float f; // “f” is only “visible” inside of “loop”
// …
for (int j = 0; j <100; j++){
// variable j can only be accessed inside the
// for-loop brackets
}
}
QUALIFIERS
Static
- The static keyword is used to create variables that are visible to only one function. However unlike local variables that get created and destroyed every time a function is called, static variables persist beyond the function call, preserving their data between function calls.
- Variables declared as static will only be created and initialized the first time a function is called.
source: COMP2121: Microprocessors and Interfacing
http://www.cse.unsw.edu.au/~cs2121
int randomWalk(int moveSize){
static int place; // variable to store value in random walk,
// declared static so that it stores
// values in between function calls, but
// no other functions can change its value
place = place + (random(-moveSize, moveSize + 1));
// check lower and upper limits
if (place < randomWalkLowRange){ place = randomWalkLowRange; } else if(place > randomWalkHighRange){
place = randomWalkHighRange;
}
return place;
}
Volatile
- The volatile qualifier directs the compiler to load the variable from RAM and not from a general purpose register (R0 – R31),
- A variable should be declared volatile when used within an Interrupt Service Routine (ISR).
- For more on Interrupts visit Gammon Software Solutions forum
// toggles LED when interrupt pin changes state
int pin = 13;
volatile int state = LOW;
void setup()
{
pinMode(pin, OUTPUT);
attachInterrupt(0, blink, CHANGE);
}
void loop()
{
digitalWrite(pin, state);
}
void blink()
{
state = !state;
}
Const
Reference: The C++ ‘const’ Declaration: Why & How
- The const qualifier declares a variable as a constant.
Example
// create integer constant myConst with value 33
const int myConst=33;
- Such constants are useful for parameters which are used in the program but do not need to be changed after the program is compiled.
- It has an advantage over the C preprocessor ‘#define’ command in that is understood and used by the compiler itself.
- Use of constant checked for scope.
- Use of constant checked for datatype.
- As a result error messages are much more helpful.
- Example usage is in the definition of a base pointer to an array
Example
// The compiler will replace any mention of
// ledPin with the value 3 at compile time.
#define ledPin 3
- Constants are saved in SRAM not in Flash Program Memory (C was originally designed for Princeton based Machines). Click here to learn how to save data to Flash Program Memory.
Arduino Scripting Language
Reference
Arduino Language Reference
Arduino programs can be divided in three main parts: structure, values (variables and constants), and functions.
Structure
Control Structures
Further Syntax
- ; (semicolon)
- {} (curly braces)
- // (single line comment)
- /* */ (multi-line comment)
- #define
- #include
Arithmetic Operators
Comparison Operators
- == (equal to)
- != (not equal to)
- < (less than)
- > (greater than)
- <= (less than or equal to)
- >= (greater than or equal to)
Boolean Operators
Pointer Access Operators
Bitwise Operators
- & (bitwise and)
- | (bitwise or)
- ^ (bitwise xor)
- ~ (bitwise not)
- << (bitshift left)
- >> (bitshift right)
Compound Operators
- ++ (increment)
- — (decrement)
- += (compound addition)
- -= (compound subtraction)
- *= (compound multiplication)
- /= (compound division)
- &= (compound bitwise and)
- |= (compound bitwise or)
When we start constructing compound assignment statements in order to assign values to fields within a peripheral subsystem register, also known as a special function register (SFR), it is important to remember operator precedence.
| Level | Operator | Description | Grouping |
| 1 | :: | scope | Left-to-right |
| 2 | () [] . -> ++ — dynamic_cast static_cast reinterpret_cast const_cast typeid | postfix | Left-to-right |
| 3 | ++ — ~ ! sizeof new delete | unary (prefix) | Right-to-left |
| * & | indirection and reference (pointers) | ||
| + – | unary sign operator | ||
| 4 | (type) | type casting | Right-to-left |
| 5 | .* ->* | pointer-to-member | Left-to-right |
| 6 | * / % | multiplicative | Left-to-right |
| 7 | + – | additive | Left-to-right |
| 8 | << >> | shift | Left-to-right |
| 9 | < > <= >= | relational | Left-to-right |
| 10 | == != | equality | Left-to-right |
| 11 | & | bitwise AND | Left-to-right |
| 12 | ^ | bitwise XOR | Left-to-right |
| 13 | | | bitwise OR | Left-to-right |
| 14 | && | logical AND | Left-to-right |
| 15 | || | logical OR | Left-to-right |
| 16 | ?: | conditional | Right-to-left |
| 17 | = *= /= %= += -= >>= <<= &= ^= |= | assignment | Right-to-left |
| 18 | , | comma | Left-to-right |
Values
Constants
Data Types (see above)
Functions – Scripting Language
Digital I/O
- pinMode() // Writes to GPIO DDR register
- digitalWrite() // Writes to GPIO Port register
- digitalRead() // Reads GPIO Pin register
Analog I/O
- analogReference() // Writes to bits REFS1:REFS0 of ADMUX register
- analogRead() // Reads ADC Data register (ADCH/ADCL)
- analogWrite() // Writes to OCRnA or OCRnB registers of Timers
Advanced I/O
- tone()
- noTone()
- shiftOut() // Software implementation of SPI MOSI interface
- shiftIn() // Software implementation of SPI MISO interface
- pulseIn()
Time
- millis()
- micros()
- delay()
- delayMicroseconds()
Math
Trigonometry
Random Numbers
- randomSeed()
- random()
Bits and Bytes
External Interrupts
- attachInterrupt() // Configures external interrupt pins INT1 and INT0
- detachInterrupt() // Clears EIMSK register bits INT1 and INT0
Interrupts
- interrupts() // Sets SREG I bit
- noInterrupts() // Clears SREG I bit
Communication
WORKING WITH BITS IN C++
Resources
1. Arduino
2. AVR-libc
Set/Clear a Bit
Assembly
GPIO Port (first 32 I/O addresses)
| sbi PORTB, PB3 | cbi PORTB, PB3 |
IO Address Space
| in r16, PORTB sbr r16, 0b00001000 out PORTB, r16 |
in r16, PORTB cbr r16, 0b00001000 out PORTB, r16 |
| // Set a Bit | // Clear a Bit |
| digitalWrite(MOTORLATCH, HIGH); | digitalWrite(MOTORLATCH, LOW); |
| // Set a Bit | // Clear a Bit |
| PORTB |= _BV(PB3); or sbi(PORTB, PB3); // deprecated |
PORTB &= ~_BV(PB3); or cbi(PORTB, PB3); // deprecated |
The AVR C library includes the following definition
#include
// _BV Converts a bit number into a Byte Value (BV).
#define _BV(bit) (1 << (bit)) // : Special function registers
C/C++
| // Set a Bit | // Clear a Bit |
| PORTB |= (1 << (PB3)); | PORTB &= ~(1 << (PB3)); |
Set a Bit Pattern
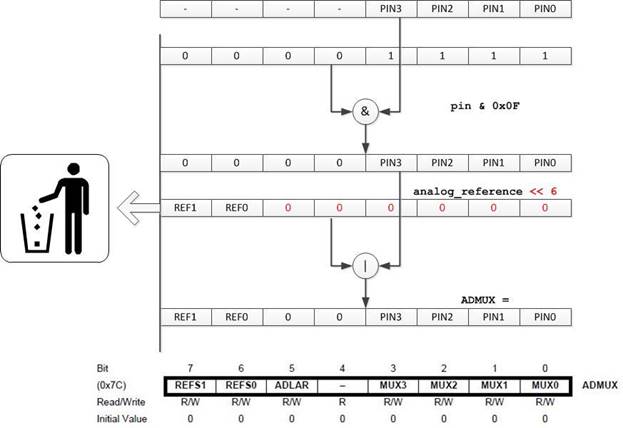
ADC Subsystem ADMUX Register Example
In this example we set/clear 2 fields within a byte. Undefined bits are cleared.
ADMUX = (analog_reference << 6) | (pin & 0x0f); // analogRead
Test Your Knowledge 1: Assume a function of type uint16_t. What would be returned if high = A and low = 3?
return (high << 8) | low;
0x0A03
Test Your Knowledge 2: How could you modify the ADMUX example to allow the programmer to set or clear the ADC Left Adjust Result ADLAR bit? Answer
ADMUX = (analog_reference << 6) | (pin & 0x0f) | ((left_adjust & 0x01) << 5);
note: if left_adjust is zero ADLAR bit stays at zero.
Program Example:
Here is my Arduino Test Script ported to AVR Studio so I could use the simulator: ArduinoToAVRStudio-Blink ****
In our first example “ADC Subsystem ADMUX Register” we assumed where each field was located within the register. In the next example we do not presuppose the location of the fields. This allows our program to adapt to different microcontroller register definitions. The downside is that, while in the first example the fields could be defined on the fly by the user (for example as arguments to a function), in this next example they must be predefined.
Timer/Counter 2 Control Register A Example 1
In this example, the wave generation mode of Timer/Counter 2 (WGM21:WGM20) is set to Fast PWM (0b11), the compare match output A mode (COM2A1:COM2A0) is configured to set on compare match (0b10), while the configuration bits for output compare register B are not modified (COM2B1:COM2B0).
#define _BV(bit) (1 << (bit))
TCCR2A |= _BV(COM2A1)|_BV(WGM21)|_BV(WGM20); // fast PWM, turn on oc0
Test Your Knowledge 3: At reset TCCR2A is cleared so our C++ example would result in COM2A1:COM2A0 = 0b10. What if another piece of software had set COM2A0 to 1 before this initialization routine was called. In this case our C++ code would not configure the register as expected. How could you solve this problem? Tip: Because of operator precedence (see Compound Operators earlier in this document) you will need to use a simple assignment operator or write two lines of code.
AnswerTCCR2A &= ~_BV(COM2A0)
Timer/Counter 2 Control Register A Example 2
In this example, the wave generation mode of Timer/Counter 2 (WGM21:WGM20) is set to Phase Correct PWM (0b01). The compare match output A mode (COM2A1:COM2A0) is configured to set on compare match, while the configuration bits for output compare register B are not modified (COM2B1:COM2B0). This example makes no assumption about the state of the bits within the WGM or COM2A bit fields.
TCCR2A &= ~_BV(COM2A0) & ~_BV(WGM21); // clear bits
TCCR2A |= _BV(COM2A1) | _BV(WGM20); // set bits
Test Your Knowledge 4: Can you combine these two expressions into one?
AnswerTCCR2A = TCCR2A&~(_BV(WGM21) | _BV(COM2A0)) | _BV(WGM20) | _BV(COM2A1);
Test Your Knowledge 5: If you are allowed to assume the location of the waveform generation mode (WGM2) and the compare match output A mode (COM2A) fields within the TCCR2A register, how would you write an expression that could set these two fields based on user defined variables output_mode and waveform? Hint: see the first example.
AnswerTCCR2A |= (output_mode << 6) | (waveform & 0x03); // analogRead
Test if a Bit is Set or Cleared
source: Special function registers
| #define | bit_is_set(sfr, bit) (_SFR_BYTE(sfr) & _BV(bit)) |
| #define | bit_is_clear(sfr, bit) (!(_SFR_BYTE(sfr) & _BV(bit))) |
| #define | loop_until_bit_is_set(sfr, bit) do { } while (bit_is_clear(sfr, bit)) |
| #define | loop_until_bit_is_clear(sfr, bit) do { } while (bit_is_set(sfr, bit)) |
ADC Subsystem ADMUX Register Example
// ADSC is cleared when the conversion finishes
while (bit_is_set(ADCSRA, ADSC));
What is _SFR_BYTE(sfr)?
Source: Playing with Arduino _SFR_BYTE() and PORT
The _SFR_BYTE() is a macro that returns a byte of data of the specified address. The _SFR_BYTE() is defined in hardware/tools/avr/avr/include/avr/sfr_defs.h as below.
#define _SFR_BYTE(sfr) _MMIO_BYTE(_SFR_ADDR(sfr))
The _SFR_ADDR() is a macro that expands the _SFR_MEM_ADDR(sfr) macro. Both are defined in hardware/tools/avr/avr/include/avr/sfr_defs.h as below.
#define _SFR_ADDR(sfr) _SFR_MEM_ADDR(sfr)
The _SFR_MEM_ADDR() is a macro that returns the address of the argument.
#define _SFR_MEM_ADDR(sfr) ((uint16_t) &(sfr))
The _MMIO_BYTE() is a macro that dereferences a byte of data at the specified address. The _MMIO_BYTE() is defined in hardware/tools/avr/avr/include/avr/sfr_defs.h as below. The input is mem_addr and dereferences its contents.
#define _MMIO_BYTE(mem_addr) (*(volatile uint8_t *)(mem_addr))
Putting it all together, this is how the compiler would expand _SFR_BYTE(sfr)
_SFR_BYTE(sfr) *(volatile uint8_t * uint16_t &(sfr))
Let’s take a closer look at this expanded macro definition. Starting from the inside and moving out. The ampersand sign (&) is known as a reference operator and lets the compiler know that “sfr” is to be interpreted as an address (i.e., a pointer). Specifically, a 16-bit address (uint16_t).
The asterisk (*) sign in the uint8_t declaration of the pointer does not mean “value pointed by”, it only means that it is a pointer (it is part of its type compound specifier). It should not be confused with the dereference operator, which come next, they are simply two different things represented with the same sign.
The final asterisk sign (*) at the beginning of the statement is a dereference operator. When the dereference operator is used you will get the “value pointed by” a pointer – the actual value of the register.
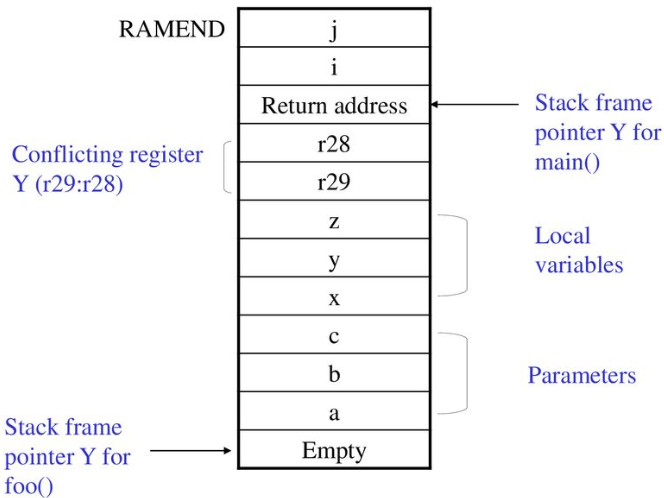
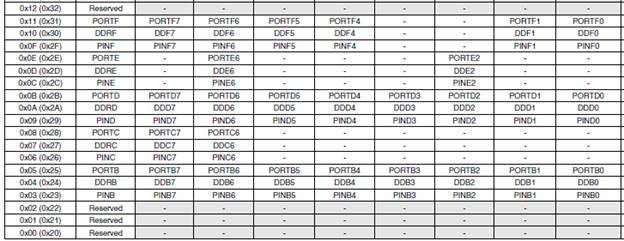
Mapping the 6-bit I/O address space into the 16-bit extended I/O address space
This works if the “special function register” is in the extended I/O address space but what if it is in the 64 byte I/O address space?
Let’s assume sfr is within the I/O address space of the ATmega microcontroller, for example a GPIO Port. Each GPIO Port includes three registers PINx, DDRx, and PORTx. For the ATmega32U4 “x” would be B, C, D, E, and F
To continue our example let’s assume we are going to write to one of the PORT registers (not to be confused with the PORT itself – see figure above). The PORTB, PORTC and PORTD registers are defined in hardware/tools/avr/avr/include/avr/iom32u4.h as below.
#define PORTB _SFR_IO8(0x05)
#define PORTC _SFR_IO8(0x08)
#define PORTD _SFR_IO8(0x0B)
Again looking at the figure, we see that arguments 0x05, 0x07, and 0x0A are the I/O addresses of PORTB, PORTC and PORTD respectively. They call _SFR_IO8(). The _SFR_IO8() converts the I/O address to the memory address. It is a macro that returns a byte of data at an address of io_addr + __SFR_OFFSET. The _SFR_IO8() is defined in hardware/tools/avr/avr/include/avr/sfr_defs.h as below.
#define _SFR_IO8(io_addr) _MMIO_BYTE((io_addr) + __SFR_OFFSET)
#define __SFR_OFFSET 0x20
Again, _MMIO_BYTE() is a macro that dereferences a byte of data at the specified address.
#define _MMIO_BYTE(mem_addr) (*(volatile uint8_t *)(mem_addr))
Putting it all together we have the equivalent macro.
#define _SFR_IO8(io_addr) (*(volatile uint8_t *)(mem_addr)) + 0x20
Appendix
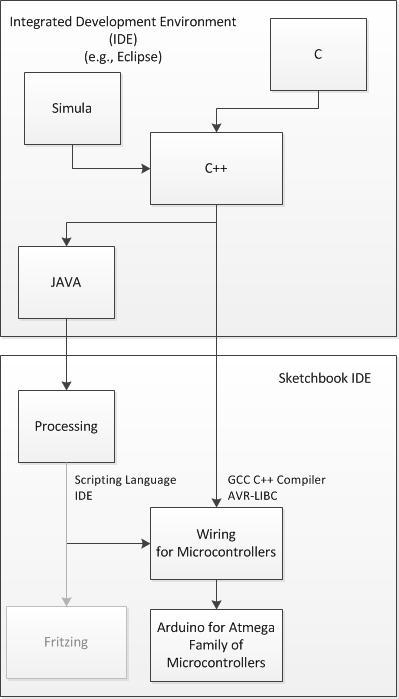
Appendix A: The Arduino Family Tree
The Arduino language (based on Wiring) is implemented in C/C++, and therefore has some differences from the Processing language, which is based on Java.
A Visual Paradigm for Programming – Processing
Source: Wikipedia – Processing (programming language)
- Processing was designed to get non-programmers (originally electronic artists) started with software programming, using a visual context, and to serve as the foundation for electronic sketchbooks.
- The concept of “visual context” makes Processing comparable to Adobe’s ActionScript and Lingo scripting based languages.
- A “sketchbook”, is a minimal alternative to an integrated development environment (IDE)
- Processing is an open source programming language and integrated development environment (IDE)
- The project was initiated in 2001 by Casey Reas and Benjamin Fry, both formerly of the Aesthetics and Computation Group at the MIT Media Lab.
- The language builds on the Java programming language, but uses a simplified syntax and graphics programming model.
From Programming to Microcontrollers – Wiring
- Wiring was design to teach non-programmers (originally electronic artists) how to program microcontrollers.
- Wiring, uses the Processing IDE (sketchbook) together with a simplified version of the C++ programming language (gcc compiler)
- There are now two separate hardware projects, Wiring and Arduino, using the Wiring IDE (sketchbook) and language.
- Fritzing is another software environment of the same sort, which helps designers and artists to document their interactive prototypes and to take the step from physical prototyping to actual product.
From Programming Microcontrollers to the Arduino
Arduino is an open-source electronics prototyping platform based on flexible, easy-to-use hardware and software. It’s intended for artists, designers, hobbyists, and anyone interested in creating interactive objects or environments.
- The C/C++ language is the foundation upon which the Arduino language (like Wiring on which it is based) is built.
- The C/C++ language is implemented using the GCC Compiler and links against the AVR C library AVR Libc and allows the use of any of its functions; see its user manual for details.
- The AVR C Library has its own family tree (nongnu, gcc)
APPENDIX B: Standard Libraries
- EEPROM – reading and writing to “permanent” storage (EEPROM)
- Ethernet – for connecting to the internet using the Arduino Ethernet Shield
- Firmata – for communicating with applications on the computer using a standard serial protocol.
- LiquidCrystal – for controlling liquid crystal displays (LCDs)
- SD – for reading and writing SD cards
- Servo – for controlling servo motors
- SPI – for communicating with devices using the Serial Peripheral Interface (SPI) Bus
- SoftwareSerial – for serial communication on any digital pins
- Stepper – for controlling stepper motors
- Wire – Two Wire Interface (TWI/I2C) for sending and receiving data over a net of devices or sensors.
APPENDIX C: C++ OPERATOR PRECEDENCE
When we start constructing compound assignment statements in order to assign values to fields within a peripheral subsystem register, also known as a special function register (SFR), it is important to remember operator precedence.
| Level | Operator | Description | Grouping |
| 1 | :: | scope | Left-to-right |
| 2 | () [] . -> ++ — dynamic_cast static_cast reinterpret_cast const_cast typeid | postfix | Left-to-right |
| 3 | ++ — ~ ! sizeof new delete | unary (prefix) | Right-to-left |
| * & | indirection and reference (pointers) | ||
| + – | unary sign operator | ||
| 4 | (type) | type casting | Right-to-left |
| 5 | .* ->* | pointer-to-member | Left-to-right |
| 6 | * / % | multiplicative | Left-to-right |
| 7 | + – | additive | Left-to-right |
| 8 | << >> | shift | Left-to-right |
| 9 | < > <= >= | relational | Left-to-right |
| 10 | == != | equality | Left-to-right |
| 11 | & | bitwise AND | Left-to-right |
| 12 | ^ | bitwise XOR | Left-to-right |
| 13 | | | bitwise OR | Left-to-right |
| 14 | && | logical AND | Left-to-right |
| 15 | || | logical OR | Left-to-right |
| 16 | ?: | conditional | Right-to-left |
| 17 | = *= /= %= += -= >>= <<= &= ^= |= | assignment | Right-to-left |
| 18 | , | comma | Left-to-right |
APPENDIX D: ARDUINO ANALOGREAD FUNCTION
int analogRead(uint8_t pin)
{
uint8_t low, high;
// set the analog reference (high two bits of ADMUX) and select the
// channel (low 4 bits). this also sets ADLAR (left-adjust result)
// to 0 (the default).
ADMUX = (analog_reference << 6) | (pin & 0x0f);
// without a delay, we seem to read from the wrong channel
//delay(1);
// start the conversion
sbi(ADCSRA, ADSC);
// ADSC is cleared when the conversion finishes
while (bit_is_set(ADCSRA, ADSC));
// we hto read ADCL first; doing so locks both ADCL
// and ADave CH until ADCH is read. reading ADCL second would
// cause the results of each conversion to be discarded,
// as ADCL and ADCH would be locked when it completed.
low = ADCL;
high = ADCH;
// combine the two bytes
return (high << 8) | low;
}
APPENDIX E: ADAFRUIT MOTOR SHIELD
Using the Motor Shield
DC Motors
#include
// motor is an instance of the AF_DCMotor class
AF_DCMotor motor(2, MOTOR12_64KHZ); // create motor #2, 64KHz pwm
void setup() {
Serial.begin(9600); // set up Serial library at 9600 bps
Serial.println(“Motor test!”);
motor.setSpeed(200); // set the speed to 200/255
}
void loop() {
Serial.print(“tick”);
motor.run(FORWARD); // turn it on going forward
delay(1000);
Serial.print(“tock”);
motor.run(BACKWARD); // the other way
delay(1000);
Serial.print(“tack”);
motor.run(RELEASE); // stopped
delay(1000);
}
Stepper Motor
#include
// motor is an instance of the AF_Stepper class
AF_Stepper motor(48, 2);
void setup() {
Serial.begin(9600); // set up Serial library at 9600 bps
Serial.println(“Stepper test!”);
motor.setSpeed(10); // 10 rpm
motor.step(100, FORWARD, SINGLE);
motor.release();
delay(1000);
}
void loop() {
motor.step(100, FORWARD, SINGLE);
motor.step(100, BACKWARD, SINGLE);
motor.step(100, FORWARD, DOUBLE);
motor.step(100, BACKWARD, DOUBLE);
motor.step(100, FORWARD, INTERLEAVE);
motor.step(100, BACKWARD, INTERLEAVE);
motor.step(100, FORWARD, MICROSTEP);
motor.step(100, BACKWARD, MICROSTEP);
}
Library Header
What is a Library?
// Adafruit Motor shield library
// copyright Adafruit Industries LLC, 2009
// this code is public domain, enjoy!
#ifndef _AFMotor_h_
#define _AFMotor_h_
#include
#include
//#define MOTORDEBUG 1
#define MICROSTEPS 16 // 8 or 16
#define MOTOR12_64KHZ _BV(CS20) // no prescale
#define MOTOR12_8KHZ _BV(CS21) // divide by 8
#define MOTOR12_2KHZ _BV(CS21) | _BV(CS20) // divide by 32
#define MOTOR12_1KHZ _BV(CS22) // divide by 64
#define MOTOR34_64KHZ _BV(CS00) // no prescale
#define MOTOR34_8KHZ _BV(CS01) // divide by 8
#define MOTOR34_1KHZ _BV(CS01) | _BV(CS00) // divide by 64
#define MOTOR1_A 2
#define MOTOR1_B 3
#define MOTOR2_A 1
#define MOTOR2_B 4
#define MOTOR4_A 0
#define MOTOR4_B 6
#define MOTOR3_A 5
#define MOTOR3_B 7
#define FORWARD 1
#define BACKWARD 2
#define BRAKE 3
#define RELEASE 4
#define SINGLE 1
#define DOUBLE 2
#define INTERLEAVE 3
#define MICROSTEP 4
// Arduino pin names
#define MOTORLATCH 12
#define MOTORCLK 4
#define MOTORENABLE 7
#define MOTORDATA 8
class AFMotorController
{
public:
AFMotorController(void);
void enable(void);
friend class AF_DCMotor;
void latch_tx(void);
};
class AF_DCMotor
{
public:
AF_DCMotor(uint8_t motornum, uint8_t freq = MOTOR34_8KHZ);
void run(uint8_t);
void setSpeed(uint8_t);
private:
uint8_t motornum, pwmfreq;
};
class AF_Stepper {
public:
AF_Stepper(uint16_t, uint8_t);
void step(uint16_t steps, uint8_t dir, uint8_t style = SINGLE);
void setSpeed(uint16_t);
uint8_t onestep(uint8_t dir, uint8_t style);
void release(void);
uint16_t revsteps; // # steps per revolution
uint8_t steppernum;
uint32_t usperstep, steppingcounter;
private:
uint8_t currentstep;
};
uint8_t getlatchstate(void);
#endif
Adafruit Private Functions
latch_tx
#define _BV(bit) (1 << (bit))
/*
Send data located in 8-bit variable latch_state
to the 74HC595 on the Motor Shield.
*/
void AFMotorController::latch_tx(void) {
uint8_t i;
//LATCH_PORT &= ~_BV(LATCH);
digitalWrite(MOTORLATCH, LOW); // – Output register clock low
//SER_PORT &= ~_BV(SER);
digitalWrite(MOTORDATA, LOW); // – Serial data bit = 0
for (i=0; i<8; i++) { // - Shift out 8-bits
//CLK_PORT &= ~_BV(CLK);
digitalWrite(MOTORCLK, LOW); // – Shift clock low
if (latch_state & _BV(7-i)) { // – Is current bit of
//SER_PORT |= _BV(SER); latch_state == 1
digitalWrite(MOTORDATA, HIGH); // – Yes, serial data bit = 1
} else {
//SER_PORT &= ~_BV(SER);
digitalWrite(MOTORDATA, LOW); // – No, serial data bit = 0
}
//CLK_PORT |= _BV(CLK);
digitalWrite(MOTORCLK, HIGH); // – Shift clock high, rising edge
} // shift bit into shift register
//LATCH_PORT |= _BV(LATCH);
digitalWrite(MOTORLATCH, HIGH); // – Output register clock high, rising
} // edge sends the stored bits to the
// output register.
enable
/*
Configure DDR Registers B and D bits assigned to
the input of the 74HC595 on the Motor Shield. Output
all zeros and enable outputs.
*/
void AFMotorController::enable(void) {
// setup the latch
/*
LATCH_DDR |= _BV(LATCH);
ENABLE_DDR |= _BV(ENABLE);
CLK_DDR |= _BV(CLK);
SER_DDR |= _BV(SER);
*/
pinMode(MOTORLATCH, OUTPUT);
pinMode(MOTORENABLE, OUTPUT);
pinMode(MOTORDATA, OUTPUT);
pinMode(MOTORCLK, OUTPUT);
latch_state = 0;
latch_tx(); // “reset”
//ENABLE_PORT &= ~_BV(ENABLE); // enable the chip outputs!
digitalWrite(MOTORENABLE, LOW);
}
Adafruit Motor Public Functions
run
void AF_DCMotor::run(uint8_t cmd) {
uint8_t a, b;
/* Section 1: choose two shift register outputs based on which
* motor this instance is associated with. motornum is the
* motor number that was passed to this instance’s constructor.
*/
switch (motornum) {
case 1:
a = MOTOR1_A; b = MOTOR1_B; break;
case 2:
a = MOTOR2_A; b = MOTOR2_B; break;
case 3:
a = MOTOR3_A; b = MOTOR3_B; break;
case 4:
a = MOTOR4_A; b = MOTOR4_B; break;
default:
return;
}
/* Section 2: set the selected shift register outputs to high/low,
* low/high, or low/low depending on the command. This is done
* by updating the appropriate bits of latch_state and then
* calling tx_latch() to send latch_state to the chip.
*/
switch (cmd) {
case FORWARD: // high/low
latch_state |= _BV(a);
latch_state &= ~_BV(b);
MC.latch_tx();
break;
case BACKWARD: // low/high
latch_state &= ~_BV(a);
latch_state |= _BV(b);
MC.latch_tx();
break;
case RELEASE: // low/low
latch_state &= ~_BV(a);
latch_state &= ~_BV(b);
MC.latch_tx();
break;
}
}
setSpeed
void AF_DCMotor::setSpeed(uint8_t speed) {
switch (motornum) {
case 1:
OCR2A = speed; break;
case 2:
OCR2B = speed; break;
case 3:
OCR0A = speed; break;
case 4:
OCR0B = speed; break;
}
}
initPWM1
This is a brief excerpt of the AF_DCMotor constructor (subroutine initPWM1(freq)), which is initializing speed control for motor 1:
// use PWM from timer2A
TCCR2A |= _BV(COM2A1) | _BV(WGM20) | _BV(WGM21); // fast PWM, turn on oc0
TCCR2B = freq & 0x7;
OCR2A = 0;
DDRB |= _BV(3);
break;


