Bioprinter Extruder Design
By Ali Etezadkhah – Project Manager
When we started working on the Bioprinter, one of our main challenges was to redesign a new extruder mechanism. While the idea of using a syringe and a linear actuator to dispense the printing gel was good, the execution needed much improvement.
The original extruder used a small syringe and a cheap linear actuator to dispense the printing material. Since it is not possible to reload the extruder while printing, we decided to use a 60cc syringe as our extruder. The larger volume allows us to print larger structures without worrying about running out of gel. In addition, the large volume has a more stable temperature. We use a 1% agarose gel as our printing medium. As such, 99% of the gel is made of water, which has a very high specific heat capacity (Properties of Water).
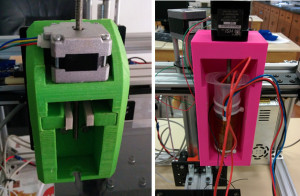
Old extruder on the left (green), new extruder on the right (pink)
The next challenge was to improve the precision of the extruder. The original extruder used a cheap linear actuator to push the plunger into the syringe. The linear actuator did not have enough torque to push the plunger precisely and extrude the printing material. Luckily for us, Dr. Moussavi had already bought a precision linear actuator from Haydon Kerk company (Haydon Kerk). Unlike the NEMA 17 stepper motors used to move the axes, this linear actuator is a NEMA 14. Although smaller than the unit it replaces, it offers more torque according to the datasheet.
The linear actuator is a non-captive model, which means the lead screw is free to rotate and can be taken out of the unit. The motor uses a rotating nut to extend or retract the lead screw, but the screw has to be fixed and cannot be allowed to rotate (Linear Actuators). If the screw is free to spin, it will do so with the nut and it will not extend or retract. We grinded one end of the lead screw into a chisel shape and designed an appropriate metal piece to mate with it and prevent it from turning. This metal piece was epoxied to the plunger.
Originally we ran into a problem when we switched the actuators. The new actuator would not stop where it was supposed to and the sound it made was abnormal after it reached that distance. We tried to get help online and from the Maker Society, but were not able to troubleshoot our issue. We contacted the manufacturer and found a very knowledgeable engineer who helped us fix the problem. With his help we were able to find the problem and fix it. It turned out the old actuator drew more current that the new unit. We adjusted the maximum current by turning a small potentiometer on the stepper motor driver. Once the adjustment was complete, the actuator started working correctly.
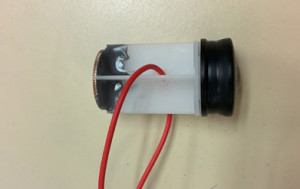
The original extruder used the bottom part of the plunger with a makeshift plastic piece to actuate it. The plastic piece was too small to effectively spread the force of the actuator. Also, there was no easy way to take the plunger out once the gel had been extruded. To remove the plunger, first we had to use a metal rod to push the plunger through the tip of the syringe. Once it was pushed up a few centimeters, a pair of needle nose pliers was used to pull it out of the syringe. Our plunger has a piece of wire attached to it. To remove the plunger, all we have to do is to pull on the wire loop and the plunger comes out easily.
New plunger assembly
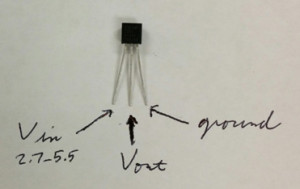
Much like regular 3D printers, our printer requires a precise extruder temperature to print effectively. We decided to use a solid state sensor to monitor the extruder temperature. The TMP36 is a precision, linear temperature sensor from Analog Devices (TMP36: Voltage Output Temperature Sensors). It has a wide operating range of 2.7 to 5.5 volts and is calibrated directly in degrees Celsius. The sensor was connected to an Arduino Uno programmed to monitor take a temperature reading every 2 seconds. The output from the Arduino was monitor by a free application called PuTTY (PuTTY).
TMP36 temperature sensor
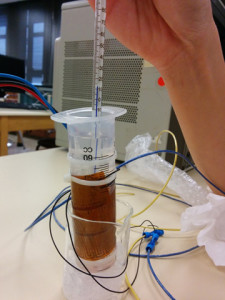
The temperature sensor was fine-tuned by comparing its reading with glass thermometer. The Arduino code was adjusted so the reading from the TMP36 matched the reading from the thermometer. Since the TMP36 is a linear device, it can be easily calibrated by adding or subtracting a constant from the reading. Had we used a thermistor, we would have to create a lookup table and calibrating it would have been much harder.
Matching the TMP36 output with a glass thermometer
The ideal extrusion temperature for our printing medium is around 33 to 35 degrees Celsius. In this range, the gel is viscous enough to keep its shape with adequate cooling, but not too thick to cause extruder head blockages. To keep the temperature in this range while printing, we used a flexible heater from Omega (Omega). Since the heater runs on 115 VAC, we used the Arduino to control a solid state relay and provide power to the heater (SSR).
The default PWM frequency of the Arduino is around 490 Hz, much too high for our application. The high frequency will cause the SSR to heat up and waste energy due to switching losses. Since our target temperature is close to the ambient temperature, we don’t expect a lot of temperature fluctuation while printing. We wrote our own version of a low speed PWM routine on the Arduino. The program never goes above 20% duty cycle and adjusts the duty cycle based on temperature differential between the extruder and the set point.
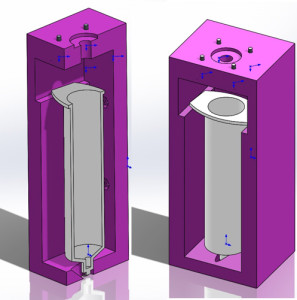
Once the extruder was ready, we designed a 3D printed structure for it. The extruder housing was designed for easy access to the extruder. The actuator sits on top of the housing and lead screw pushes down the plunger. The first step was to model the syringe in SolidWorks. Next, the extruder housing was designed and the two were mated in a SolidWorks assembly. Once we were sure of the proper clearances and operation limits, the housing was printed.
New extruder housing
Works Cited
Haydon Kerk. (n.d.). Retrieved from http://www.haydonkerk.com/LinearActuatorProducts/StepperMotorLinearActuators/LinearActuatorsHybrid/Size14LinearActuator/tabid/77/Default.aspx
Linear Actuators. (n.d.). Retrieved from Wikipedia: http://en.wikipedia.org/wiki/Linear_actuator
Omega. (n.d.). Retrieved from http://www.omega.com/pptst/KHR_KHLV_KH.html
Properties of Water. (n.d.). Retrieved from Wikipedia: http://en.wikipedia.org/wiki/Properties_of_water#Heat_capacity_and_heats_of_vaporization_and_fusion
PuTTY. (n.d.). Retrieved from http://www.chiark.greenend.org.uk/~sgtatham/putty/download.html
SSR. (n.d.). Retrieved from http://www.amazon.com/Solid-State-Relay-24-380V-Control/dp/B0087ZTN08/ref=sr_1_5?ie=UTF8&qid=1398739255&sr=8-5&keywords=solid+state+relay
TMP36: Voltage Output Temperature Sensors. (n.d.). Retrieved from Analog Devices: http://www.analog.com/en/mems-sensors/digital-temperature-sensors/tmp36/products/product.html

