Adapt C++ 3DoT Mission Code to SAMB11
Written by Zachary de Bruyn
Table of Contents
Purpose
The purpose of this post is to instruct how to implement the 3DoT code for the SAMB11 MCU. Unfortunately, the SAMB11 is not supported by such a large community like that of the ATMega32U4. There is also not built in functions like there are for Arduino which simplify matters for those interested in the SAMB11.
Set-Up
The first step in utilizing the SAMB11 to be implemented for use is to first download Atmel Studios, which can be found HERE. The good thing about Atmel Studios is that there is a plethora of MCU’s one can program through the software, including the SAMB11.
In order to prep Atmel Studios to use the SAMB11 the following steps need to be performed:
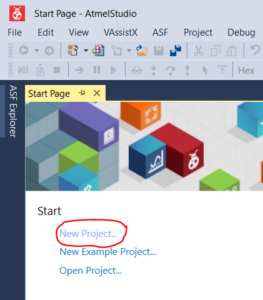
First, click on the “New Project” link at the left hand side of the program. A window will pop-up prompting you to choose one of the various options, either a C or C++ executable program. Once you have chosen which to use, be sure to name the file. After which a folder is created in the “Location” directory where you can find your project. It is suggested if you are wanting to use a majority of Arduino syntax, C++ is the best option, considering C does not support some functionality that Arduino does, such as Classes.
Once you have saved the executable project a “Device Selection” window will appear. This is where you can select a wide variety of microprocessors, including the SAMB11.
As we can see from the figure, the device we have opted to use was the ATSAMB11G18A. Once the correct MCU has been selected, Atmel brings you to the editor, and the “main.cpp” file is automatically generated. Within this main.cpp program, you can see a header file “sam.h” is automatically generated.
Adding .h and .cpp files
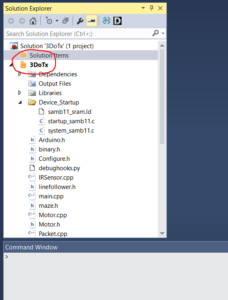
Once you have gotten to the main editor window, you can begin creating header files and other subordinate files to the main.cpp(). Note, that it is important that when you are creating new files, you do so under the “Project Name” file. By not doing this you will have many issues when it comes to compiling and debugging your code.
If you do not see the Solution Explorer window click CTRL + ALT + L.
To add other files to your project file, right click on your project name, go to Add and select New Item. Here you can implement another .cpp file or a .h file
Implementing the new program in Atmel Studios
Unfortunately, as I’m sure you are aware, implementing the Arduino software in any other IDE is not a simply copy and paste solution. Because there are MANY built in functions in Arduino, a lot of what we incorporate into the .cpp file will not be supported. Functions like pinMode(), analogWrite(), analogRead(), will all have to be created within the project file. The same is true for Arduino libraries, such as: EEPROM, Wire, and Robot. These libraries do not exist in Atmel Studios, therefore a lot of work will be needed to generate these replacement files.
A solution to this is create a new .h file, and implement the various Arduino function in the file so that you can utilize them for your program. Lets say for example we want to create the ability to use pinMode() in our .cpp file. To do so, in your created header file (.h file) you could start by declaring the function like you would for a function in Arduino. Below is an example:
#ifndef FileName_h
#define FileName_h

// LIST DEFINITIONS YOU MAY COMMONLY USE IN ARDUINO, EXAMPLE PI

void pinMode(uint8_t, unit8_t);

#endif
In the above code we created the function pinMode to accept two unsigned 8 bit integers, which is what would normally be implemented in the Arduino built in function. Creating all these files is a tedious process, and requires research into how Arduino implements there custom libraries to utilize various built in functions. There are various resources online that can help with implementing Arduino code to the new program you are writing however, be ready to debug because what you find online may not be applicable.
Atmel Studios Built-in Examples
If you find yourself lost and confused, don’t worry you’re not alone. Atmel Studios actually provides a lot of examples on how to implement various aspects of which ever microprocessor you choose. One suggestion is to invest in a development board which utilizes the SAMB11. This link HERE provides one suggestion to where you can begin testing. In order to access the built-in examples for which ever board you choose (The suggested one is recommended because it’s known for a fact that there are examples associated for that board.) click on the “New Example Project” shown in the first figure right under “New Project”. If you have the Xplained Pro plugged into your computer, Atmel Studio will automatically detect it. If not, click on “Kit” and select the “SAM B11 Xplained Pro”. From the drop-down menu, you can see the plethora of examples you can use. For example, there are a few example projects which discuss BLE implementation and allow you to send and receive texts from your mobile device. Note, in order to use these BLE examples, you must download the mobile app “Atmel SmartConnect”, which will allow you to discover your board to send and receive messages from your computer.


