ArxRobot and 3DoT Interface SOP
Introduction
The ArxRobot mobile application is an essential component to the MarioBot project. Without it, we don’t have any method of wirelessly controlling our system. Through this application, users can create custom commands that will interface between the 3DoT board and the ArxRobot app itself using telemetry packets as a form of communication. For the functionality of our system, ArxRobot allows MarioBot to drive forward, steer forward, left, and right, as well as integrating our other sensors and game software. Most of the information covered is explained further in detail on the Arxterra website.
In order to create custom commands that will interface between the 3DoT board and ArxRobot, the first step is to download the ArxRobot application on either the Google Play Store, or the App Store. It is important to note that for the App Store, it is required to provide the IMEI number of the device to Humans For Robots, the supplier of the 3DoT boards. They will provide permission to the user since this application is considered under Beta status. More information about this can be found on both the Humans For Robots website as well as the Arxterra website. Moreover, the Google Play Store does not require users to obtain permission; Android users can freely utilize this mobile application.
Custom Commands: ArxRobot App
To create a custom command, ensure that the device is in developer mode, as shown in the yellow box of Figure 1. Once this is set, press the gear button that is represented by the blue box. This will open a window which will include various features of ArxRobot.
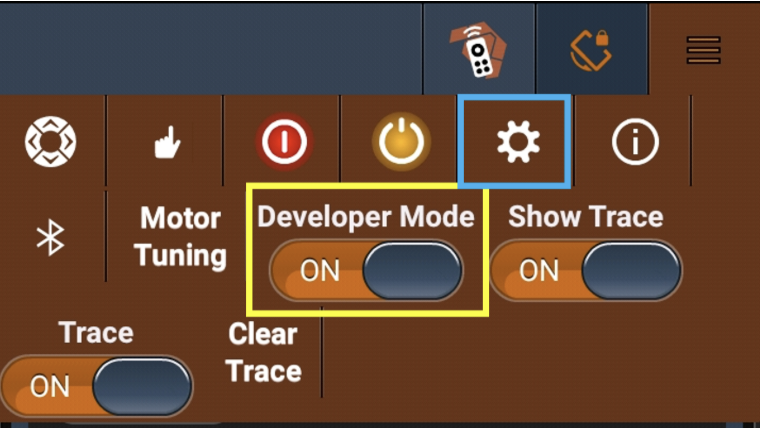
Figure 1. ArxRobot: Developer Mode
For custom commands, select the Custom Command & Telemetry Configuration option, as shown in the green box of Figure 2. Once pressed, a new window will open, which will provide a list of all the commands that have been created.
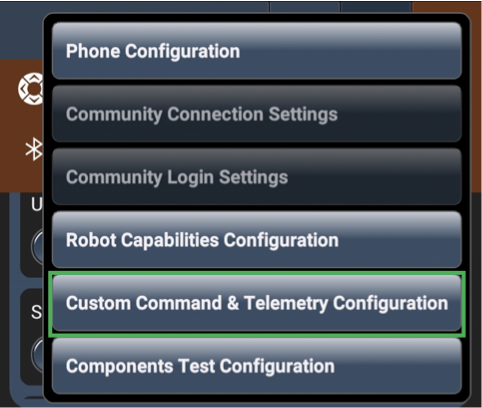
Figure 2. ArxRobot: Custom Command Directory
Shown in Figure 3 are the current commands that are being utilized for the MarioBot project. In this new window, the most important piece of information is the command IDs, which are denoted within the red box. These IDs, also known as Entity IDs, will be important when designing its respective code.
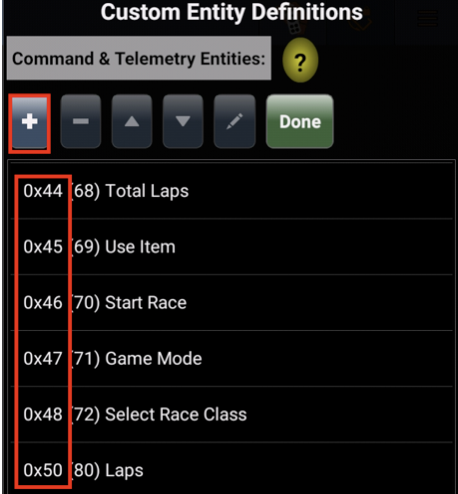
Figure 3: ArxRobot: MarioBot Commands
Pressing the “+” button from Figure 3 will open another window that begins the creation of a new command. The available commands are shown in Figure 4. According to the Arxterra website, there are various commands that serve a specific purpose. Using MarioBot as an example, the data types that have been used are mainly: Byte and Unsigned Byte as well as the Boolean. From MarioBot’s experience, some of the types seemed to be repetitive, therefore, these two data types were used in MarioBot’s design.
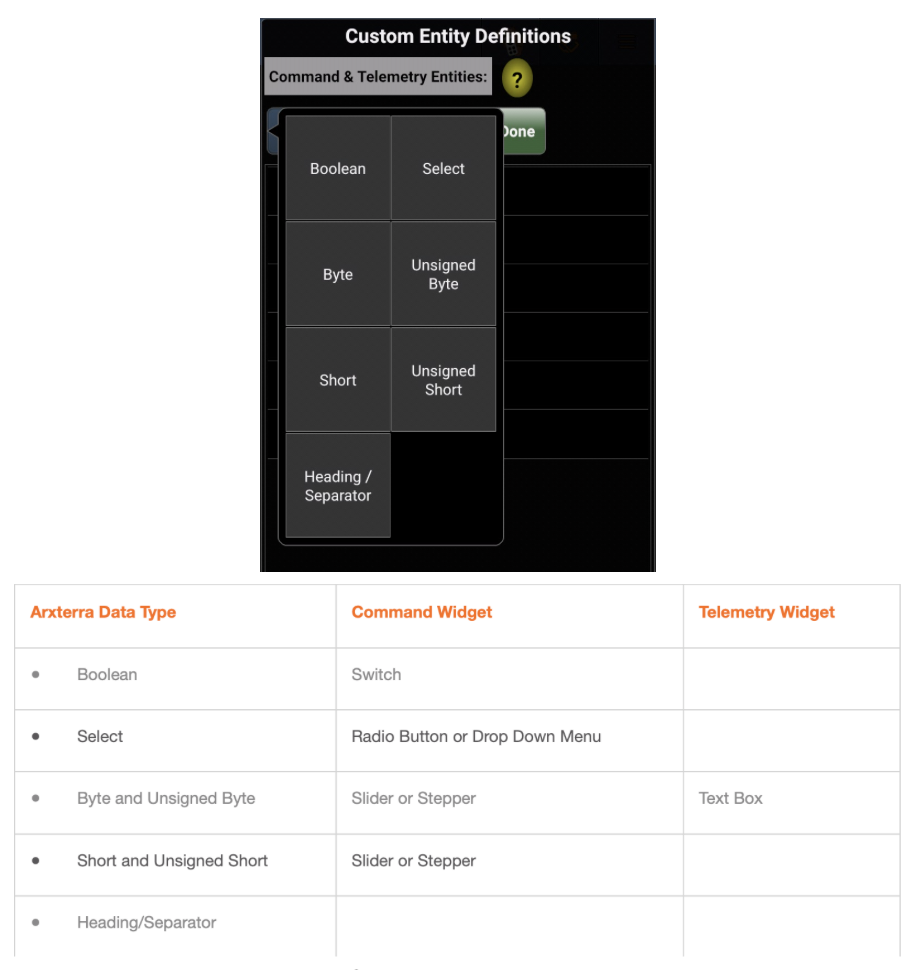
Figure 4. ArxRobot: Command ID Types + Arxterra Description
Once a data type has been chosen, another window will open, where the command can be further configured. Two important components as shown in Figure 5, within the configuration step would be both the Entity ID and the Flow Protocol. The Entity ID is the Command ID that will be used. It is essential that the command ID address, denoted in hexadecimal form, ranges from 0x40 to 0x5F. These are addresses that are specifically used for custom command IDs. This is important becasue there are built-in command IDs, which range from 0x00 to 0x3F. As far as the Flow Protocol, which describes the interface from the ArxRobot application to the 3DoT board, the default option should be chosen which is Command & Telemetry State. This option will provide parallel communication between the app and the 3DoT board. In other words, there is a simultaneous interaction between the two. There is another option denoted as Telemetry State, however, the MarioBot team did not have enough time to look into this matter. From our understanding, this option allows the 3DoT board to communicate to the ArxRobot app only. It prevents the ArxRobot app from communicating that command to the 3DoT board.
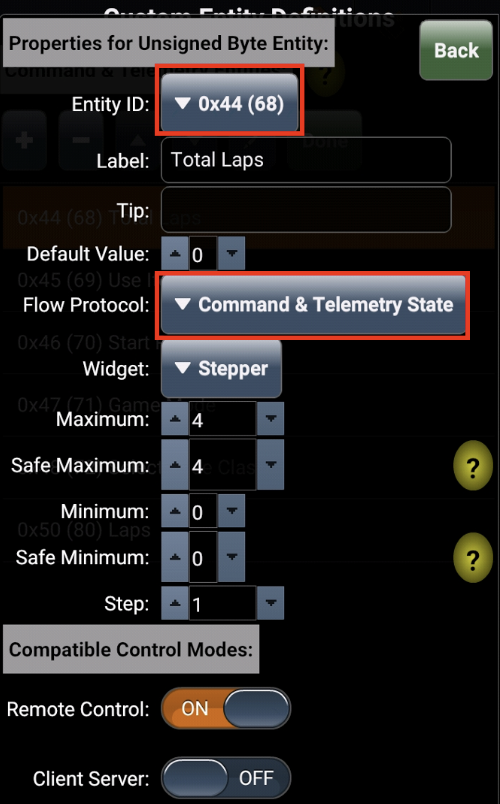
Figure 5. ArxRobot: Command ID Configuration
Custom Commands: Arduino Code
The last component to creating a custom command is to create what is known as a Command Handler. This will be tied to a specified Command ID and will pass three parameters, which will be discussed in further detail in the upcoming sections. Before creating a Command Handler, it is important to define the Command ID that was chosen in the prior section. Shown in Figure 6 are a few of the definitions from the MarioBot project. The MOVE command is one of the built-in commands, which is the reason why the Entity ID falls within its respective range.

Figure 6. Arduino: Define Custom Command ID
Once the commands are defined, the Command Handler can now be created. Each command will have its respective handler function that will pass three parameters: cmd, param[], and n. The cmd command is the Entity ID that the handler should be connected to. Param[] is a parameter array that will contain the values that will correspond to the user’s input. Finally the n parameter is the number of parameters within the telemetry packet that will be used to communicate between the 3DoT and ArxRobot. For programming purposes, MarioBot mainly used the param[] value, since it focuses on the user’s input.

Figure 7. Arduino: Example of Command Handler
Finally, to complete a full custom command, there are two lines of code that are essential: creating a total number of commands used and tieing the Entity ID to the Command Handler, as shown in Figure 7. Without these two lines of code, the 3DoT board would not know what to do with the information that it’s receiving from the ArxRobot app.

Figure 8, Arduino: Connect Entity ID to Command Handler
Conclusion
Overall, the ArxRobot application provided a simple solution such that we could control MarioBot and integrate the various features of our project. Although this does not provide in-depth detail about how the commands are created, we hope that this provides some type of foundation that could be built upon so that more advanced project designs could be implemented.
References
https://www.arxterra.com/arxterra-built-in-commands-and-telemetry/
https://www.arxterra.com/arxterra-custom-commands-and-telemetry/
https://www.arxterra.com/3dot-telecomm-servo/
https://www.arxterra.com/arxterra-bluetooth-wireless-communication/
https://www.arxterra.com/viewing-arxterra-bluetooth-and-usb-communication/
https://www.arxterra.com/programming-your-robot-custom-telemetry/
