Arxterra Coding
By Chau To
- Introduction:
This blog post will introduce how to code and connect the Arxterra control panel into the Android phone. The Android phone that the Hexapod will use is to connect the Arduino ADK via the USB port. In order to link between the Android phone and the ADK, the user needs to download the adb.h library. Please contact the instructor or the division manager for download link.
- Arxterra command byte:
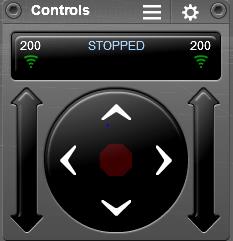
Basically, the Arxterra control panel will send the command to the Android phone and from through the phone; it will communicate with the ADK via the USB port. The command from Arxterra is 5 byte (the last 5 byte of the 16 byte command series). It’s stored in the array called “data”. This is the list of the byte that the Arxterra sent out; the “xx” means that these bytes will change every time the user presses the button.
MOVEMENT CONTROLLER:
Forward: 01 01 xx 01 xx
Turn Right: 01 01 xx 02 xx
Backward: 01 02 xx 02 xx
Turn Left: 01 02 xx 01 xx
NOTE: This data only valid when the user presses stop between each command. For example, if user wants to turn right after walking forward, they have to press the stop button (the middle button).
CAMERA CONTROLLER:
Left: 02 00 xx 00 xx
Right: 02 00 xx 00 xx
Hexapod does not use camera controller tilt up and tilt down, but the concept is very similar.
- Coding:
The 1st byte data[0] is the command ID. Each controller will have a different command ID. Movement is data[0] = 01, Camera is data[0] = 02. So, we can compare the value of the command ID to control the robot.
The next step is to compare the 2nd value of the array data[1]. For movement, data[1] of forward and right turn in equals, and data[1] of backward and left turn is equal. Therefore, we will continue to compare the 4th value of data[]. The data[3] will be compared to decide that what movement the robot will need. With a couple of if…else statement, we can determine the action of the robot.
The data [2] and data[4] is varied overtimes because Arxterra was initially designed for the ROVER, and those byte were to control the speed of the DC motor. So do not worry about those bytes!!
Remember that you have to press stop before switching to a new command.
For CAMERA controller, the command ID is data [0] = 02. The third byte data[2] and the fifth byte data[4] is actually the angle when you convert from HEX to int.
- Custom Command:
Since the Hexapod team this semester uses only 1 servo to control the camera (turn the camera left or right), we decided to create a custom command. The custom command is a very powerful tool to add a new desired controller. The custom command is provided on the Android Arxterra Apps on the phone. When the custom command is created, it will appear on the Arxterra website controller.
The custom Camera that I created will have a command ID of 0x04, initial value is 0, maximum value is 40 and minimum value is -40. Each increment by 1, the servo will move 2 degrees.
This is the Sample Code for the Arxterra testing:
#include <SPI.h>
#include <Adb.h>
#define FALSE 0
#define TRUE 1
// Commands to Numeric Value Mapping
// Data[0] = CMD TYPE | Qual
// bit 7654321 0
#define MOV 0x01 // 0000000 1
#define CHOICE 0x02 // 0000001 0
#define CAMERA 0x40
// Adb connection.
Connection * connection; // the connection variable holds a pointer (i.e. an address) to a variable of data type Connection
// Event handler for the shell connection.
void adbEventHandler(Connection * connection, adb_eventType event, uint16_t length, uint8_t * data) // declared void in version 1.00
{
// Serial.print(“adbEventHandler”);
// Data packets contain two bytes, one for each servo, in the range of [0..180]
if (event == ADB_CONNECTION_RECEIVE)
{
Serial.print(“rover received command “);
uint8_t cmd = data[0];
uint8_t cmd2 = data[1];
uint8_t cmd3 = data[3];
uint8_t cmd_cam = data[2];
if (cmd == MOV) {
Serial.println(” MOVE “);
if (cmd2 == MOV){
Serial.println(” Forward or Turn Right “);
if (cmd3 == MOV){ Serial.println(” Move Forward “);}
else if (cmd3 == CHOICE){ Serial.println(” Turn Right “);}
else { Serial.println(” Stand “);}}
else if (cmd2 == CHOICE) {
Serial.println(” Backward or Turn Left “);
if (cmd3 == CHOICE){ Serial.println(” Move Backward “);}
else if (cmd3 == MOV){ Serial.println(” Turn Left “);}
else { Serial.println(” Stand “);}}
else {Serial.println(” Stand “);}
}
else if (cmd == CAMERA) {
Serial.println(” CAMERA “);
int fone_ang = int(data[1]);
if (fone_ang <= 40){
int ang = 90 – fone_ang*2;
Serial.print(“Angle: “);
Serial.println(ang,DEC);}
else{
int ang = 90 + (255 – fone_ang)*2;
Serial.print(“Angle: “);
Serial.println(ang,DEC);}
}
else {Serial.println(” Stand “);}
}
}
void setup()
{
Serial.begin(57600);
Serial.print(“\r\nStart\n”);
//init_servos();
ADB::init(); // source of OSCOKIRQ error
// Open an ADB stream to the phone’s shell. Auto-reconnect
connection = ADB::addConnection(“tcp:4567”, true, adbEventHandler);
// insure motors are off and turn off collisionDetection
// stopMotors();
}
void loop()
{
ADB::poll();
}
Upload and Open the Serial Monitor (Ctrl+Shift+M) to test it.
SPECIAL THANKS TO VINH KHOA TON and TOMMY SANCHEZ !!!


