Spring 2018 AT-ST Line Follower Code

By: Samuel K. Yoo (Electronics & Control – Software)

Verified By: Intiser Kabir (Project Manager)

Approved By: Miguel Garcia (Quality Assurance)

Table of Contents

Introduction

The main objective of this code is to make the robot follow a line. The initial part of the program has two motors turning wheels to move forward. After accomplishing this first part of the code, the next is to create the line follower. There would be four sensors not touching the line, and if the sensor hit the line, the robot would swerve away and continue to head straight. The AT-ST would not use motors for forwarding motion, instead, it uses servos. The four sensors will still be the same for the AT-ST.

Code

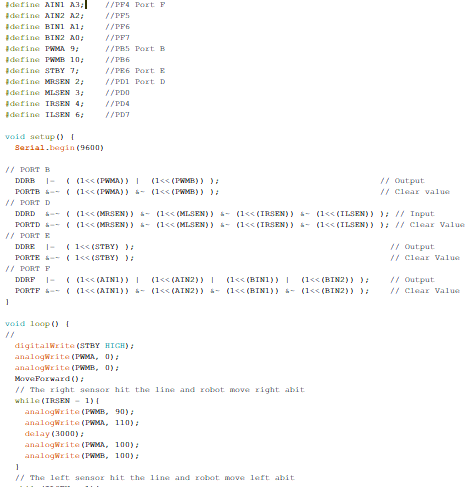
Figure 1: Code Screenshot

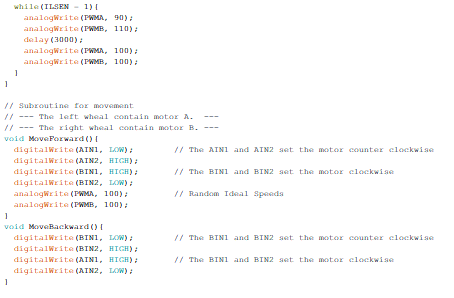
Figure 2: Code Screenshot cont.

Explanation

The beginning of the code initializes all the pin definitions and the I/O for each pin.  After that part of the program, the main loop contains the movement code. This code allows two motors to spin in opposite directions, attached to the wheels to move the robot forward. However, this movement code will be modified at a later date, as the AT-ST uses servos. The servos do not work like the motors and require a lot more analog pins. These pin requirements will need an analog extension. The sensor reading code, however, can mostly stay the same. The concept of slowing one part and increasing the speed of the other part will stay the same. However, it would not be the torque but the movement of the leg. Another huge difference in the code is the values. If this program would run on a robot right now it would crash or not move straight at all. This is because each motor is made with different values. There is no minimum value for the speed and the delay values might be too long.

Conclusion

So this line code main purpose is to move the robot forward and to follow a line. One of the issues is the AT-ST does not use motors for movement, it instead uses servos, which at the moment of this blog post, there is no research on. Another issue is the values inside the code are not accurate. These values need to be tested in real life to get value for the code. Overall, the general idea of the code in this blog post, however, needs to be updated with servos code and the real values in the final code.  

Spring 2018 AT-ST Power Budget

By: Joseph Cho (Mission, Systems, and Testing)

Verified By: Intiser Kabir (Project Manager)

Approved By: Miguel Garcia (Quality Assurance)

Update: Figures have been updated to measured values.

Table of Contents

Introduction

Power budget of the AT-ST project will be estimated using the power budget general template. The power budget will be estimated to determine the battery that should be used on the AT-ST. All of the values used in the power budget are measured using a current meter.

List of Parts

This is the list of all of the parts we are using as of today!

  • 3DoT Board
  • Bluetooth: HM11
  • Dual Motor Driver: DRV8835
  • (2) Motor: 50:1 Micro Metal gear motor
  • (2) Servos: HTX900
  • (2) Shaft Encoders : Pololu product 3081
  • I2C Expander: TCA9548A
  • Gyro : GY-521 (MPU6050)
  • Ultrasonic: HC-SR04
  • IR LED 1 (rated for 16~18mA)
  • Light sensor 1: Si1145
  • IR LED 2 (rated for 16~18mA)
  • Light sensor 2: Si1145

Power Budget Spreadsheet

Figure 2: The total Power In/Output of the system

Figure 3: Boost Parameters

Figure 4: Margin Calculation

Description

The current design for AT-ST uses 2 motors and 1 servo. The majority of the power is consumed by the motors and servo to move the AT-ST. The motors output power will be distributed by the motor driver. Four sensors will be used: UV, ultrasonic, shaft encoder, and gyroscope. The sensors will be using less power compared to the motors. Based on the estimated current consumption, a general power usage will be estimated using the power budget general template.

Measuring Current

Figure 5: Multimeter used to measure current

Description:

Rigol DM3058E digital multimeter was used to measure the current drawn by the components. The multimeter was tapped between the output pin of the microcontroller and VCC of the sensor.

Resources

  1. https://www.arxterra.com/news-and-eventsmembers3dot-robots3dot-goliath/
  2. https://www.sparkfun.com/datasheets/Components/LED/YSL-R547P4C-E3.pdf
  3. https://docs.google.com/spreadsheets/d/1WsdFps31TaSi-vaA3mB8fVlLQd3yEO-VCvbinQXoAG8/edit?usp=sharing
  4. https://docs.google.com/spreadsheets/d/1OaWtFrqYVQsylEh2nXOvKjFT-g2KG72ej-pF6OJWQ54/edit?usp=sharing

Spring 2018 AT-ST Resource Reports (Mass, Power, and Cost)

By: Joseph Cho (Mission, Systems, and Testing)

Verified By: Intiser Kabir (Project Manager)

Approved By: Miguel Garcia (Quality Assurance)

Table of Contents

Introduction

The resource report contains three parts: Mass report, power report, and cost report). These reports will be covering the resources’ mass, power, and cost. An estimate of the total mass will be shown on the mass report. For power report, the current values were taken from previous projects’ blog posts as reference. Lastly, cost report will show that the AT-ST project is within the budget.

List of Parts

  • 3DoT Board
  • Bluetooth: HM11
  • Dual Motor Driver: DRV8835
  • (2) Motor: 50:1 Micro Metal gear motor
  • (2) Servos: HTX900
  • (2) Shaft Encoders : Pololu product 3081
  • I2C Expander: TCA9548A
  • Gyro : GY-521 (MPU6050)
  • Ultrasonic: HC-SR04
  • IR LED 1 (rated for 16~18mA)
  • Light sensor 1: Si1145
  • IR LED 2 (rated for 16~18mA)
  • Light sensor 2: Si1145

Mass Report

Figure 1: Mass Report


Description:

Comparing our AT-ST to last generation of velociraptor, the mass will be around 800g. 3D printing mass is estimated on the mass report blog post. Since the custom PCB will be made with the same materials with 3DoT board, we can estimate that the mass of the PCB will be similar to the 3DoT board. Our main PCB is slightly smaller and two other sensor PCB are half the size. Further more information about how the masses were estimated and weighed are in Mass report blog post. There are also couple of measured weight as 0. This is due to those parts being included in the body of the mass measurement.

Power Report

Figure 2: Power Report

Description:

The power report shows the expected current draw needed from the power supply. Each servo is rated at 270 mA with a load. The 3DoT board current draw is also counting these parts: Bluetooth and dual motor driver. Measured currents have been added. The motor uses 29mA with load and 170mA when stalled. Power budget was used to determine if a battery with higher capacity was needed.

Link to Power Budget

Cost Report

Final Cost

Figure 3: Cost Report

The cost report shows the total expected cost to be slightly more than half of the budget. After totaling up the spendings, we are still under the budget of $250. There are some components that are given or borrowed; therefore, the actual cost is zero for those items. Our total cost for the AT-ST materials is $199.58 with shipping included.

Extra Cost

Figure 4: Extra costs (included in Cost Report)

Description:

There were additional costs to AT-ST, but not included in final cost report because these resources were not used on the AT-ST.

Conclusion

The reports show that the AT-ST had all resources within the project allocation. The final mass of AT-ST was 256.80 grams, which is very light compared to 2nd generation of Velociraptor. Total cost of the final product was $199.58 and the prices could have been lowered if parts were ordered earlier.

Resources

  1. http://www.custompcb.com/faq.php
  2. https://docs.google.com/spreadsheets/d/1_q0K2hwcqDshcp3e7MT1azD3lbXh80qJeSJ1bALZQZ0/edit?usp=sharing
  3. https://docs.google.com/spreadsheets/d/1P0TaSyV01-3muaii-rDUmqtotstaM6gV4AgC4sjzqFQ/edit?usp=sharing
  4. https://docs.google.com/spreadsheets/d/1j9I_ts227pN5yA5srDkUxOWhMTKYiYWG9uBwJw8IQA8/edit?usp=sharing 

AT-ST Mass Report

By: Joseph Cho (Mission, Systems, and Testing)

Verified By: Intiser Kabir (Project Manager)

Approved By: Miguel Garcia (Quality Assurance)

Table of Contents

Introduction

This blog post will show the mass of the AT-ST and include the ways that the masses have been initially estimated. All of the parts have been measured for the final mass report.

Mass resource report

Figure 1: Mass Report

Description:

Mass of the AT-ST has been estimated by the given masses on the retailers. The 3D printed parts were estimated by rough calculation shown below. PCB mass was estimated by comparing the size to the 3DoT board size.

All of the parts have been measured on the AT-ST. The total mass came out to be 256.80 grams. There are some parts that have been listed as 0 grams because they have been put together in the body weight.

Measuring the Mass

Figure 2: Scale used to measure the mass

Description:

Ozeri pronto digital scale was used to measure the mass of our components. The scale had to be placed on a leveled surface and calibrated by pressing “TARE” button. The weight of the parts was rounded to the nearest gram. I would recommend a scale that has more accuracy for lower masses.

Theo Jansen Leg Dimensions

Figure 3: Theo Jansen leg concept

Description

With the Theo Jansen leg dimensions, we are going to estimate the volume of each legs to find the mass of the legs. The Theo Jansen legs will have a width of 3.96875 mm and thickness of 3.825mm.

Theo Jansen Leg 3D mechanical drawings (from mechanical drawing blog post)

Figure 4: Theo Jansen Leg 3D mechanical drawing

Body (housing for 3DoT and PCB)

Figure 5: Estimated Body Volume

Calculations

Figure 7: Mass Calculations for supports and Joints

Figure 8: Total Mass for one Leg and Joints

Figure 9: Total Mass Calculation for body (box)

Description:

The legs and body calculations were done by estimating the volume of the 3D printed parts and multiplying their density to them. Since 3D prints do not fill the parts completely with the material, the estimate of the mass will be higher than the actual weight. The mass of the AT-ST 3D printed parts will be around 253 grams for the box and 120 grams for the legs.

Resources

  1. http://www.strandbeest.com/beests_leg.php
  2. http://www.psyclops.com/tools/technotes/materials/density.html
  3. https://docs.google.com/spreadsheets/d/1l4bPs0FaRDSLj46PryDBNb4UZcGDcVGFgoV37JaNrXk/edit?usp=sharing

AT-ST Verification Test Plan

By: Joseph Cho (Mission, Systems, and Testing)

Verified By: Intiser Kabir (Project Manager)

Approved By: Miguel Garcia (Quality Assurance)

Table of Contents

Introduction

Verification test plan is used to verify our L1 and L2 requirements through analysis, inspection, demonstration, and/or testing. The L1 and L2 requirements are listed in the spreadsheet below. The test plans will be generated from the spreadsheet. Few of L1 and L2 requirements have been reworded by MST.

Please be noted:

GL1 is General Level 1 requirement;

SL1 is Specific Level 1 requirement;

SL2 is Specific Level 2 requirement.

Verification Matrix

Figure 2: Verification Matrix continued.

Figure 3: Verification Matrix continued.Description:

This matrix contains all of the verification needed for the AT-ST. Each test cases are differently colored. Test Case 1 is green, Test Case 2 is blue, Test Case 3 is yellow, and Test Case 4 is red.


Test Cases

TC-01: General Inspection

Description: Verify all of AT-ST inspections..

Test Environment: Indoors on a level surface. Preferred to be inside ECS 316.

Figure 4: Test Case 1 (included in the Verification matrix)

Figure 5: Test Case 1 Continued

Figure 6: Test Case 1 Continued

Figure 7: Test Case 1 Procedure Step

TC-02: Maze Demonstration

Description: Verify all requirements for the hedge maze.

Test Environment: Indoors on a level surface. Preferred to be inside ECS 316.


Figure 8: Test Case 2

Figure 9: Test Case 2 Continued

Figure 10: Test Case 2 Procedure Step

TC-03: ArxTerra App. Demonstration

Description: Verify all requirements for ArxTerra App. Demonstration

Test Environment: Indoors on a level surface. Preferred to be inside ECS 316.

Figure 11: Test Case 3

Figure 12: Test Case 3 Procedure Step

TC-04: Mechanical Testing

Description: Test all mechanical requirements of AT-ST

Test Environment: Indoors on a level surface. Preferred to be inside ECS 316.

Figure 13: Test Case 4

Figure 14: Test Case 4 Procedure Step

Description

The test cases above is a list of test cases that will be done in order to test the level one and level two requirements of AT-ST. All these tests will be done as the project progresses and additional test cases may be added in the near future.

References

Goliath Fall 2017 Verification and validation test plans:

https://docs.google.com/document/d/1AxqEOK9IbOjYYHCB_hjBvkPCMkmBkUHTAropGCucphM/edit?usp=sharing

Goliath Verification and validation matrix:

https://docs.google.com/spreadsheets/d/1nidxLcOYEpPlr_o6vkksaHdT84JXj-LlkuektFs7Hwg/edit?usp=sharing

AT-ST Verification and validation matrix:

https://docs.google.com/spreadsheets/d/1HHaQliwvLYbqErqJi2AVOlqGEzNX7grKOYJ2CBUFQ7M/edit?usp=sharing

AT-ST L1 and L2 requirements:

www.arxterra.com/spring-2018-at-st-project-specific-requirements-and-objective-l1l2/