Spring 2017 Velociraptor: Fritzing Diagram

Table of Contents

Authors

By: Mohammar Mairena (Electronics & Control Engineer)
Approved By: Jesus Enriquez (Project Manager)

Introduction

Before one can create a custom printed circuit board (PCB), one has to create a Fritzing diagram. A Fritzing diagram is a virtual electronic circuit that is modeled after a circuit tested on the breadboard. Fritzing is used to provide the layout of the breadboard given the tools needed for a future PCB design.

Fritzing Diagram

The diagram shown is the Fritzing diagram our group used for the Preliminary Design Review (PDR). The diagram is a very rough idea of the parts we are using for the final schematic. This diagram is meant to provide a general idea of the parts needed for the final PCB design. Each part shown serves a purpose.

The breadboard consists of the 3Dot board, three servo motors, two DC motors, an external battery, an A/D converter with rotary/shaft encoders, an additional low-dropout voltage regulator for the extra servo motor and a GPIO expander. Two DC motors are used to control the legs of the raptor, one servo motor to control the head and another to control the tail. The extra servo motor will be used to control the turning motion of the Velociraptor. Since the 3Dot board is only capable of utilizing two servo motors and two DC motors, a PWM expander is necessary for our additional servo motor. The PWM/Servo driver is not shown and should replace the GPIO expander in the design. The PWM/ Servo driver with i2C interface has the capacity to add extra servos through two pins, SDA & SCL (Data and Clock).


Note: The 3Dot board was taken from Fall 2016 Velociraptor’s fritzing diagram.

Resources

  1. http://web.csulb.edu/~hill/ee400d/Technical%20Training%20Series/07%20FritzingDocumentation.pdf        
  2. https://www.arxterra.com/fall-2016-velociraptor-w-fritzing-diagram/ 

Spring 2017 Velociraptor: RGB Color Sensor

Table of Contents

Authors

By: Mohammar Mairena
Approved By: Jesus Enriquez

Introduction

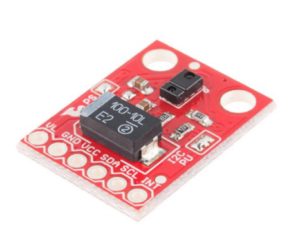
The Velociraptor will compete in a game similar to Pacman. One of the requirements is that the Velociraptor shall attempt to collect as many red dots as possible while navigating the maze utilizing either a static or dynamic walk. As a result, we will be using an IR sensor to detect the dots in the maze. My choice for the color sensor is the Sparkfun RGB Color Sensor. The reason I chose this specific sensor (APDS-9960) is because of the detection range and the operating voltage at 3.3 volts. In comparison to other sensors, this one has a lengthy detection range of 4-8 inches.

Analysis

The SparkFun sensor includes examples of Arduino library code for color sensing and proximity detection. I tested the color sensor and proximity sensor with the library code. After hooking up the sensor to the breadboard and uploading the code, I placed different colors up to the sensor. I had a hard time distinguishing colors using the serial monitor on the Arduino interface.

Conclusion

In retrospect, the SparkFun RGB Color Sensor is an ideal infrared sensor for the Pacman game however, detecting the different colors (red, blue, green) proved to be very difficult. Another disadvantage of this sensor is that it is very miniscule and would only detect the red dots if they were large in size. Completing this experiment helped me realize how minute the sensor was and how important it is going to be to correctly place the sensor on the robot.

Resources

  1. https://www.sparkfun.com/products/12787

Spring 2017 Velociraptor: SolidWorks Hardware Design Model

Table of Contents

Authors

By: Andrea Lamore (Manufacturing)
Approved By: Jesus Enriquez (Project Manager)

Introduction

Throughout the engineering design process, the SolidWorks model for the Velociraptor went through a series of changes as our team went through trial and error with the different components for the robot. This post includes some of the thinking that went behind the hardware design of the robot.

Hardware Design

Servo Holder

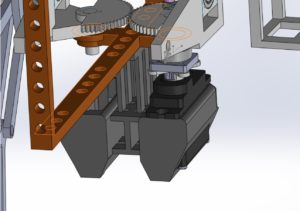
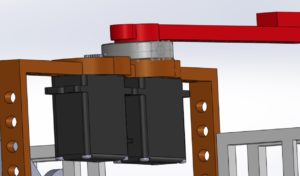
Previously we planned on 3D printing and ordering all the parts necessary to build out first prototype. I modified and added a few parts to the velociraptor skeleton in anticipation of some problems that might occur during the build phase.

Mounts for the server were added to the bottom of the velociraptor for hip movement. Two or one servos could be placed here to accomplish hip rotation.

Head & Tail

Horizontal ball bearing will be used to facilitate rotation of the head and tail and the hip. The weight of the velociraptor is being supported by the legs, meaning that the body will resting on the hip mechanism which is attach to the legs – bearing will be added along the shaft of the hip that attaches to the leg. In order for the horizontal bearings to turn properly the outer and the inner radius of the bearing must not both be resting on the same surface. Circular extrusions for the parts resting on the bearing will be used to allow for proper slipping. The same horizontal bearing mechanism will be used to facilitate head and tail rotation.

Leg Mechanism

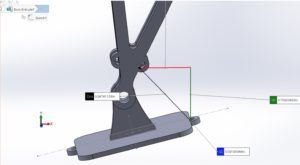
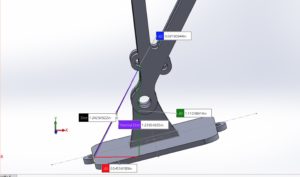
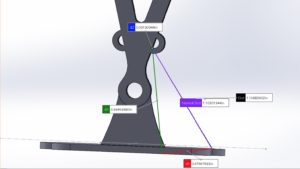
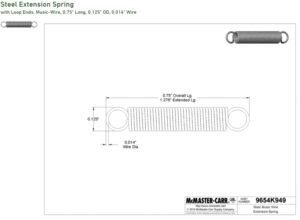
An issue with the Theo Jansen mechanism is the inability to keep the foot parallel to the floor is. Instead the foot moves in parallel with the legs circular motion. This means that that the whole body will shift back and forward with the foot motion when the velociraptor takes steps. With our first prototype, where we intended to use servos, a mechanical mechanism to keep the foot parallel to the floor could easily be incorporated into our design. A rounded out sole and a pair of springs attached to a pivoting joint at the angle was incorporated into the design in order to keep the foot parallel while  it is carrying the weight of the velociraptor(when it is the supporting foot being used to stand). The rubber sole will give the velociraptor height in order to prevent the toe from hitting the floor on steps and to keep the foot from slipping.


Conclusion

After going through the design process, there was still consistent changes throughout the semester in terms of Hardware design as our team consistently went through prototyping. As a result, we ended up deciding to do most of the manufacturing through laser cutting instead of 3D printing according to our original plan.

Spring 2017 Velociraptor: Servo Torque Test

Table of Contents

Authors

By: Mohammar Mairena, Electronics & Control Engineer

Approved by: Jesus Enriquez, Project Manager

Introduction

The torque needed to move the different parts of the robot are specified by the Design and Manufacturing engineer. By testing the torque required at a specific location of the robot, one can prove the servo chosen will handle the stress placed at a certain location.

Analysis

Based on the measurements given by the Design and Manufacturing engineer, the servo placed at each hip will need to support 400 g at a horizontal position.

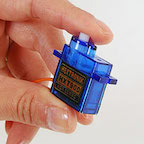
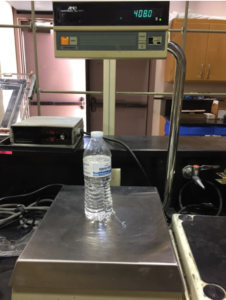
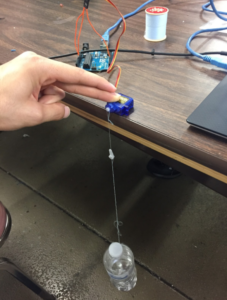
The experiment was done using a water bottle, HXT900 Micro Servo provided by Professor Hill, and a piece of string attached to the water bottle. The water bottle weighed approximately 408 grams, mimicking the weight that the servo (at the hip) will handle. The servo must rotate completely, without a stall under the 408 g load. The torque requirement at the hip was successful and rotated without a stall. Power came from the 3.3 V pin on the Arduino Uno and the current reading at 3.3 V came from the digital multimeter from the lab. At 3.3 V and under a 408 gram load, the HXT900 Micro Servo drew 180 mA of current.

Since the shaft radius of the servo is 2 mm and the weight of the water bottle is 408 grams, we can multiply them to get the Torque required at the hip. 2 mm converts to .2 cm, 408 g converts to .408 kg. Together, the torque required is .0816 kg*cm, which is equal to 1.13 oz-in.  


HXT900 Servo Placement Voltage Current Drawn Weight Torque Needed Shaft Radius
Hip 3.3 V 180 mA 408 g 1.13 oz-in 2 mm


Conclusion

It is important to note that at each hip, the servo will need to provide 1.13 oz-in of torque. As a result, the current drawn at each hip will be around 180 mA. Since the servos at the hips will only be used to make turns, the current drawn does not place much stress on the 3Dot battery. Max current output is 500 mA for the 3Dot Battery. The servos will not exceed the 500 mA limit.

Resources

  1. https://hobbyking.com/en_us/hxt900-micro-servo-1-6kg-0-12sec-9g.html
  2. http://www.rcuniverse.com/forum/giant-scale-aircraft-3d-aerobatic-110/2197950-how-do-you-test-servos-torque.html

Spring 2017 Velociraptor: Range of Motion Prototype

By: Andrea Lamore (Manufacturing)
Approved By: Jesus Enriquez (Project Manager)

Table of Contents

Introduction

The range of motion of the leg determines the type of step the robot will take. A static walk requires a different stride from a dynamic walk and it is important to pick the linkages in the leg according to the type of walk that the robot will be using. The robot is to fulfill the following requirement:

L1-7: The Velociraptor shall be able to perform a static walk


Prototype

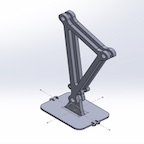
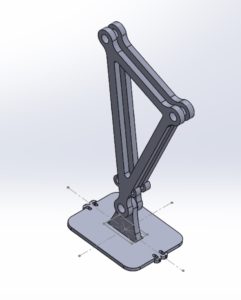
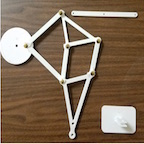
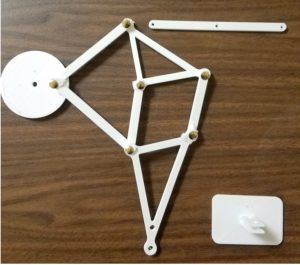
The velociraptor we are building shall have a static walk which uses two DC motors, so the Theo Jansen linkage was chosen as the optimal leg design for the robot. The following is the 3D printed model of the Theo Jansen Linkage. Before choosing the Theo Jansen Linkage [1] a series of other leg designs were cutout from cardboard and pinned together at the joints to simulate range of motion on a 2D plane.

Figure 1: Theo-Jansen Leg Mechanism Prototype

Conclusion

The 3D printed model of the Theo Jansen Linkage was scaled up for this prototype just to get an early idea of whether or not to implement this idea into our design. This leg mechanism will be rotating upon a single axis of rotation using a DC motor to over all drive the load of the robot.

References

[1]: https://en.wikipedia.org/wiki/Jansen%27s_linkage

Spring 2017 Velociraptor Preliminary Project Plan

Project Team:
Jesus Enriquez (Project Manager)
Oscar Ramirez (Mission, Systems, & Test)
Mohammar Mairena (Electronics & Control)
Andrea Lamore (Manufacturing)

Table of Contents

Work Breakdown Structure

By Jesus Enriquez (Project Manager)

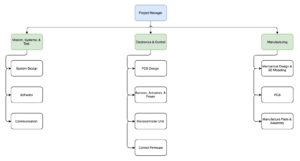
The figure below shows the Work Breakdown Structure for the Velociraptor project splitting the responsibilities and tasks of each member within their respective division. The structure was developed through research and development of Level 1 Requirements that were agreed upon between the Customer and Project Management team. Specific tasks were assigned as solutions to complete the mission profile of the project as explained in the Preliminary Design Document.

Project Schedule

By Jesus Enriquez (Project Manager)

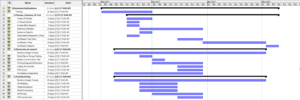
The following figure below show the project timeline from a Top Level Project and System/Subsystem Level perspective. The tasks within the Top Level Perspective derive from the Level 1 requirements as agreed upon between the Customer and the Project Management team. The top level consists of 4 main components: Planning, Design, Assembly, Project Launch. These different components have specific tasks that are critical paths to one another throughout the semester in order to reach project completion.

The system/subsystem level project schedule is structured to compliment the Product Breakdown Structure and the tasks assigned to each respective division. These tasks are split amongst the systems and subsystems engineers as shown in the figure which include MST, E&C, and Manufacturing.

Top Level Schedule

System/Subsystem Level Tasks

Burn Down & Project Percent Completion

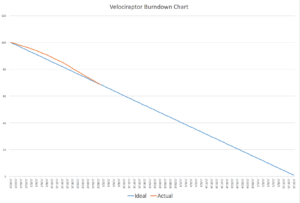
The figure below shows the burn down report graphically representing metrics of the project and how well our project team is meeting project deadlines. Our project was graphed in percentage terms over the course of 15 weeks (full semester). As detailed in the figure, the “Orange” data shows us the actual work or state of the project completed, whereas the “blue” data shows us the ideal task completion our project should follow. This Burn Down report follows the task as given in the Gant Chart shown in the Project Schedule.


System Resource Reports

By Oscar Ramirez (Mission, Systems, & Test)

Mass Report

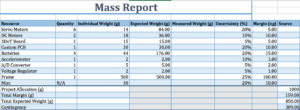
The goal for the mass of the velociraptor was to be able to carry a sufficient load (secret weapon) while continuing to operate normally. The mass of the robot should not affect basic functions such as walking or turning. The mass ideally should be less than one kilogram since power consumption from our motors will begin to become an issue. The total expected weight of the robot is 850 grams and falls below one kilogram, which should be sufficient enough for our motors to handle. The aluminum frame while sturdy is a lightweight metal with a low density and weighs less than polylactic acid (3d printed plastic).

Power Report

The amount of power that will be consumed by the velociraptor will ideally less than 5500mA. For this we will need four batteries that can provide this much or greater combined current. The majority of the power being consumed is from the Servo and DC motors but the 3DoT board and the custom PCB will also have an expected current draw of 750mA. The rest of the current drawn from the robot is almost negligible compared to the motors and boards but is still accounted for. Finding the type of batteries that can supply this much combined current should not be too much of an issue since most batteries that can power our robot typically output more than 1500mAh.


Project Cost Estimates

By Oscar Ramirez (Mission, Systems, & Test)

Cost Report

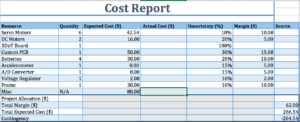
The overall cost of the project should be $266.54 therefore a budget of $300 should cover all expenses and uncertainties. The highest factors contributing to this cost are the motors and custom PCB, which should take a considerable amount from the budget since they are the main components. There is some uncertainty with the custom PCB cost since we have gotten some rough quotes from different suppliers. The material should be relatively cheap since we are using aluminum but the cost to stencil the aluminum to our design is a cost that has been accounted for in the miscellaneous section of the cost report. More miscellaneous costs include wire, small components, and additional parts. Overall this project could be completed with a budget of $300 but this is not accounting for the 3DoT board.

Resources:

  1. https://hobbyking.com/en_us/towerpro-mg92b- 360-mini- digital-robotic- servo-3- 5kg-0-048sec- 13-8g.html
  2. http://arxterra.com/fall-2016- velociraptor-w- preliminary-project- plan/
  3. https://www.adafruit.com/products/2019gclid=CjwKEAiA3NTFBRDKheuO6IG43VQSJAA74F77G0GPI6v5JDgxwulfMspg8EP1gATbZGylBD57y4JpBoCU9Pw_wcB
  4. https://www.metalsdepot.com/products/alum2.phtml?page=sheet
  5. http://cds.linear.com/docs/en/datasheet/1107fa.pdf
  6. https://www.arxterra.com/spring-2016- velociraptor-preliminary- project-plan/


Spring 2017 Velociraptor Preliminary Design Documentation

Velociraptor Team:

Jesus Enriquez (Project Manager)
Oscar Ramirez (Mission, Systems, & Test)
Mohammar Mairena (Electronics & Control)
Andrea Lamore (Manufacturing)

Table of Contents

Program Objective/Mission Profile

By Jesus Enriquez (Project Manager)

The Velociraptor Biped, inspired by that of the Titrus-III model developed by the Tokyo Institute of Technology, is to meet customer expectation through demonstration in a negotiated battle defined between the customer and the Robot Company project teams. While carrying out the mission, the Velociraptor will be operated through video support from a remote location using an assigned support vehicle from The Robot Company. The Velociraptor will be further controlled by a designated user through the Arxterra mobile application.

References:
EE 400D S’17 Project Objectives and Mission Profiles

Requirements and Verification

Program/Project: Level 1 Requirements

By Jesus Enriquez (Project Manager)

  1. The velociraptor budget shall not exceed an estimated cost based on an agreement between the customer and the project team
  2. The Velociraptor Biped Robot shall demonstrate that it has met the capabilities expected from the customer during the EE 400D Final on May 15th, 2017
  3. The Velociraptor should resemble a Velociraptor of the Theropodous Dinosaur Suborder
  4. The Velociraptor will use a 3DoT board embedded system
  5. The Velociraptor will use the Arxterra Android or iPhone Application and/or control panel to control the Velociraptor
  6. The Velociraptor shall operate with an external power source for a minimum time based on an agreement between the customer and project team regarding the mission objective
  7. The velociraptor shall use an external PCB with an I2C interface as the 3DoT board
  8. The Velociraptor shall use a 3DoT board while using I2C to communicate with electronic sensors, A/D converters, and GPIO
  9. The Velociraptor with its support vehicle shall have no more than one top secret weapon, approved by the management team

References:
Fall 2016 Velociraptor (Th): Preliminary Design Document
Spring 2016 Velociraptor: Preliminary Design Document

System/Subsystem: Level 2 Requirements

Mission, Systems, & Test

By Oscar Ramirez (MST)

  1. The Velociraptor Biped Robot shall use a 3DoT board as a servo motor driver and main microcontroller unit on the Biped
  2. The 3DoT board shall also work alongside the main PCB board and other on board sensors, drivers, and the Bluetooth communication system
  3. The Bluetooth communication system on the Velociraptor Biped shall be used to sync the user’s Android/iPhone device
  4. The user shall communicate with the Velociraptor Biped Robot via the Arxterra Android/ iPhone application to perform all the required tasks
  5. The power source shall be able to fit inside or on the robot and must be integrated into the Velociraptor Biped such that it does not affect the functionality of the robot
  6. The Velociraptor Biped’s 3DoT board shall use the appropriate libraries to communicate with the accelerometer, A/D converter, servo motors, and all other components on the PCB
  7. The Velociraptor Biped testing shall be conducted twenty-five feet from the robot and via a live feed to simulate the challenge conditions that are TBD

Electronics & Control

By Mohammar Mairena (E&C)

  1. The external battery should last for up to one hour
  2. The robot shall equip the right amount of torque to bear the weight of the Velociraptor
  3. The Velociraptor will use one DC motor for each leg
  4. The Velociraptor should use rotary encoders/sensors
  5. The Velociraptor will use one servo motor for the head and one servo motor for the tail to work independently of each other

Manufacturing

By Andrea Lamore (Manufacturing)

  1. The structure of the Velociraptor shall be made of Aluminum and/or 3D printed material
  2. The feet of the Velociraptor will be padded with rubber soles
  3. There will be a total of TBD motors within the body of the Velociraptor
  4. The Velociraptor shall be capable of calculating its center of gravity dependent on the position of its motors allowing it to adjust itself
  5. The Velociraptor will use servos and motors capable of supporting the body with the legs
  6. The Velociraptor shall be capable of achieving a static walk

References:
https://www.arxterra.com/fall-2016-velociraptor-preliminary-design-documentation/ https://www.arxterra.com/3dot
https://www.arxterra.com/fall-2016-velociraptor-th-preliminary-design document/#Electronics_Subsystem_Requirements

Design Innovation

By Jesus Enriquez (Project Manager)

After researching through the different designs of the previous generations of Velociraptor Biped Robots, it was noted that the certain types of leg mechanisms such as the Theo Jansen linkage was not appropriate to get the Robot to walk in a dynamic fashion but rather a static motion since it can only move forward and backwards rotating along a single axis. This limits the robot in terms of flexibility to move and turn in a dynamic fashion. Considering the mission of this robot per the customer’s request, it is essential that the robot have flexibility in its ability to move and turn under certain conditions. Using the creative process, our group was able to generate a few solutions.

Creativity Presentation

System/Subsystem Design

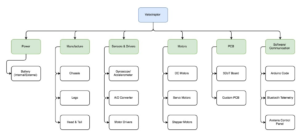
Product Breakdown Structure

By Oscar Ramirez (MST)

Power

The Velociraptor Biped will be powered by a portable power source that while not taking away any functionality or balance to the Biped must also be able to power the robot.

Body

The frame of the robot must have a strong material considering it will have a higher center mass when walking dynamically. The frame will consist of the head, tail, legs, and chassis. Aluminum will be ideal for this since it is not only a strong but lightweight material. Aside from the physical advantages to using aluminum the cost will also benefit the design since aluminum is going for about $30 per 4 square feet at 1.6mm thickness. This translates to a little more than one and a half kilograms of aluminum but not all of the 4 square feet sheet will be used and the frame of the robot will likely be the bulk of the mass.

Sensors and Drivers

An accelerometer will be used to help while walking to track motion and ensure that the system is not off balance. An analog to digital converter will also be used with the DC motors to track the position of the motors rotation and translate it into digital data that will be read into our microcontroller. Drivers will also be used for the DC motors since the microcontroller cannot directly control the speed of the motors.

Motors

As required by the customer, DC motor will be incorporated into our design. There will be two total DC motors that will provide motion to our Velociraptors legs and carry the majority of this load. Servo motors were used in the past but DC motors are better suited for the task since the can handle more torque. Servo motors will still be used in our design but they will be restricted to controlling the head and tail to move in sync with the center mass of the robot. Stepper motors will also be used to help provide more stability and needed torque for the legs.

PCB

There will be two PCB boards incorporated in our design. One of them will be our 3DoT board that will contain our microcontroller and control the servo motors and the other will be the main PCB board that will have all other sensors, communications systems, and drivers.

Software and Communication

The Velociraptors software will be based in C++ and written in an Arduino sketch. This sketch will control all motor functions and communicate to the Bluetooth module. The Bluetooth module will then sync with the users Android or iOS device and be controlled via the Arxterra control panel application. This application will have a GUI that will let the user perform any function of the robot such as walking, turning, and use of the on board secret weapon.

References:
http://arxterra.com/fall-2016-velociraptor-preliminary-design-documentation/
https://www.metalsdepot.com/products/alum2.phtml?page=sheet
https://www.arduino.cc/
https://www.arduino.cc/en/Main/ArduinoMotorShieldR3

Electronic System Design

System Block Diagram

By Mohammar Mairena (Electronics & Control)

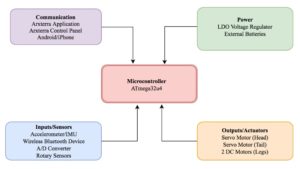
Shown above is the block diagram for the electronic design. Within the 3DoT board is the I2C interface that allows the user to add multiple devices using the SDA and SCL pins (data and clock, respectively). The block diagram highlights the importance of the micro-controller as the root of each and every device as well as the significance of the micro-controller in terms of communicating with certain devices.

Interface Definitions

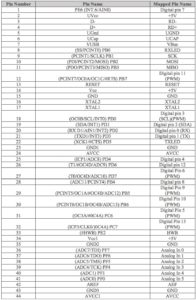
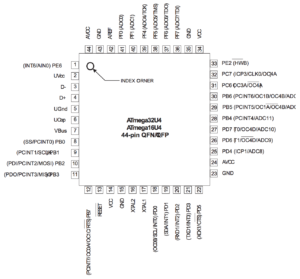
By Jesus Enriquez (Project Manager)


Reference:
https://www.arduino.cc/en/Hacking/PinMapping32u4

Mechanical Design

By Andrea Lamore (Manufacturing)

The velociraptor design be broken down in the following: The legs, feet, and the head-tail.

The entire design is going to be top-heavy and tall. Making the device top heavy will allow for good traction to floor and a small moment of inertia at the body so the top (the body) is more stable than the legs. The tall height in the legs makes it so there is a longer radius between the body and the feet, this also increases the moment of inertia at the body. A longer radius will give the robot more time to catch itself.

Leg Structure
The leg’s structure is going resemble that of a robot’s that is able to complete a passive dynamic walk. Without a mechanical control for preventing “bounce back” in the knee (referring to the knee bouncing back to bent after straightening), the leg design will not be able to complete a passive dynamic walk. Instead of a mechanical mechanism to prevent bounce back, there will be two motors used to control each leg – like the Titrus III design. One motor is responsible for the knee motion and the other for the swing of the hip. Using a combination of the successful passive walking robot and the Titrus III model, we will be able to create a leg that has the physical structure required for both passive and dynamic walking.

Static Walk
For the static walk the legs will be crouched by bending the knee and rotating the hip. This crouch will lower the center of mass and make the robot’s stance more stable. In the crouched position, the robot will utilize its head and tail to shift the center of mass from side to side depending on the foot that is stepping. In the crouched position the knees will move forward and the robots center of mass will be shifted, the upward motion of the head will be used to compensate for that forward motion. The tail will be capable of being used as a third leg so that the robot may utilize a very stable tripod stance. 


Turning
Turning will be controlled by motor as the hips. The motors responsible for turning will be placed here in order to keep the top heavy and reduce bulk in the legs so that the legs may accelerate as fast as possible and thus catch the robot as it falls on each step faster. The hips, if viewed from the top will angle the leg away or towards being in parallel with the other leg.

Feet
The feet will be statically joined at the ankle in order to reduce the amount of motors needed. If the legs need not enter the crouching position then the static flat foot with the heal attached to the ankle would suffice, however, since the robot will be crouching, the foot will need to roll over onto a different plane in order to keep the robot stable. To solve the problem, the robot will be able to bend its leg backwards (in the opposite direction of the dynamic walk bend) and roll over onto the ankle plane which will be at a slightly different angle from the rest of the lower leg.

Head/Tail
The head and the tail will move up & down and side to side. This mechanism will be that of the Titrus III robot, which used a “horse reign” schematic to control the head and tail. This “horse reign” method is similar to the reign of a horse in that two motors control the head/tail to move wither side to side or up and down. When one of the motor is rotated the head will turn either away or toward the motor in motion by moving left to right. If both motors are rotated in the same direction the head/tail will either lift or fall to the ground.

References:
https://www.youtube.com/watch?v=rhu2xNIpgDE&list=LLNnlTvhtytEM7T9W2Ou5IGA&index=27
https://www.youtube.com/watch?v=GxVv4WNlXMA&index=29&list=LLNnlTvhtytEM7T9W2Ou5IGA

Design & Unique Task Descriptions

Electronics & Control

By Mohammar Mairena (E&C)

The battery used to power the Velociraptor must take into account a few things such as: current capacity and mass of the battery with relation to the robot’s total weight. In order to choose the right battery in accordance to its specifications, tests must be run. The Servo motor will be under different load conditions and we will record measurements for current drawn in each unique load condition. Additionally, the operating voltage for DC and Servo motors will be 5V.

Velociraptor Electronics & Control Tasks

  • Perform a servo test to determine the servo load vs the current drawn with respect to the load
  • Conduct trade off study to determine which DC motor best serves 3DoT board
  • Conduct trade off study to determine which Servo motor best serves 3DoT board
  • Create a fritzing diagram to test the breadboard
  • Create an electrical schematic/PCB based on Eagle CAD
  • Determine the total current drawn in order to pick the correct battery for the robot
  • Conduct control algorithm tests for Servo motors through Arduino IDE
  • Conduct control algorithm tests for DC motors through Arduino IDE

Fall 2016 Velociraptor (W): Final Project Document

By Lam Nguyen (Project Manager)


Table of Contents

Executive Summary of Project


Project Objectives

For CSULB Fall 2016 semester, the Velociraptor biped robot project will branch off to a new species of dinosaurs and set up a new baseline with the Theo Jansen robot design. The Velociraptor is to be a toy robot resembling a Theropodous dinosuar suborder by it’s static walking movement. The objective of this project focuses on utilizing a Theo Jansen design to produce a walking robot that will be remotely controlled through Bluetooth communication by using the Arxterra Control Panel. The robot’s application will have a 3DoT MCU board and demonstrate it’s feasibility by participating in a game with other robots.

Mission Profile

The Mission Profile of the Fall 16 Velociraptor is to participate in the game arena called Save the Robot on the last day of school, December 14th 2016 at 9:00 am. The game will involve Velociraptor chasing other toy robots through various terrains tele-robotically from the Arxterra control panel. The robot’s application of the 3DoT board MCU will demonstrate it’s walking capabilities by navigating through terrains in a game.


Project Features


DC motors

Apart from previous semester the Velociraptor’s project design had problems with servos that actuates a walking motion. DC motors were introduced to have a continuous rotation for our walking motion.

3D Model – Theo Jansen Biped Robot Model

In order to design the robot with the Theo Jansen model as the project baseline. The project used Solidworks 3D modeling to validate and verify new designs within a short period of time. Using unique applications from Solidworks the mass properties helped save time and money on both printing the parts.

1

Picture 1. Theo Jansen BiPed Robot Model

Rotary Sensor and A/D Converter

With the new actuators for the walking motion. DC motors has less precision for every full rotation, therefore by using rotary sensors and A/D converter we will be able to track each leg’s position for a stepping motion.
6

Picture 2. Rotary Sensor

8

Picture 3. A/D Converter

Experiment List/CheckList

For the Final Verification and Validation Test Plan the project was given a checklist that stated the project’s requirements and experiments to figure out the results.

velociraptor-experiment-listchecklist


System Design


System Block Diagram

2

Figure 4: System block diagram Velociraptor (W)

The system block diagram for the velociraptor group was designed in order to use an external PCB that would be able to interact with the 3dot board embedded system. The system block diagram displays the overall connections that are needed to make the controls of the velociraptor possible. For the velociraptor PCB, it will have stepper motor drivers (A3901) which will have 2 stepper motors which control the linear actuators. With the help of the actuators we will be able to change the pattern of the step. For instance if the velociraptor needs to go up an incline, it would be able to step higher and not hit its foot against the bottom of the incline. In order to have the stepper motor driver be compatible with the I2C interface, we will utilize a GPIO expander that is I2C compatible. The driver will control the linear actuators. The linear actuators will change the radius of the rotational movement which will change the motion of the leg movement. For more information on each block of the diagram, readers are advised to visit the blog post link cited below.


Subsystem Design


Interface Definitions

3

Figure 5. Interface Definition

The above figure is for the interface definition which is linked  to the cabling tree diagram. Both of the above figures are linked in the sense that the interface definition is an outlined pin layout from the EagleCAD schematic while the cabling tree demonstrates what the layout will look like. The EagleCAD schematic was designed by the electronics engineer and through that the manufacturing engineer is able to know how to design the PCB and have the right connections.

4

Figure 6. Cable Tree

In the cable tree diagram, there is more details regarding the connection types; the wire lengths and also the gauge sizes. The cable tree diagram that has been provided below is based on the system block diagram and follows the same format and layout.


Mission Command and Control


The command and control of the velociraptor was to be designed in such a way that both the systems and electronics engineer have a good understanding of the 3DoT library provided by Professor Hill. The library needed to be modified in order to be able to include the custom command for each senior design group. For procedures on how to create custom commands and how to create a custom telemetry commands on the Arxtera control panel, readers should visit the systems blog post on how to create custom commands as well as telemetry commands. For the telemetry we will be displaying the roll, pitch and the left right rotary sensor values. A rotary encoder will be able to tell us how much in each direction the encoder has been turned. The custom command is when we have information that is being sent to the robot from the user. The custom command that we created for static walking for instance; it lets the velociraptor know when to start walking. However, telemetry would be the robot sending back information to the user what the leg placement is. There are two separate blog posts on custom commands and telemetry commands. Both of these blogs can be reviewed in order to gain a better understanding of the commands.


Electronic Design

Rotary Sensor

The rotary encoder is necessary to know the position of the dc motors. Without them, the walking motion would be a disaster. They are potentiometers. The signal is converted to a digital, and it is read via I2C.

Control Algorithm Code

The C++ code is a control algorithm for the velociraptor. It moves the servo which moves the head and tail to control the center of mass. It uses DC motors and rotary encoders to control the legs properly. Overall, it controls its walking motion and its turning.


Firmware

Software Block Diagram

The software block diagram shows a detailed description of what coding blocks information were needed to implement the move commands for the velociraptor. For instance, dynamic walking was a walking style in which the customer would have liked to accomplish but unfortunately wasn’t successful. For the static walking motor commands, the velociraptor was programmed to be able move forward, move backwards, turn right and turn left. The turn commands go into details about describing how a turn occurs after the foot has been planted in a stable position while the other foot is continuously being moved until the robot is able to turn in the specified direction. Identifying the necessary components and flow chart diagrams of what the velociraptor motor commands were supposed to do, made the coding a little bit easier when it was time to implement it in Arduino.

Sample of Code:

Link: telemetry-and-custom-command-sample-arduino-code-1


PCB Schematic

Fritzing Diagram/EagleCAD Schematic

The Fritzing diagram and Eagle schematic lays out how the components connect together on the PCB. Fritzing gives you a more visual representation while Eagle shows all the details of the connections. Once the Eagle schematic is complete, the manufacturing engineer fabricates the board so that it can be coded.


PCB Layout

The PCB layout was carried out through EagleCAD. The design utilized thru-hole components and L-shaped form to integrate with the 3DotBoard.  Majority of the IC components were placed on the top layer to utilize a SMT solder paste stencil for reflow soldering. Only one IC component was placed on the bottom layer, which will be soldered through hand soldering. The picture below shows the PCB layout for the custom PCB of the Velociraptor. Decoupling capacitors were placed close to the IC components and wire sizes were adjusted to prevent problems with the power and signal lines. For PCB fabrication, OSH Park was chosen.
For more information, the blog post below will give detailed information regarding the PCB layout.


Hardware Design

To fulfill requirements, a modified version of the Theo Jansen linkage was integrated with the leg design. The continuous rotation of the linkage corresponded with the continuous motion of a DC motor. The design was created in SolidWorks to observe features such as center of mass. The center of mass was accurately calculated from a custom library of densities in SolidWorks. Subsystem components, such as the toe joint and see-saw body, were to fulfill requirements and improve the design from previous generations of the Velociraptor.


For more information, the blogpost below will give thorough information regarding the hardware design.


Verification and Validation Test

The verification and validation matrix is a complied version of the requirements that the velociraptor group was required meet. In this matrix below, we notice that the requirements have been labeled as either a shall, should or will. For this Wednesday velociraptor group, we were able to accomplish about half of the will requirements that were expected from us. In the figure below, readers can find a copy of the verification and validation report. Matrix has been provided below in order to give viewers a better understanding of project requirements.


Project Status


Power Allocation

For the power allocation report, the velociraptor robot consumes a total of 375mA when in complete motion. Based on a torque test performed by the electronics engineer in our group, we were able to determine that the DC motors can move a mass that is at a 1000g maximum. Due to robot size being 348g, we know that the motors will be able to successfully control the robot without stalling.

Mass Allocation

The overall weight of the velociraptor is 348g which is only using 34.8% of our maximum requirement of having it not weigh more than 350g. This therefore fulfills our requirement of the total mass and also makes it possible to have the GM9 motors supply enough torque to move the velociraptor. The final mass report which is provided in the figure will be able to provide more information about the overall weight distribution of other components.

Cost Report

The cost budget was finalized by the customer to allocate the cost to each project. In the end the customer was the deciding factor for the Velociraptor (W)  budget. In the cost report the items were provided by the customer were $0.00 and this help the project lower the budget to $46.55.


Product Breakdown Structurea

Figure 7. Product Breakdown Structure

The product breakdown structure above was categorized into 5 sections:

  1. Movement System
  2. Control
  3. Software Control
  4. Power
  5. 3DoTBoard/PCB Board

The PBS was worked with Paul Auhmada from the Velociraptor (Th) class. The movement system pointed to the mechanical design, servos, and dc motors. The Controls had attributes for sensors. The Software Control had communication and control algorithm code applications. The 3DoTBoard/PCB board was for the external PCB board unique to each projects design.


Work BreakDown Structure

aa

Figure 8. Work Breakdown Structure

The Work Breakdown Structure allocated the task to different divisions of the team. This semester this project the system engineer and the electronics and controls engineer had a huge learning curve therefore there were difficulties to push the project forward in a short period of time. Therefore the system engineer role were covered by both PM’s of each Velociraptor. The electrical and controls engineer role was assisted by their division manager.


Project Schedule

The project schedule indicates the number of tasks needed to follow in order to complete the project. Unfortunately the project reached some obstacles in the electronics and mechanical design.aaaa

Figure 9: Project Schedule

The burndown structure shows two different graphs where the orange line indicates the tasks remaining to complete the project and the blue line indicates the expected tasks completed. As you can see the path diverged early in the semester, where our systems engineer had reached some obstacles in the task. This problem ended up affecting the rest of the divisions due to time.

The project is marked as 80% complete and needed to implement the feet design of our robot and the control algorithm with the rotary sensor.

aaa

Figure 10: Burndown Structure


Conclusion

The Velociraptor this semester had face many problems to move the project foward. The Theo Jansen Linkages designs was set but when the group assembled our first prototype we noticed that the feet design was one of the issues in having the robot balanced when stationary. There was problems with every division and the delays caused other work to be pushed back. The control algorithm used to move the robot forward and turn was not completed by the final project demonstration. The foot design was one of the biggest problem that needed to be implemented to have the robot balanced when the robot walks.

Future Projects:

  1. The manufacturing engineering should start on the mechanical design as soon as possible if not then the manufacturer will face bigger problems towards the end.
  2. The electronics and controls engineer should learn C++ from the start to be prepared for coding tasks.
  3. The system engineer should not only focus on the requirements but also be ready to think about all factors. Know that the system design is the baseline of the project, therefore if something is changed from the system’s side then there is a possibility this could affect other divisions.


Project Resources

[1] Project Video: https://www.youtube.com/watch?v=1fSIvmpCkRk

[2] Critical Design Review: critical-design-review

[3] Preliminary Design Review: preliminary-design-review and preliminary-design-review PowerPoint

[4] Microsoft Project : projecct-schedule-1

[5] Verification and Validation document: verification-and-validation-test-plan-results

[6] Solidworks File: https://www.dropbox.com/s/9mycah24zwdqag8/Velociraptor.zip?dl=0

[7] Fritzing Files: fritzing-diagram

[8] EagleCAD Files: eaglecad

[9] Control Algorithm Code: control-algorithm

[10] MatLab Code for Torque studies: matlab-code

[11] Complete Bill of Materials (BOM): bill-of-material


Fall 2016 Velociraptor (W): Analog to Digital Converter

By: Taylor Farr (Electronics and Control)

Approved by Lam Nguyen (Project Manager)

Table of Contents

Introduction

I chose to use the Adafruit ADS 1015 analog to digital converter. This will be used to convert the analog signals from the rotary converter to digital ones. This ADC communicates via I2C, so this satisfies our level 2 requirement.

Materials

  • 3382 Series 12mm Rotary Position Sensor
  • Adafruit ADS1015
  • Screwdriver
  • Breadboard
  • Wires
  • USB Cable
  • Laptop
  • Test Code
  • Arduino
  • protractor

Procedures

  1. Connect the ADC to the breadboard.
  2. Connect Vcc to the 3.3 volt pin on the Arduino and breadboard.
  3. Connect ground to one of the ground pins on the Arduino.
  4. Connect SCL and SDA to the SCL and SDA pins on the Arduino.
  5. Connect the Vcc of the rotary encoder to the Vcc on the breadboard.
  6. Connect ground of the rotary encoder to ground on the breadboard.
  7. Connect the signal output of the rotary encoder to the A0 pin on the ADC.
  8. Upload test code to Arduino and open the serial monitor.
  9. Using the screwdriver and protractor, move the position of the ADC to different angles and observe the digital readings on the screen.

Results

Angle (degrees) Bit reading
0 1
45 115
90 222
180 550
225 667
270 827
350 1101

Conclusion

From The table of results, we can see the digitized results of the rotary encoder. The ADC is a 12 bit analog to digital converter. The voltage on our PCB is about 3.3 volts. This is why we do not read the full span of the 11 bits (211 = 2048). Now that we know the range as well as the specific values of the encoder at specific angles, we can use this to update the control algorithm for the velociraptor.

Fall 2016 Velociraptor (W): Interface Matrix Update

By Gifty Sackey (Mission, Systems, Systems Engineer)

Approved by:

– Lam Nguyen (Project Manager)

– James Lee (Division Manager for Mission, Systems, and Test


Table of Contents

Introduction


In this current block post, the interface matrix along with the eagle card documents have been provided and discussed in order to allow future 400D students to have a smooth transition when building upon the robot. The interface matrix excel document was designed based off the EAGLE CAD design which was designed by my groups electronics engineer. The EAGLE CAD allows us to have an idea of what our PCB will look like before actually printing it. With the help of this computer software, tracing the design is not tedious because we are able to see the components that are used and their respective wire connections. For the diagram below, the components are placed in columns and have their connections to the 3DoT board listed in each row section by the pin name. For instance with our GPIO expander, we notice that the SCL is connected through the IC1-12 pin while the SCA pin is connected at the IC1-13 to the GPIO expander.


Matrix Interface Link


Matrix Interface Link: interface-definition


Cable Tree Diagram


Along with the interface matrix, each project group is required to design a cable tree diagram which is another visual presentation of the system block diagram but with more details regarding the connection types; the wire lengths and also the gauge sizes. The cable tree diagram that has been provided below is based on the system block diagram and follows the same format and layout. This diagram was made possible through draw.io which served as the tool to design our diagram.

4

Diagram 1: Cable Tree


Conclusion


These diagrams that have posted above in this current blog post are the cabling diagram and interface diagrams. Both of these documents from above were previously presented during our presentation for the critical design review. Subsequently they have been revised to ensure that the velociraptor group produces excellent documentation materials.


Resources


[1] https://drive.google.com/file/d/0BzIcuzRpcmk4S252NEc5Sld5MU0/view