Lab 5B: A Little Animation
Is your finger tired from pushing the button every time you want the bear to take a step? In this last part of lab 5, you are going to teach your bear how to walk down a hallway by himself to speed up his navigation through the maze.
Table of Contents
What is New?
Here are some of the new concepts you will be exploring in this lab.
- Implementing Logical Operators (&&, ||) in Assembly
- 4-State Finite State Machine (FSM)
No new assembly directives or instructions are introduced in this lab.
Part I – IsHallway
What Question Does IsHallway Answer?
In the second part of this lab you are going to teach the bear how to walk down a hallway until he encounters bees, a corner, or an intersection. Clearly, before you can tell the bear to walk down a hallway, you need to test for these conditions – is the bear in a hallway without any bees? To help answer that question, you are going to write a new function named IsHallway.
The hallway question is answered by looking at Figure 1 Programmer’s Reference Card. Here we see that Room 6 (room = 01102) is a vertical hallway and Room 9 (room = 10012) is a horizontal hallway. If room equals either of these two values (it is a hallway) and the hallway does not contain any bees, then your function will return a non-zero value (true), otherwise the function will return zero (false).
The bee question will be answered by testing if r22 (bees) is equal to zero (tst).
Arduino C++ IsHallway
In the previous section I described how IsHallway works in words. A more concise answer is provided by simply looking at the C++ code which does the equivalent operation. If you open the Arduino script Lab05B.ino you will see IsHallway defined as…
boolean isHallway(byte room, byte bees){
return (bees == 0x00 && (room == 0x09 || room == 0x06))
}
IsHallway Returns a Boolean Answer in r24
As you have learned in past labs, functions return values in the r24 register. Following this convention allows your functions to be called from C++ and assembly. For these functions you did not push/pop r24 allowing the register to provide the answer to the question asked (ex. did your right paw touch a wall?). If your function, like IsHallway, returns a Boolean value (true or false) then the calling program immediately executes a tst instruction followed by a breq (answer is false) or brne (answer is true) instruction. The branch selected is based on the program path you wish to take.
Use the comments in the following IsHallway template to complete your new function. Do not forget to add your own comments.
; ————————–
; — Is this a Hallway? —
; input r24 = current room (room), r22 = bees
; output r24 = 0 if answer is false (r24 == 0),
; otherwise the answer is true (r24 != 0).
; The answer is true if the bear is in a hallway
; without any bees.
; no registers are modified by this subroutine
; ————————-
IsHallway:
// return (bees == 0x00 && (room == 0x09 || room == 0x06));
1. Test (tst) if the room has bees R22 != 0x00. If the answer is yes (brne), go to answer_is_no.
2. Compare (cpi) room to a horizontal hallway (room == 0x09). If the answer is yes (breq), go to answer_is_yes
3. Compare (cpi) room to a vertical hallway (room == 0x06). If the answer is yes (breq), go to answer_is_yes
answer_is_no:
ldi r24, false // room is not a hallway or contains bees
rjmp endOfHallway
answer_is_yes:
ldi r24, true
endOfHallway:
ret
Test IsHallWay
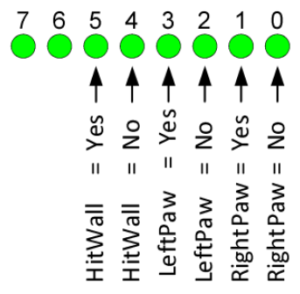
Here is a subroutine to test your new IsHallWay function named TestIsHallway. To display the answer, TestIsHallway uses discrete LEDs 5 and 4 as shown in Figure 2.
; ————————–
; —– Test IsHallway —–
; Called from LED display section in the main loop
; Input: r24 Outputs: spiLEDs bits 5 and 4 only
TestIsHallWay:
push r16
mov r16, spiLEDS
tst r24 // test return value from isHallway
brne inHallway
sbr r16, 0b00010000 // Bear is not in hallway, so turn on LED 4
cbr r16, 0b00100000
rjmp doneHallway
inHallway:
sbr r16, 0b00100000 //Bear is in hallway, so turn on LED 5
cbr r16, 0b00010000
doneHallway:
mov spiLEDS, r16
pop r16
ret
Place TestIsHallway in the Test Subroutines section of your program, which is after the main loop.
Add calls to your new IsHallWay and my TestIsHallway procedures in your discrete LED display area of the main loop.
/* Update Discrete Red LEDs */
:
lds r22, bees
lds r24, room
rcall IsHallWay
rcall TestIsHallway
rcall Delay
rcall Pulse
// writeDisplay(leds,seg7);
call WriteDisplay
rjmp loop
Before proceeding to the next section, upload your program and test your IsHallWay function to make sure the bear knows when he is in a hallway (LED 5 is ON) or not (LED 4 is ON), or if he sees any bees (LED 4 is ON).
You will be adding IsHallWay in the next section as part of your Finite State Machine (FSM). Now that you have tested your IsHallway subroutine you may delete this section of code or keep it to provide additional insight into the operation of your FSM.
Part II – A little Animation
If the bear is in a hallway we want him to walk down the hallway. Specifically we want him to mimic the user pressing the button.
Software Implementation of a 4-State Finite State Machine
To teach our bear to walk down a hallway, we will be adding a fourth state to our FSM as described in Figure 3.
In Lab 4 Part A “Software Implementation of a 2-State Finite State Machine” you built your first FSM. In Lab 4 Part B “Software Implementation of a 3-State Finite State Machine” you extended your design to include a third state. Applying what you learned in Lab 4, add a 4th state as defined by Figure 3 “4-State Moore Finite State Machine (FSM).” As always if you need additional help you can look at the Arduino Script version of the lab (Lab05B.ino). That’s it! Have fun helping your bear solve the maze. That is of course after you have debugged the program.
The hallway variable that is present in Figure 3 is referring to the output from the IsHallway subroutine. Use the diagram to figure out where in the code you will need to call IsHallway and how that will be utilized in the next_state decoders. Remember, you cannot go directly to another state and must update the next_state variable with the correct value.
Test Your Program
You may upload your program to quickly check to see if it works. An updated owner’s manual is provided in the next section to help you step through the maze. I would be surprised if your program works the first time in which case you will need to simulate the steps defined in the owner’s manual. See “Simulation and Debugging” for help here.
On a personal note, when I wrote this program for the first time, I do not know how many hours it would have taken to get it working without the simulator.
Updated Owner’s Manual
Follow these steps to navigate a maze. You can follow along by opening Lab05B.ino within the Arduino IDE.
- After you upload and run the program, no room should be displayed (the bear is outside the maze). Place both direction switches up, all other switches should be in the down (off) position.

- The North direction 7-segment LED should be blinking telling the bear to walk North.
- Push the button telling the bear to take a step. The bear should now be shown in the first room – a room with a west facing wall.
- Point the bear in the direction you want him to proceed by setting the direction switches.
- Push the button to provide the bear with the directions. You should now see the bear walk (hallway blinks on and then off) until a decision needs to be made (a corner, fork in the road, or bees). The room the bear is in along with the direction (blinking) in which the bear was told to walk should now be displayed.
- Repeat steps 4 and 5 until the bear makes it to the forest.
Simulation and Debugging
You have added a lot of code to your program and the probability that it will work the first time you upload it are not good. Consequently, you will need to use the simulator to find the problem.
Here you will use the techniques learned in previous labs to set timer and external interrupts. In addition I would recommend using the watch window to quickly update and track your variables.
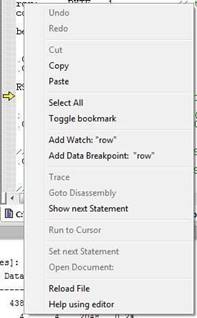
If it is not already open from the menu bar select View and Watch. Now left click the variables you want to update and track and select and from the pop-up menu select
Add Watch: “some variable”
When I was debugging my program I watched variables row, col, blink, state, and room. Here is what their values are after initialization.
Erratum: The original form of the state variable, was a variable named blink. It is this variable that is shown in the screen capture here and in subsequent screen captures.
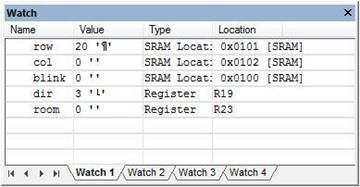
As you can see the bear is standing just outside the maze (row = 20 col = 0) facing north (dir = 3) in an empty room (room = 0). All numbers are in decimal so you may want to convert to hexadecimal.
Instead of spending time walking your bear to a location that includes a bug, you can now simply modify the variable in the watch window to take your bear directly to the problem. In this sample watch window I have positioned my bear in the first hallway.

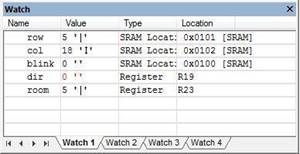
Here are two watch windows testing the first instance of the bear entering a room with bees. The two cases are testing the effect of variable blink on this room.
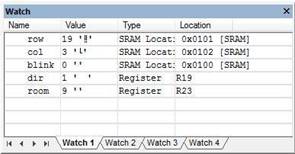
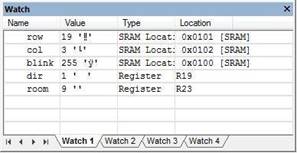
In this final example, my bear is entering the third left hand turn of the shortest path.
Design Challenge B – Walk into a Wall (2 points)
This is the second of two design challenges. You can skip these sections if you are happy receiving a passing grade (“C”) on the lab. If you want to receive a good or excellent grade you will need to accept one or more of the challenges.
Modify TakeAStep to not take a step and to set the four remaining LEDs (3 to 0) if the bear walked into a wall.
Lab 5 Deliverable(s)
STOP Read the Lab READ ME document contained in the Labs Folder. Be absolutely sure you have followed all instruction in the “Lab Formatting” section of this document. Points will be deducted if you do not follow these instructions. You have been warned (again, and again and again…)
Make sure your lab notebook is up to date. Follow the guidelines provided in the “Lab Notebook” section of the Lab READ ME document.
Make sure you have read and understand the “Plagiarism” section of the Lab READ ME document, especially if you are repeating the class.
All labs should represent your own work – DO NOT COPY.


