C++ Robot Lab 6 – Utilizing Arrays & Structures in C++
Table of Contents
Introduction
In the previous labs, you programmed your robot to operate in the real-world. In labs 6 and 7, you will develop the software to keep track of its position in a virtual world. Specifically, you will write functions to teach your robot how to enter and study rooms within a virtual representation of the maze. To accomplish your task, this lab includes a digital description of the maze.
What is New
New terminology and concepts are listed below in black. If you have any questions on this information,
refer back to the lecture on C++ Arrays.
C++ Data Types / Declarations / Definitions
PROGMEM // Variable or value saved to flash program memory
type arrayName[arraySize]; // Array declaration type
type *pointerName; // Pointer declaration
struct name_t{ // Structure Prototype
type var1;
type var2;
type varn; // etc
}
name_t var; // Declare var of data type name_t
Road Map – A Fork in the Road
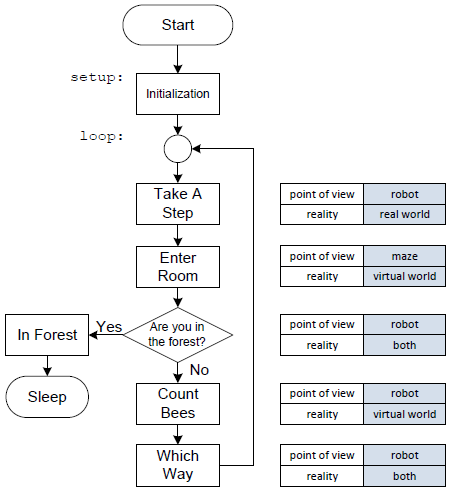
Figure 1 shows the top-level structure of Labs 6 and 7. We will build this structure and all but one function in Lab 6. We will defer writing the whichWay function to Lab 7.
In writing each block it is important to remember both the point-of-view (pov) and world reality. As shown in the tables to the right of each block, the code may be written from the robot’s pov (1st person) or the maze (3rd person). The reality may be real or virtual.
Labs 1 to 5 developed the code for takeAStep and writing the functions to teach the robot how to turn. All functions controlled the real robot navigating in the real world. Subsequent labs will be operating in the real and/or virtual world from the perspective of the maze or robot. The enterRoom function’s viewpoint is of the robot and its location in the maze. This function mirror’s in the virtual world the real world’s takeAStep function. In contrast, the countBees function is written from the perspective of a virtual robot and is therefore limited to a room. Like takeAStep, the inForest controls the real robot operating in the real world.
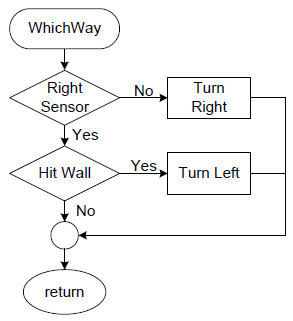
The shortest path version of whichWay is shown in Figure 2. The whichWay function is unique in that, while the pov is the robot‘s, the block will operate in both the real and virtual worlds.
Build the Framework
Time to Clean Up
Before we start building our new virtual functions, lets clear some space by moving our functions that operate in the real world to a new file named RealWorld.ino. Click on the drop down arrow on the right hand side of the tab bar, and select New Tab as indicated by the blue rectangle in the figure below. Type out the name of the file (RealWorld) and click the OK button.
Move all your real world robot functions takeAStep, turnLeft, turnRight, turnAround, sensorRead, and walk, to this new file.
The Maze.h Include File
While in the previous labs, your robot rolled around in a real maze, most of our new functions operate on a digital representation of the real maze.
Download a digital representation of the maze here. Place the maze.h file in your project folder and help the preprocessor find it with an include directive, located with the other #include directives at beginning of your program.
#include "3DoTConfig.h"
#include "maze.h"
The quotes (“”) tell the preprocessor to look in the project folder.
In this and future sections, I will be introducing C++ structures. For those of you new to this topic, Appendix A provides an introduction to C++ data structures.
Now, let’s take a closer look at the maze.h file.
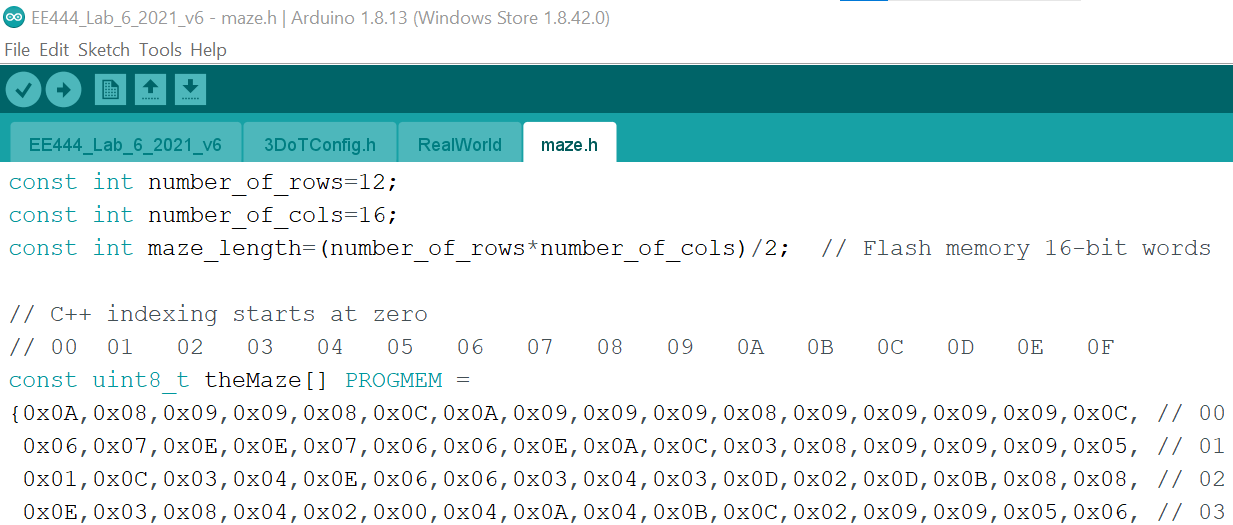
The file begins by defining a number of constants. These constants allow us to quickly adapt the robot to different maze types. Specifically, the constants allow us to define the number of rows and columns a maze contains, plus at what point the robot enters the maze.
The file now provides a digital encoding of the real-world maze. Here is the first line of this digital encoding.
const uint8_t theMaze[] PROGMEM =
Here is what it says in “hopefully” plain English.
Define a new array named theMaze[]. Once defined, the array may not be modified (const). The array contains 8-bit unsigned integers (uint8_t). So far so good; but what does PROGMEM mean? The keyword PROGMEM simply says, place this array into Flash into program memory. Which leads naturally to two questions.
Why do we need to explicitly teach the compiler to place the array into Flash program memory?
Most compilers, including ours, were designed for computers based on the Princeton memory model, unlike ours which is based on the Harvard memory model. Put into plain English, most computers like the one you are probably working on right now, only have one type of memory. This is dynamic memory and holds both program and data. In contrast, many micro-controllers, like ours, use Flash memory to hold the program and SRAM to hold the data. As a result, compilers natively, do not know about Flash Program memory and need a special library to help them learn it. For our processor, it is the pgmspace.h library contained in the avr folder. The good news is that PROGMEM; part of the pgmspace.h library is included in all versions of the Arduino after 1.0 (2011), so you will not need to include the library at the top of your sketch.
Why do we want to save this array to Flash program memory?
While the Atmega32U4 contains 32K bytes of Flash program memory, it only contains 2.5 K bytes of SRAM data memory. SRAM data memory needs to hold all of our global variables including variables qualified by the keyword static and const. In addition, SRAM contains the stack used to save all local variables (when the subroutines are called), return addresses, and other data. In other words, SRAM is a valuable and limited resource and should not be used to hold a large array of constants. In contrast, our 32 K bytes of Flash program memory is a perfect place to save this type of data.
Digital Encoding The Maze
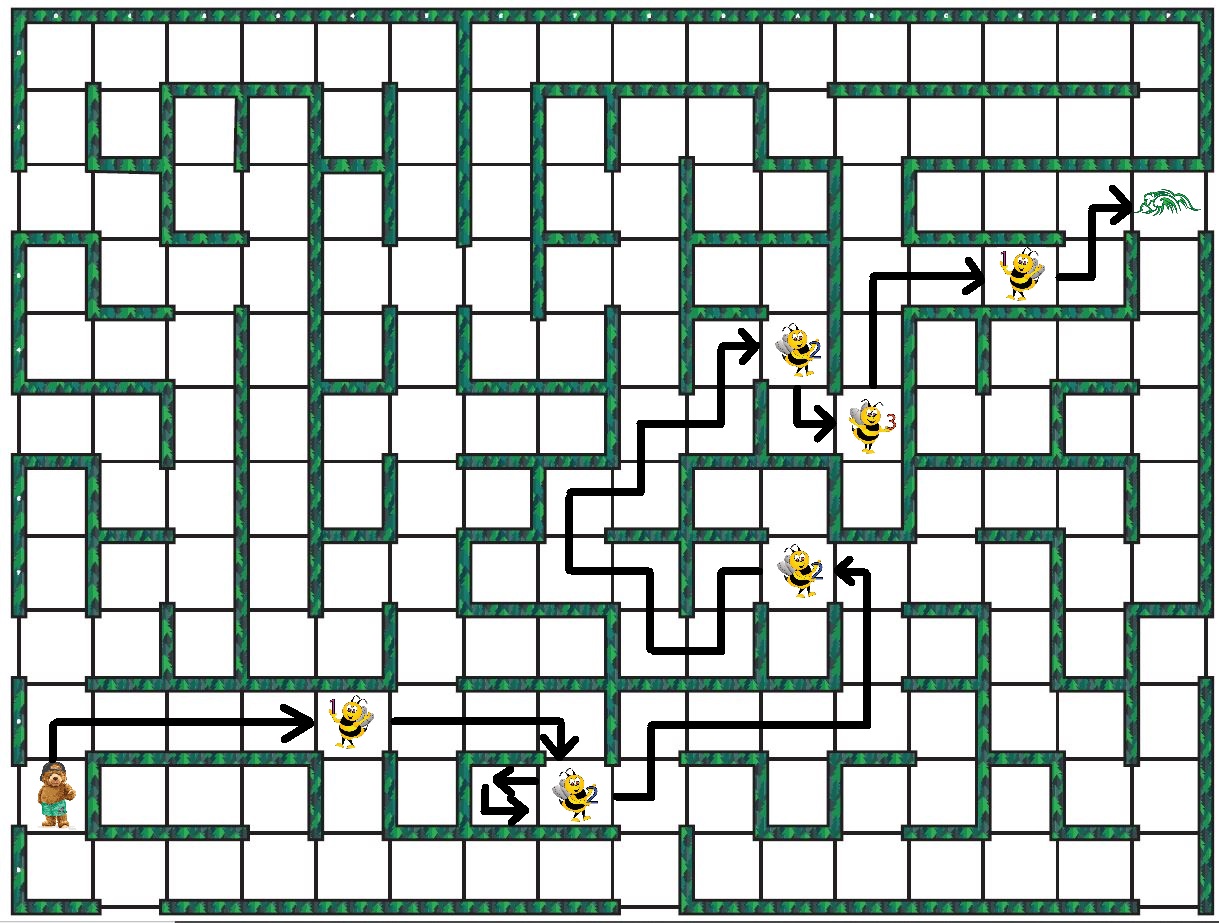
The numbers across the top and right side of the encoded maze (Figure 4) correspond to the columns and rows of the maze. You will notice that all of these values are in provided in both hexadecimal and decimal notation.
Each entry in the table defines the room at that row and column address. The definition of the room is encoded in the least significant nibble (4-bits) of each 8-bit entry. The most significant nibble defines the number of bees in the room (0 to 15).
To encode a room, each wall is assigned a bit (Table 1) based on its location along with the points of a compass (Figure 6). Figure 4 shows each room and its resulting bit encoding. For example, the room at coordinates 0,0 has a value of 0x0A = 0b1010. From Table 1, you see that this corresponds to a room with two walls facing North and West.
| Direction | North | East | West | South |
| Bit | 3 | 2 | 1 | 0 |
Table 1. Wall and Corresponding Bit
Add the following definitions to your 3DoTConfig.h file, where the constant value assigned to a compass point (North, East, West, and South), is the bit position of that wall in a room as defined in Table 1.
#define NORTH 3     // wall bits used to encode a room, and direction bits
#define EAST 2
#define WEST 1
#define SOUTH 0
Define and Instantiate two new Data Structures
To navigate a maze the robot will first need a digital description of its location in the maze.
struct coord_t {
uint8_t row = 0x0B+1; // locate robot at the entrance to the maze
uint8_t col = 0x0F;
} coord;
This is the first data structure introduced, so let’s take a closer look. Although a simple two-dimensional array would suffice to define the row and column that the robot currently occupies in the maze, a data structure allows us to do the same thing in a more descriptive fashion. Our structure is named coord_t. The “_t” at the end of the name, is simply a programming convention and means that this is a data type. All instances of our new data structure will have a row and column property. The first instance, of our new data type, is named coord and is initialized at the entrance to my maze. Accordingly, you will want to initialize coord to the entrance to your maze. In this case, the entrance is located in the last column and at the bottom, and just outside, of the maze. Notice that you define an instance of a data structure in an analogous way you define a built-in data type like an int or float.
Next, to add clarity to the program, group these associated variables into a single structure named myRobot_t. This data structure defines the room in which our robot is located (room), the direction he/she is facing (dir), and provides a notepad in which the number of bees encountered up to this point can be recorded.
struct robot_t {
  uint8_t room = 0x00;
  uint8_t dir = NORTH;           // NORTH,EAST,WEST,SOUTH
  uint8_t notepad = 0x00;
} robot;
The first instance, of our new robot_t data type, is defined with the data structure and is named robot and has my robot facing North. Again, initialize your robot to face in the correct direction.
Place both data structures (coord_t and robot_t) in the 3DoTConfig.h header file along with the points of the compass (last section).
The best method for organizing associated data and functions is in a C++ robot class. This Object Oriented (OOPs) implementation is left as an exercise for the student.
Function enterRoom
Take a Step in the Real and Virtual World
As mentioned in the introduction, your robot currently enters a room within a “real world” maze by taking a step – implemented by the takeAStep() function. This lab begins after this first “real world” step by updating our location in our “virtual world” – implemented by the enterRoom() function. Put another way, until we return from enterRoom, we do not know where the robot is located within the virtual maze.
Here we can see a visual representation of the problem. In the example pictured above, the function takeaStep() is called from the main loop one time. This causes the robot (bear), which was initially in row 0xA0, to take one physical step north and ending up in row 0x90. Without the enterRoom(), the robot has no way of updating its position in the virtual maze and for this reason, it never changes. This means that the physical position will be row 0x90, while the virtual position will remain at 0xA0, leading to a mismatch. In the next section, this problem is solved by writing a new function named enterRoom() which mirrors real-world steps in our virtual world.
enterRoom Template
Complete building the framework by calling enterRoom.
void loop() {
                                         // reality       point of view
  takeAStep();                           // real world    robot
  robot.room = enterRoom(robot.dir);     // virtual       maze
}
The objective of the enterRoom function is to mimic in our virtual world the robot taking a step (takeAStep()) in the real world. We are passing the enterRoom function the robot direction dir property as an argument. Add the enterRoom function and use the global instance of the coord_t data type, named coord, to keep track of the location of the robot as it navigates the maze.
/* Virtual World */
uint8_t enterRoom(uint8_t dir) {              // pov = maze

}
The enterRoom function can be logically separated into three blocks.
Block 1: Update Location
Increment or decrement the row or col property of coord based on the direction the robot is facing (robot.dir) after he/she takes a step (takeAStep) in the real world. This block of code may be implemented in many ways including a series of if-else conditional statements, or conditional operators “?”, a switch-case statement, or as an array. Your solution should look at the direction the robot is facing (dir) and based on this value (NORTH,EAST,WEST,SOUTH) either increment (++) or decrement (–) the robot’s coordinates (coord.row, coord.col) within the maze. For example, if the real-world robot was facing NORTH when he/she took a step, then you would want to decrement the row coordinate of the virtual robot.
Block 2: Out-of-Bounds Check
Once the coordinates of the robot have been updated, verify that the robot is still located within the maze. The dimensions of the maze are defined by constants number_of_rows and number_of_cols. Be careful when checking for out-of-bounds conditions – remember C++ array indexing starts at zero. To simplify your code, the action to be taken if the robot is outside of the maze or enters the forest is the same, specifically, set room equal to a unique number.
room = forest; // robot is in the forest or outside maze boundaries
Where the forest is defined as an 8-bit unsigned integer constant. For future reference group this constant with the compass direction definitions and our two new data structures robot_t and coord_t in the 3DoTConfig.h file.
const uint8_t forest = 0x80;
Block 3: Update Room
If the robot is located within the maze then using the robot’s new position, lookup the room the robot has entered. The maze is located in Flash program memory so you will need to use the pgm_read_byte_near() function located in the pgmspace.h library.
robot.room = pgm_read_byte_near(theMaze + index);
The location of the room within the matrix is a function of the base address (theMaze) plus an index. The index is an unsigned 16-bit integer (uint16_t) and is a function of the row (coord.row), column (coord.col), and the number of columns (number_of_cols). For example, say the robot is heading EAST in a room at map coordinates 0x08, 0x00 (row, column) and then takes a step. The robot is now in the room located at map coordinates 0x08, 0x01. Assuming our maze has 16 columns the room would have an index address of 8×16 + 1 = 129 relative to the base address of the maze.
Test enterRoom
In Lab 5 you could visually see if your takeAStep() function was working in the real world. Unfortunately, you can not tell by simply looking if your enterRoom() function is working in the virtual world. To solve this problem, I have created a lot of handy functions for entering and displaying data. As provided in a “test bench” application, these functions will work together to allow you to watch your virtual robot navigate the maze through Arduino’s IDE Serial Monitor. Quoting Wikipedia…
In the context of software or firmware or hardware engineering, a test bench is an environment in which the product under development is tested with the aid of software and hardware tools. The software may need to be modified slightly in some cases to work with the test bench but careful coding can ensure that the changes can be undone easily and without introducing bugs.
Downoad Testbench.ino here. This is a standalone application and will allow you to test your new enterRoom() function along with two to-be-written functions. This testbench.ino program is pretty much required to get your program debugged.
Open the Testbench.ino program and copy-paste your enterRoom() function from Lab6. Initialize the provided robot_t and coord_t data structures so your robot is at the entrance of the maze. Run the test bench, answering the prompts to move your robot around the maze. At some point navigate your robot out of the maze to verify he/she is in the forest.
When working with TestBench functions and the Serial Monitor always set the line ending to Newline.
Function inForest
While the enterRoom function worked only with the virtual robot, the inForest function works in both worlds. It begins in the virtual world by checking the robot’s notepad to see if he/she has entered the forest. If the answer is yes, then the robot places the motor driver into a low power state and goes to sleep. Add the following conditional statement after enterRoom in the main loop.
void loop() {
                                      // reality     point of view
  // takeAStep();                     // real world  robot
  robot.room = enterRoom(robot.dir);  // virtual     maze
  if (robot.room == forest) {         // virtual     robot
    inForest(robot.notepad);          // real world robot
  }
}
For my implementation, I simply check to see if the room is equal to the forest. Add the inForest() function after enterRoom() and write the code implementing the comments as explained in the following sections.
/* Real World */
void inForest(){       // pov = robot
  // Step 1. spin in place n times, where n is the number of bees encountered in the maze.
  // Step 2. brake and place motors into sleep mode
  // Step 3. go to sleep http://www.thearduinomakerman.info/blog/2018/1/24/guide-to-arduino-sleep-mode

}
Block 1: Dance (Design Challenge #1)
Once you enter the forest isolate the number of bees encountered during your robots journey through the maze.
uint8_t n = (robot.room & ~forest) >> 4;
This C++ statement first clears the most significant bit and then shifts the number of bees in the most significant nibble to the least significant nibble. The resulting total number of bees is then saved to variable n. Now add the code to teach your robot how to spin n times.
Block 2: Motor Driver to Standby
Review C++ Robot Lab 1, Section 7 “Controlling the Motors” for help on placing the motor driver into standby mode.
Block 3: Sleep (Design Challenge #2)
There are a number of ways to put your robot to sleep. The simplest is the while(true); statement. Because a while loop will continue until the test condition is false, this while loop will continue forever, or at least until the reset button is pressed, switched off, or battery runs out of power (technically an under voltage lock-out condition occurs).
Your second design challenge is to put the MCU to sleep. Read this article on “Putting your Arduino to Sleep” or any of the many other articles and videos on this subject.
Test inForest
Run Testbench.ino, answering the prompts to move your robot around the maze. At some point navigate your robot out of the maze to verify he/she is in the forest. You will need to test the inForest function in the real world.
Function countBees
As the robot navigates the maze he/she will encounter bees (or other objects to be recorded). Fortunately, our robot carries a notebook where he/she can record the number of bees found during his/her journey through the maze.
Each entry in maze.h encodes both the number of bees and the room number. The most significant nibble of the byte holds the number of bees, while the lease significant nibble equals the room number. The countBees function removes the bees from the byte and adds them to the number of bees already recorded in the notepad.
Add the countBees function call following the conditional statement in the main loop.
void loop() {
                                      // reality     point of view
  // takeAStep();                     // real world  robot
  robot.room = enterRoom(robot.dir);  // virtual     maze
  if (robot.room == forest) {         // virtual     robot
    inForest(robot.notepad);          // real world  robot
  }
  robot.notepad = countBees(robot.notepad, robot.room);      // virtual     robot
Add the countBees() function after the enterRoom() and before the inForest() function.
uint8_t countBees(uint8_t notepad, uint8_t bees) { // pov = robot
  shift bees into the least significant nibble and add to notepad
  return notepad
}
For your solution, you may want to use the C++ Boolean bitwise right shift (&, |, <<, >>, ~, ^) and assignment (=, +=, &=, etc.) operators. If you need help, please review my C++ introductory lecture.
Test countBees
Open the Testbench.ino program and copy-paste your countBees function from Lab 6. In the maze.h file included with the Testbench application, I have included some bees near the entrance defined in the default starting location. Launch the test bench and navigate your robot around the default entrance (0x0B, 0x0F) recording how many bees he/she has discovered.
In this example, I entered the maze at the default entrance immediately encountering 2 bees. I then turned west and encountered one more bee bringing the total number of bees discovered to 3.
Design Challenge(s)
Your two design challenges are located in the inForest section of the lab.
Lab 6 Deliverable(s)All labs should represent your own work – DO NOT COPY. Submit all of the files in your sketch folder. Make sure that the code compiles without any errors. Be ready to demonstrate your enterRoom(), inForest(), and CountBees() functions on the testbench. |
Checklist
Remember before you turn in your lab…
- Your enterRoom function implements the three blocks of code.
- Your countBees function implements the two defined tasks.
- Your inForest function implements the three blocks of code.
Appendix A: Data Structures
Data Structures in C++ provide a greater level of organization for complex systems. Before going into greater details; arrays will be reviewed as they give a good insight on how structures work. for example: type array[size]; C++ arrays are a fixed length of a singular data type. This allows us to collect groups of numbers for data for analysis. The issue comes when collections of data are not conducive to arrays or if there is a mixture of data types. Starting from basic C++ foundation, the immediate idea is to make sets of arrays and organize the groups of information by index. That is the core premise of structures! Structures also take us one step closer to Object Oriented Programming (OOP).
Structure… Structure:
From “What’s New” Section:
struct name_t{ // structure prototype
type var_1;
type var_2;
type var_n; // etc
}
You can now declare variables of this data type, just as if they were primitive data types.
name_t var; // Defines a variable of type name_t
Structures enable the user to define sets of data and with a variety of data types based on their needs.
For an example:
struct student_t{ // structure prototype
string name; // C style string (Char array)
uint8_t age; // integer for age
uint8_t classes[7]; // array of size 7 for their class list.
float GPA; // float with decimals.
}
student_t student; // Defines variable student of type student_t
Looking at this example, structures establish a blueprint for how the information you want to store is grouped. Similar to how you can declare more than one instance of any type, we can do the same with this structures now!
For example:
int x;
int y;
student_t student1;
student_t student2;
etc.
Manipulating the information in the struct requires a new notation, the dot (.) operator. This enables us to explicitly change a member within the structure.
It looks like:
student1.age = 21; //or
student1.age = x // assuming x is a uint8_t.
Data type rules still hold true. Since age within the structure was defined as an uint8_t, the compiler will check to make sure a uint8_t is placed in that variable. Finally note how we can choose to say the age of Student2 is different than Student1. This flexibility lays the foundation for how we want to define our structure in this Lab.


