Goliath Fall 2017
APP Controlled RC (Record and Playback)
Mark Huffman (Project Manager)
Table of Contents
Introduction
By Mark Huffman (Project Manager)
This guide aims to explain configuring Arxterra for custom commands needed for RC control, then the steps to interpret these received commands. Lastly using this received information to control Goliath through the maze either by recording a route to EEPROM or playing back a saved route.
Arxterra Custom Commands
By Mark Huffman (Project Manager)
To set up the app for remote control an excerpt of the Goliath Setup and control guide is repeated here.
After obtaining access to either the Android or IOS Arxterra App, we need to set up at least two actions. We need a selection menu for changing the operating mode of Goliath and we need to set the interface for d-pad motor control.
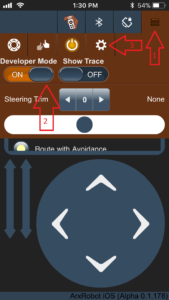
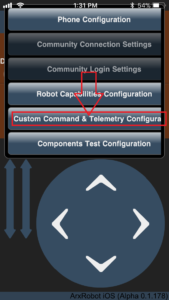
Step 1: To get to Custom Commands and Telemetry, enable developer mode and then enter the interface in the Arxterra App.
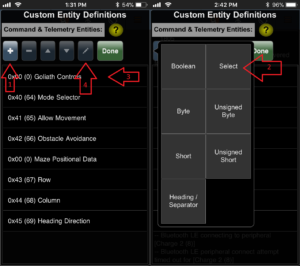
Step 2: Add a “Select” Entity in order to add a selection menu for changing the operating mode.
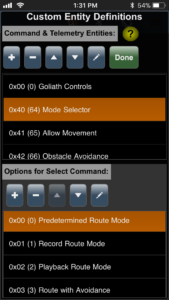
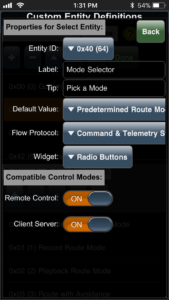
Step 3: Click on the added Entity. In the lower menu make sure to add at least these three options. These will determine the modes you can switch into.
(0) Predetermined Route Mode
(1) Record Route Mode
(2) Playback Route Mode
Step 4: Click on on the marker to edit the details of the “Selection Entity”. Most importantly take note of the entity ID this will be the reference for receiving the command.
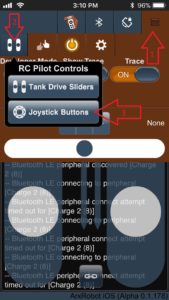
Step 5: Press “done” and return to the main control screen. If there are two sliders on the bottom of the screen instead of a d-pad do this:
Now the app is all set up to send commands to the 3Dot.
3Dot Custom Command Setup
By Mark Huffman (Project Manager)
Using a combined function of other guides and the reference example included in the 3Dot library, setting up receiving custom commands in Arduino is simple. Basically, define command addresses (Entity ID’s for earlier), set up calling in the 3Dot library by using onCommand(), then simply write the received functions that will be called. The focus here is only setting up commands for changing the operation mode from the Select Entity define above and overwriting the move command for deciding at intersections.
Step 1: Add a definition for the “mode selection Entity” address
#define MODE 0x40
Step 2: Setup handlers for onCommand Function. These names are the functions that will be called when that particular Entity address is called.
void moveHandler (uint8_t cmd, uint8_t param[], uint8_t n);

void modeHandler (uint8_t cmd, uint8_t param[], uint8_t n);

const uint8_t CMD_LIST_SIZE = 2; // total number of custom commands
Step 3: Setup the onCommand Function, this links the void with the actual Entity address desired. Note: MOVE is provided by the library and is already defined to the proper address.
Robot3DoTBoard::cmdFunc_t onCommand[CMD_LIST_SIZE] = {{MODE, modeHandler}, {MOVE, moveHandler}};
Step 4: Setup the internal onCommand Function within the 3Dot Library. This should be placed just after Robot3DoT.begin(); in setup();
Robot3DoT.setOnCommand(onCommand, CMD_LIST_SIZE);
Step 5: Add the functions defined. Note: these functions are designed to work with the current Goliath code layout, however, the general point still stands.
MoveHandler (Overwrites the general move command)
Methodology:
1 – Check if at an intersection waiting for a command.
2- Break out move command to its parts to indicate the turn direction
Received param format: ##(Left Motor Direction) ##(Left Motor Speed) ##(Right Motor Direction) ##(Right Motor Speed)
Only look at motor directions
if 0x01(Left) && 0x01(Right) = Foward
if 0x02(Left) && 0x02(Right) = Backward
if 0x01(Left) && 0x02(Right) = Turn Right
if 0x02(Left) && 0x01(Right) = Turn Left
3- Set turn direction as indicated to be used later for actual turing
void moveHandler(uint8_t cmd, uint8_t param[], uint8_t n)

{

// Set the turn direction and record it, (ONLY ACCEPT AT INTERSECTIONS)

if(physicalBot.turnCommand == 4){ // at intersection for turn command

// 01 2B 01 2B == Foward

if (param[0] == 0x01 && param[2] == 0x01){

Serial.println("Go Straight");

physicalBot.turnCommand = 0;

// 02 2B 02 2B == Backward

}else if(param[0] == 0x02 && param[2] == 0x02){

Serial.println("Go Backward");

physicalBot.turnCommand = 3;

// 01 00 02 00 == Right

}else if(param[0] == 0x01 && param[2] == 0x02){

Serial.println("Go Right");

physicalBot.turnCommand = 1;

// 02 00 01 00 == Left

}else if(param[0] == 0x02 && param[2] == 0x01){

Serial.println("Go Left");

physicalBot.turnCommand = 2;

}

}

}
ModeHandler (Used to change operating mode)
Methodology:
1 – Look at the received param value (a number between 0-2) to determine the new mode
2- Reset all internal variables (Maze position, heading, current route index and reset to the start maze position)
3- Change the mode variable to the new setting
void modeHandler(uint8_t cmd, uint8_t param[], uint8_t n)

{

//Changes the set mode

// Mode 0 = Predetermined Route

// Mode 1 = Record Mode

// Mode 2 = Playback Mode

if(param[0] == 0 && physicalBot.mode != 0){ //Predetermined Route

// change mode and reset needed paramters

physicalBot.mode = 0;

resetPhysicalBot();

}

if(param[0] == 1 && physicalBot.mode != 1){ //Record Mode

// change mode and reset needed paramters

physicalBot.mode = 1;

resetPhysicalBot();

}

if(param[0] == 2 && physicalBot.mode != 2){ //Playback Mode

// change mode and reset needed paramters

physicalBot.mode = 2;

resetPhysicalBot();

}

}
Side note: All custom commands can only be processed and received by Robot3Dot.loop(); when contained within the main loop() call. Meaning that any code must not “while” loop outside of the main loop if a custom command is needed. So, a state machine used within loop() is the recommended approach.
Modifying Whichway for Recording and Playback
By Mark Huffman (Project Manager)
Recording the route using the method whichway (Using the software Translation), takes only a simple modification. Then a set of support code to translate the received direction command. Playback mode is the easiest to implement as long as EEPROM writing and reading has been implemented. Note: The code represented is for Goliath, however the method and idea still holds true.
Whichway – Methodology
By Mark Huffman (Project Manager)
Record Mode Methodology:
1- Any intersection that does not require a decision (Hallway, left turn, right turn or a dead end) complete the action automatically.
2- If at an intersection with three or more open paths, look at the operating mode (in record mode).
3- Stop the bot, and set a flag to wait for a new direction to be received.
4- When a new direction is received (by the custom command), check that it is a valid direction (An open path not a wall).
5- If it is, save the turn direction to EEPROM and then increment the route index.
6- Then start the bot again and turn in the indicated direction.
Playback Mode Methodology:
1- Any intersection that does not require a decision (Hallway, left turn, right turn or a dead end) complete the action automatically.
2- If at an intersection with three or more open paths, look at the operating mode (in playback mode).
3- Using the current route index, read the next turn direction from EEPROM and then increment the route index.
4- Move the bot again and turn in the indicated direction.
Whichway – Goliath Implementation
uint8_t whichWay(MyRobot mazeBot){

switch(roomType(mazeBot)){

case 0:

// 4 way Intersection

if(physicalBot.mode == 1){

LEDDirection("?");

robotMovement("Stop");

physicalBot.turnCommand = 4;

physicalBot.turnWait = true;

physicalBot.wallDir = 0;

return 0x05;

}else if(physicalBot.mode == 2){

physicalBot.routeIndex++;

return EEPROM_read(physicalBot.routeIndex);

}

return 0x00;

case 1:

// T-Intersection (Wall to right)

if(physicalBot.mode == 0){

physicalBot.routeN++;

if(physicalBot.routeN == 3) // Predetermined ROUTE

return 0x02;

}else if(physicalBot.mode == 1){

LEDDirection("?");

robotMovement("Stop");

physicalBot.turnCommand = 4;

physicalBot.turnWait = true;

physicalBot.wallDir = 1;

return 0x05;

}else if(physicalBot.mode == 2){

physicalBot.routeIndex++;

return EEPROM_read(physicalBot.routeIndex);

}

return 0x00;

case 2:

// T-Intersection (Wall to Left)

if(physicalBot.mode == 0){

physicalBot.routeI++;

if(physicalBot.routeI == 1 || physicalBot.routeI == 2) // Predetermined ROUTE

return 0x01;

}else if(physicalBot.mode == 1){

LEDDirection("?");

robotMovement("Stop");

physicalBot.wallDir = 2;

physicalBot.turnCommand = 4;

physicalBot.turnWait = true;

return 0x05;

}else if(physicalBot.mode == 2){

physicalBot.routeIndex++;

return EEPROM_read(physicalBot.routeIndex);

}

return 0x00;

case 3:

// Hallway Continue Foward

return 0x00;

case 4:

// T-Intersection (Wall in Front)

if(physicalBot.mode == 0){

return 0x02;

}else if(physicalBot.mode == 1){

LEDDirection("?");

robotMovement("Stop");

physicalBot.turnCommand = 4;

physicalBot.turnWait = true;

physicalBot.wallDir = 4;

return 0x05;

}else if(physicalBot.mode == 2){

physicalBot.routeIndex++;

return EEPROM_read(physicalBot.routeIndex);

}

return 0x01;

case 5:

// Left Turn (Turn Left)

//setTurn("Left");

return 0x02; // Predetermined ROUTE

case 6:

// Right Turn (Turn Right)

//setTurn("Right");

return 0x01;

case 7:

// Dead End (Turn Around)

//setTurn("Around");

return 0x03;

}

}
Goliath support code for interpreting decision direction. Located within loop()
if (physicalBot.turnWait == true && physicalBot.turnCommand != 4) {

uint8_t newTurn = 4; // physicalBot.turnCommand != 4 when a custom Move command has been recived

switch (physicalBot.wallDir) { // check that the new direction is valid for completing a turn (Not going to turn into a wall)

case 0: // 4 way Intersection

newTurn = physicalBot.turnCommand;

break;

case 1: // T-Intersection (Wall to right)

if (physicalBot.turnCommand == 1)

newTurn = 4;

else

newTurn = physicalBot.turnCommand;

break;

case 2: // T-Intersection (Wall to Left)

if (physicalBot.turnCommand == 2)

newTurn = 4;

else

newTurn = physicalBot.turnCommand;

break;

case 4: // T-Intersection (Wall in Front)

if (physicalBot.turnCommand == 0)

newTurn = 4;

else

newTurn = physicalBot.turnCommand;

break;

}

if (newTurn != 4) { // Only true if the new turn direction was a valid choice

robotMovement("Go"); // start movement again

robotMovement("Foward"); // start movement again

physicalBot.turnWait = false; // start movement again

mazeBot.turn = newTurn; // Set the turn direction

physicalBot.routeIndex++; // update the route index

EEPROM_write(physicalBot.routeIndex, mazeBot.turn); // Save the new direction to EEPROM
if (mazeBot.turn == 0x01) {

physicalBot.turnAct = "Right";

LEDDirection(physicalBot.turnAct);

physicalBot.turnTime = millis() + 1300;

} else if (mazeBot.turn == 0x02) {

physicalBot.turnAct = "Left";

LEDDirection(physicalBot.turnAct);

physicalBot.turnTime = millis() + 1300;

} else if (mazeBot.turn == 0x03) {

physicalBot.turnAct = "Around";

LEDDirection(physicalBot.turnAct);

physicalBot.turnTime = millis() + 1300;

} else if (mazeBot.turn == 0x00) {

LEDDirection("Foward");

}

} else {

physicalBot.turnCommand = 4; // If direction was not valid, reset and wait for another recieved custom command

}

}
Note: “physicalBot” refers to a structure used to keep all variables involved with physical movement together. “LEDDirection” is used only to display visuals on the LED display on Goliath.

