Mini-Rosco Spring 2020
Mini-Rosco Automated Mode and Move Handler
Author: Alex Margaris
Table of Contents
Introduction
The overall goal of this blog post is to aid future generations of Mini-Rosco in beginning their firmware additions. The focus of generation 1, this generation, of Mini-Rosco is to develop autonomous driving modes, and autonomous following modes so that Mini-Rosco may complete its mission of locating and following another robot. As such, the content below will reflect this.
The only pre-requisite for the completion of this task is to obtain a computer with the Arduino IDE installed. The sections listed below in this blog post will explain the next steps in greater detail.
Setup and Library
Automated Mode Command
Mini-Rosco’s three stage mission required that an automated drive mode be used such that once a waypoint coordinate is entered into Mini-Rosco, it will travel to a waypoint by itself.
The first step in implementing this stage of the mission required the automated drive mode. It was crucial to Mini-Rosco’s mission however to keep this feature toggleable such that the user can manually control Mini-Rosco in RC-mode if desired.
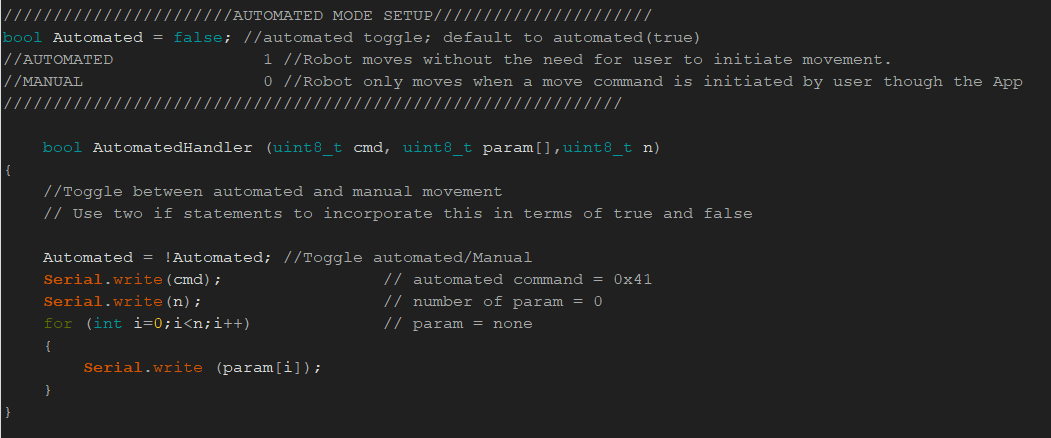
Seen below in figure 2, Mini-Rosco’s automated handler and automated mode setup is shown.
This method makes use of a boolean variable created from within the ArxRobot application. The goal is that when this variable is toggled in the “on” position or “TRUE” position, Mini-Rosco will be in automated mode and is ready to receive a waypoint coordinate to travel to. When the variable is toggles in the “off” position or “FALSE” position, Mini-Rosco will utilize manual move functionality. Please note that more on move functionality is discussed below.
Move Commands
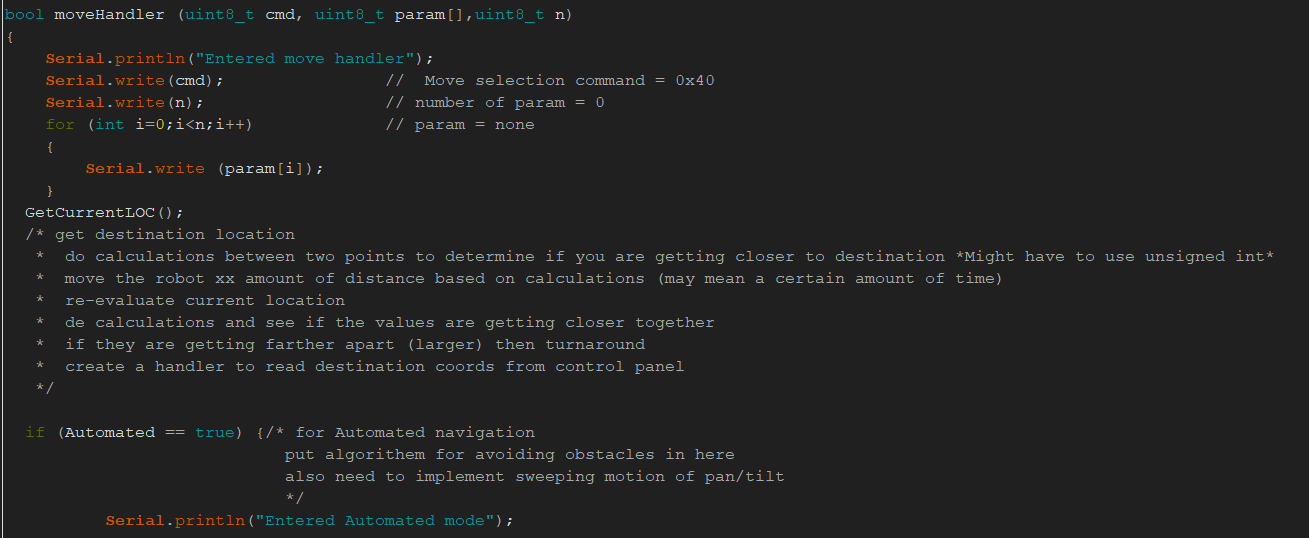
In order to allow Mini-Rosco to have an automated and manual drive mode, two different sets of commands must be issued to the motors. However first, a motor handler must be initiated.It should be noted that in Figure 3, the basic moveHandler function is shown. While there is a “GetCurrentLOC()” function listed, it is not the main focus of this blog post and as such pseudo-code will be inserted as a placeholder for how GPS coordinates will be integrated into the move handler.
Once a move handler is specified, then the two different cases must be implemented. If automated mode is toggled to “on” or “True” Mini-Rosco will utilize the onboard ultrasonic sensor as a means of determining which direction it should travel in. This can be clearly seen in Figure 3. As it is not the focus of this blog post, please click here for more information on how the ultrasonic sensor can be used to direct the movement of Mini-Rosco.
As seen in figure 4 above, when automated mode is set to “off” or “FALSE”, Mini-Rosco will be set to manual mode where the Remote control will be used to input move commands.
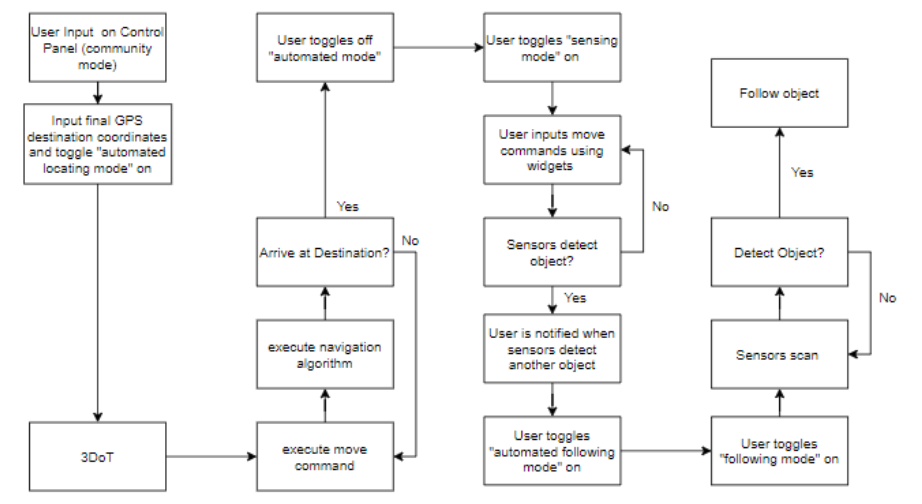
In Figure 5 below, the complete Mini-Rosco generation 1 software block diagram can be seen for reference. The steps listed above are vital for the completion and success for the transition between the second, third, and fourth columns. Without a toggle-able automated mode and automated move handler, Mini-Rosco would not be able to complete its mission.
Conclusion
In conclusion, this post is ultimately aimed at assisting new generations of Mini-Rosco on how to implement aspects of their firmware. The work mentioned above in this blog post serves as a basic platform that is meant to be expanded upon.


