New Components, Part 1
By Tuan Vo, Program Manager
Introduction:
Weight is the number one factor when determining our components that will be used on our aircraft. As stated in the Preliminary Design Document, we decided to use the fans and speed controllers given to us.
Purpose: To identify and expatiate on the equipment and materials selected for the aircraft.
- Microprocessor:
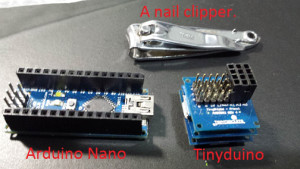
We had a choice of several microprocessors that are lightweight enough and can provide the processing functionality required for flight. The last team to work on this project utilized the TinyDuino which is produced by tiny-circuits.com. The TinyDuino processor board was used in conjunction with a USB and ICP shield and protoshield. All together this set up costs 40$. The processing is the specification provided by tiny-circuits.com.
- Atmega328P processor (same as is used on the Arduino Uno)
- Reset switch
- Status LED
- 8MHz ceramic resonator
- Optional battery connector for CR1612-CR1632 coin cell batteries
- External power supported with a 0.1″ power connection holes
- Supports automatic switching between +5V and VBATT (if +5V is present, it will be used instead of the battery)
This TinyDuino setup was provided to us by the customer because it was utilized by the last group to take on the vertical take-off and landing aircraft. However, the last group could not power the TinyDuino using USB alone. There appears to be hardware damage when we received the stack of boards. It constantly need a coin cell battery in there just to be able to power on. Power was not the main factor that inhibited this team from recycling the TinyDuino for this build, it was the fact that we could not program with it. No one in the company knew how to communicate with the TinyDuino, and we have tried asking tiny-circuits.com for support to no avail. The last team to use it also documented significant difficulty while programming it, although they left us no help on how to establish a connection in the first place. One problem could be that the TinyDuino was structurally compromised, and we could buy a new one to find out if it’s an isolated case. However, the cost of the whole setup is $40 dollars, so we decided to explore other options.
The Arduino Uno is a good board to use; it uses the same ATmega328P that the TinyDuino uses. However, we cannot use this reliable board because at 28 grams it is too big and heavy. The Arduino Pro Mini and Mini series are smaller versions of Arduino Unos, weigh only 4 grams and are much, much smaller in size. However, the consensus on quadcopter forums is that the Pro Mini and Mini are troublesome to work with and have a reputation of failing more frequently.
The final board we have decided on is the Arduino Nano. The Nano is very similar to the Uno and Pro Mini, weighs in at 4 grams, and has been proven reliable in the past. In fact, one of our team member has used the Nano in his EE444 class where it was used on a robotic rover. The Nano runs off of 5V battery source which could be provided by the onboard Battery Eliminator Circuit (BEC) of one of the speed controller. Below is the provided specification for the Arduino Nano. It has 14 I/O pins which is more than enough control outputs for PWM purpose. At $10 dollars each, the Nano is a good choice.
| Microcontroller | ATmega328 |
| Operating Voltage (logic level) | 5 V |
| Input Voltage (recommended) | 7-12 V |
| Input Voltage (limits) | 6-20 V |
| Digital I/O Pins | 14 (of which 6 provide PWM output) |
| Analog Input Pins | 8 |
| DC Current per I/O Pin | 40 mA |
| Flash Memory | 32 KB (ATmega328) of which 2 KB used by bootloader |
| SRAM | 2 KB (ATmega328) |
| EEPROM | 1 KB (ATmega328) |
| Clock Speed | 16 MHz |
| Dimensions | 0.73″ x 1.70″ |

