Spring 2016 A-TeChToP Manufacturing Design of EDA Watch Bands

Marena William (Manufacturing Engineer)

In the past few weeks the housing for the seizure watch was designed and 3D printed as a prototype. The focus currently is on how the electrodes for detecting electrodermal activity will be placed on the wrist and how the electrodes’ wires will be running on the straps of the watch.

Read more

Spring 2016 3 DOT Goliath Arxterra Control Panel Test

By:  Tae Min Lee (Mission, Systems, and Testing Engineer)

As we get closer to the final product we started implementing the Arxterra Control Panel that will be used for the demo.  The Arxterra Control Panel will be used to control the Goliath and provide a live video feed from an android phone with a periscope.


Setup for Arxterra Application on Android/apple Device:

Going on your android/apple device go to the Arxterra application and click on community (see figure 1).

1


Now tap the connect button (see figure 2) and wait for the next screen to show up (see figure 3).

Now assign the robot’s name using an Arxterra application on the android/apple device.  For this example, I used TaeML7 as my pilot’s name and robot name as TaeML.


2           3


Arxterra Control Panel Setup:

Logging onto Arxterra using your computer type in your pilot’s name you assigned on your Arxterra application on your android/apple device.  For the password you can type in any password you wish for the login on Arxterra Control Panel (figure 4).

4

Once your login onto to the Arxterra control panel you should be able to see the robot name on the map (ex. TaeML).  Now click on the green man to enter the cockpit of the robot (Figure 5).

5


Now were in the cockpit of the Goliath where it displays the controls, speed, and battery levels of the Goliath (Figure 6).


7


Arxterra Control Panel Test:

After testing the Arxterra Control Panel we were able to control the Goliath by pressing a key on the keyboard (W = forward, A = left, S = backward, D = right).  In addition, the android device was able to provide a live video feed with the periscope as seen on figure 6.


Sources:

  1. https://www.arxterra.com/bluetooth-interface-to-arxterra-application-in-progress/
  2. https://www.youtube.com/channel/UCJXZGMpv8GqxkOi6W02GzoQ

Spring 2016 3 DOT Goliath Arxterra Firmware Motor Control Modification Test

By:  Tae Min Lee (Mission, Systems, and Testing Engineer)

In order to use the Arxterra control panel we need to first implement the Arxterra firmware for the Goliath.  After testing the Arxterra firmware we encountered a problem with the motor control.  Since, the Arxterra firmware is implemented to using TB6612FNG motor control we had to make a few changes to the firmware to use the Arduino motor shield.

The following changes were made to implement the basic movements of the Goliath:

firts pic Tae


The run_AMS function is responsible for setting the direction and brakes on a motor.  In this case we treated IN1 of controlling the direction on the motor and IN2 to controlling the brakes.

The following table will indicate the movement of the Goliath:

secon Tae

Setting a HIGH value for IN1 will make the motor move forward.  While setting a LOW value for IN1 makes the motor go backward.  In addition, the brakes are activated when we set IN2 variable to HIGH on the motors and setting a INT2 to LOW we will disable the brakes.

To make a right turn on the Goliath we made the motor on the left side to go forward while the motor on the right go backward.  This provides a faster method of turning the Goliath to the right.  A similar action can be performed for the left turn by having the motor on the right go backward and the motor on the left go forward.

third pic Tae


Sources:

  1. https://www.arduino.cc/en/Main/ArduinoMotorShieldR3
  2. https://www.arduino.cc/en/Tutorial/DueMotorShieldDC


Spring 2016 A-TeChToP Analog Electrodermal Signal Processing

By: Robin Yancey (Systems Engineer)

A highly accurate electrodermal activity signal, within a precise frequency range and voltage level, is obtained by developing a simple circuit for analog pre-processing [1]. This circuitry is used to limit the current to the electrodes to a safe amount, measure the resistance between the electrodes, and amplify the signal for input to the ADC of the BTLC1000 chip.

Read more

Spring 2016 3 DOT Goliath IR sensor Code

By: Tae Lee (Systems Engineer)

IR Sensor Code

To implement the laser tag game we have to show an indication of when the Goliath gets hit by the enemy’s IR LED. This will be shown through the three LEDs we will be using to indicate the number of hits.

The following code shown below will be used to implement the three hit indicator:

IR code1


IR code 2

The general idea of how this code operates will be shown by the block diagram below:


IR code 3

The code will start by checking if a signal is received at the detector. If the detector detects the IR emitter it will light up one of the LEDs and increases the count. The count will be used to indicate the number of hits received by the enemy. As we get hit the count will increase to power each LED until it reaches 3 hits. The if statement will be used to check if the Goliath receives 3 hits, which will disable the Goliath. Otherwise, it will do nothing and it will repeat the program through a loop.

Spring 2016 A-TeChToP Temperature Sensor

Mimy Ho (Manufacturing Engineer)

Introduction

The digital temperature sensor DS18B20 was selected based on the level 1 and level 2 requirements of the project: weight, accuracy, and safety. The sensor is waterproof and therefore safe for a child who sweats during play. This blog post focuses on the initial testing and implementation of the sensor.

Read more

Spring 2016 3 DOT Goliath body dimensions

By: Jerry Lui, Rickeisha Brown (Manufacturing Engineers):

Given the requirement of having the phone housed within the body of the rover the body must accommodate for the dimensions of the particular phone being used. In this case, a Samsung Galaxy S4 is being used as the camera for the rover and has the dimensions of 5.38”x2.75”x0.31” (1). Also, to be able to see through the horizontally placed camera a periscope will be used with a dimension of 13/16’’x13/16’’x1-1/16’’.

manufacturing 1


The top lid has a length of 5.5’’ which gives a clearance/play of 0.12’’. The top portion also has a slot to accommodate the periscope and is set to 1’’ (free space of 3/32’’ per side) to allow for movement and alignment of the scope.


Next, portions of the body was removed to reduce the weight of the rover with the sharp corners of the sections filleted with a conic rho profile. The conic rho profile (default solidworks value at 0.5) adds a smoother transition from the adjacent faces yet is able to keep close to the original shape of the cutout instead of having an extremely rounded corner.

manufacturing 2

Also, since we want to be able to access the phone quickly the top should be removable and to accomplish that without having seating issues both the top and the bottom has ledges that sit within each other. Tolerances will be given and set to 0.01574”or 0.4mm (2). The periscope gives a90°shift in the view so that we can see directly forward of the rover.

manufacturing 4


manufacturing 5

The side designs are simply easier to construct, since they are solely based on the top and bottom component configuration. The sides are also going to support the various housing of components such as: motors, batteries, 3dot board, and pcb.


As you can see by the figures above, the side components support the wheel axeling, from the motor to the wheel itself. The diameter of each hole measures 0.1” which is the diameter of our screws and our our rod components. This is the exact measure of the diameter of the rods and screws that are used for our rover.


The inner side features include ledges for the cellphone placement. The ledge is centered about the top measurement 5.50” and begins 0.53” from the top of the rover, consider the thickness of the cell phone, the periscope will sit just perfect outside of the body, with enough area to for viewfinder.


Sources

  1. http://www.gsmarena.com/samsung_i9505_galaxy_s4-5371.php
  2. http://makezine.com/2013/12/11/top-ten-tips-designing-models-for-3d-printing/


Spring 2016 A-TeChToP ECG Demonstration

By: Stephen Cortez (Electronics Engineer)

For the electrocardiogram (ECG) demonstration, the group was required to generate a real-time ECG signal from a subject and transmit the signal to over to the Arxterra website either on a phone application or a computer through Bluetooth. The following is the process taken in order to develop the ECG circuit and develop communication both from the Bluetooth module to the phone and from the phone to the Arxterra app.

Read more

Spring 2016 3D SMD: Conversion of EAGLE file to GCode: Initial Process

By Christine Vu (Missions, Systems, and Test) and Henry Nguyen (Electronics and Control)

Table of Contents

A preliminary simulation was conducted to determine how to convert a PCB design on EAGLE to a Gcode/CNC file for the Makeblock X-Y Plotter Robot Kit to operate. We set up an assembly line to provide an understanding on how the Makeblock X-Y Plotter Robot Kit has potential to pick up a component and place a component down. Future works depend on the development of the project. If time is available, software will be updated.

Fig. 1

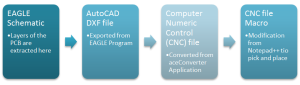
Fig. 1. Preliminary process of converting an EAGLE file to a GCode file.

Downloads:


Eagle Schematic & AutoCAD DXF File

We began the process of the EAGLE conversion with a PCB design. Screenshots of the process are shown below.

  1. Add 3 SMT capacitors size 0805 on the PCB (Or use any design)
  2. Go to File -> Switch to board
  3. Go to View -> Layer settings…
  4. Under Display -> Click None button -> Select Nr 23 tOrigins. This layer presents the origin of each component placed on the board
  5. Click Apply -> Click OK. The origins of the each component should only be show
  6. Go to File -> Export ->DXF

Schematic

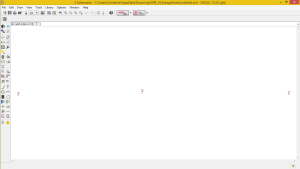
Fig. 2. A set of three 0805 capacitors placed on the EAGLE schematic.

tOriginstOriginsBoard

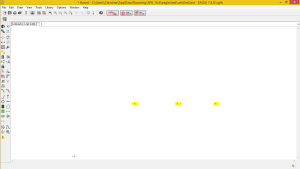
Fig. 3. Display window of the EAGLE board. tOrigins was selected to show the origin of the capacitor (capacitor was placed on the top layer, t). Highlighted on the EAGLE board are the origins of each capacitor.

CNC File

aceConverter Download Link: http://www.dakeng.com/ace.htm

The Makeblock X-Y Plotter Robot Kit operates using Computer Numerical Control (CNC) files, which are often used with milling machines using G-code as the machine programming language. G-code are simply coordinates for a machine to navigate and trace. More information on understanding the G-code can be found here: http://www.tormach.com/machine_codes_gcodes.html

The DXF File exported by the EAGLE board was converted using a free open source application known as the aceConverter.

  1. Open aceConverter
  2. Click Open
  3. Select DXF File
  4. Click Convert

CNC File Macro

The control of the software was simplified with the implementation of a macro on Notepad++.

Information on how to run a basic macro is shown here: https://www.youtube.com/watch?v=Ks2u4MTTQbo

For our purposes, we set the macro to replace all Z-values with values to lift up (Z 18.0) and lift down (Z 34.0). After saving, this file, simulation was done to determine the placement of the reel feeders.

X-Y Plotter Simulation: NC Plot

An important aspect of the engineering method is the use of rapid prototyping and simulation. Before uploading GCode to the Makeblock X-Y Plotter Robot Kit to operate, a program was used to simulate the movement.

Gcode and NCPLOT

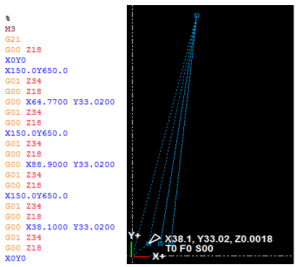
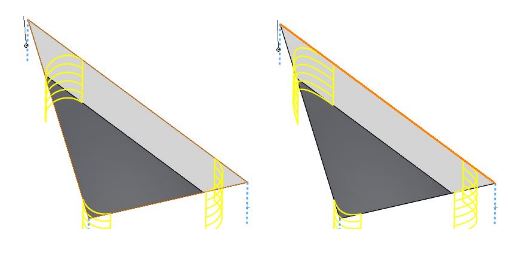
Fig. 4. Simulation of X-Y Plotter movement using NCPlot Program.

After using the macro in order to adjust all of our z-axis Gcode, we used a new software called NCPlot. This software is able to take .DXF and .Gcode files and simulate the actions of our X-Y plotter. I was also able to placed the reel feeder location X150.0 Y650.0 on the NCPlot editor directly. After finding the position of our reel feeder components, I was able adjust the Gcode to go to our reel feeders, pick up the component, head to the location of our first capacitor, and drop the component. This action was repeated for every component for our PCB. This program has great simulation features that allows us to visually see what our Gcode is doing. After verifying the simulation, we were able to send this file directly to our GRemote GUI and have our machine perform as expected.

Spring 2016 RoFi: Soldering Servo Driver

Christopher Andelin (Project Manager)

Mario Ramirez (Systems Engineer)

Qui Du (Manufacturing Engineer)

Andrew Laqui (Electronics and Controls Engineer)

Henry Ruff (Electronics and Controls Engineer)

Soldering Servo Driver

Qui Du (Manufacturing Engineering)


Due to the transition from the Arduino Mega to the Arduino Uno it is necessary that we implementh the servo driver to provide the pins we need.  Below are the steps I used in soldering our header pins to our 16 channel servo.


Tools

  • Solder
  • Soldering Iron Cleaner
  • Soldering Station
  • Soldering Iron
  • Unsolder Pump
image 1

Image 1: Soldering Tools

Servo Driver soldering process

  1. Turn on the soldering station and wait for the soldering iron to reach the desired temperature
  2. Clean the servo driver and header pins
  3. Install the header pins into the servo driver
  4. Heat the connection of the pin and the driver with the tip of the soldering iron for a few seconds, and then apply the solder at the connection
  5. Allow the solder to cool

Note: Only apply heat to the connection; do not apply heat to the solder.

image 2

Image 2: Servo Driver

Soldering Completed:

image 3

Image 3: Final Product

Source

https://learn.adafruit.com/downloads/pdf/16-channel-pwm-servo-driver.pdf.