Spring 2014 BioPrinter

By Ali Etezadkhah, Project Manager

Team members:
Ali Etezadkhah – Project Manager
Mevan Fernando – Sensors, Actuators & Powertrain
Anh Nguyen – Controls & Image Processing
Omair Tariq – Systems and Tests

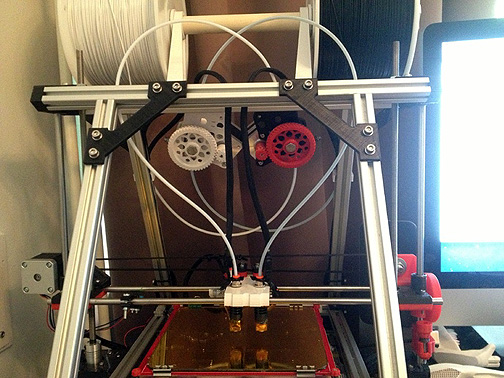
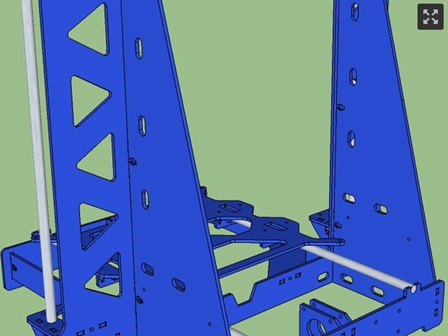
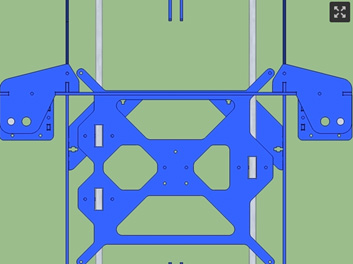
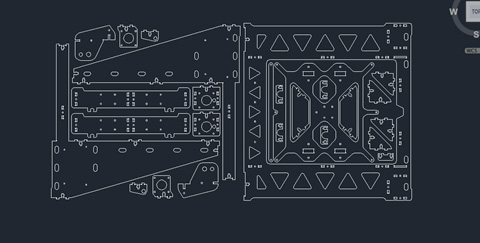
Our team has chosen to continue the work on the 3D bioprinter that was built last semester.  We explored using different printer designs, but most of the models have a building platform that moves in the horizontal plane as well the vertical plane.  Since we plan to use a heated gel to print, a stationary platform that only moves along the z-axis is preferred.  In the next few blogposts, we will publish our research into different 3D printer models.

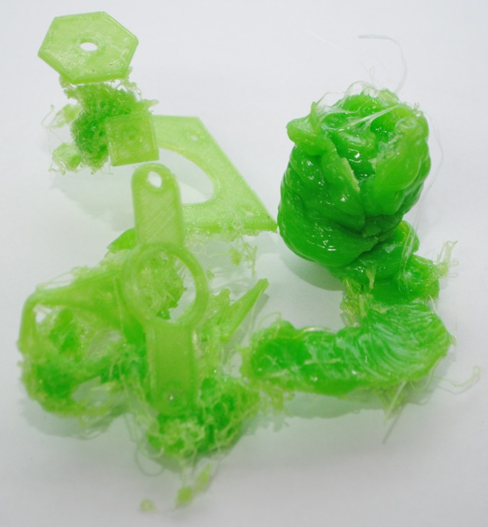
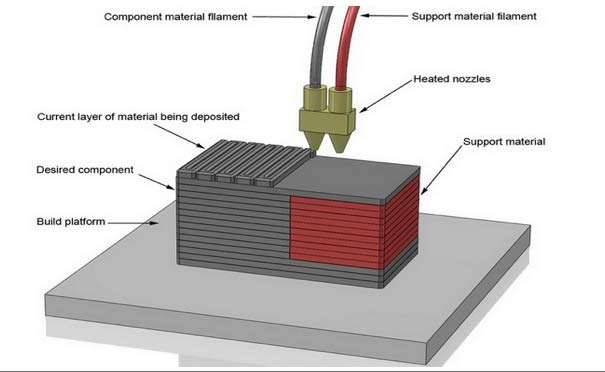
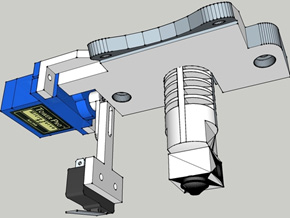
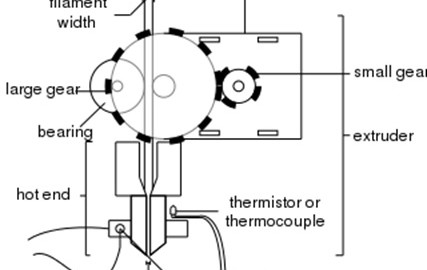
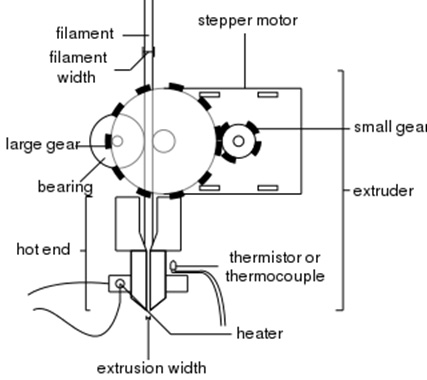
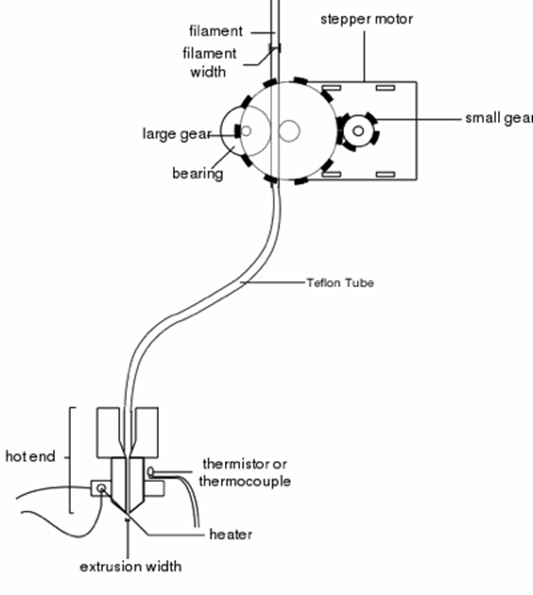
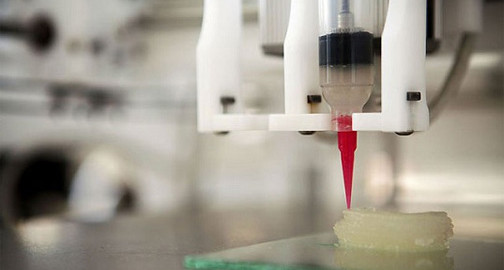
The team from last semester was able to print 3D structures using silicone, but silicone remains fluid until it dries in a few hours.  Our challenge is to design an extruder optimized to print using a biological gel.  When printing with plastics such as PLA or ABS, the extruder temperature is not critical and the structure begins to solidify immediately after extrusion.  This is due to the large temperature differential between molten plastic, which is around 200°C, and the room temperature.  When printing with biological media, the gel must be mixed and kept warm as it is loaded into the extruder.  The temperature of the extruder must be maintained precisely to keep the gel right at the gelling temperature.  As soon as an element is laid out by the print heat, it must be cooled quickly to maintain the structure.

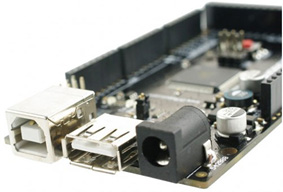
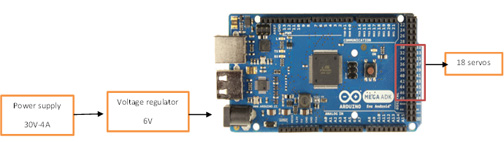
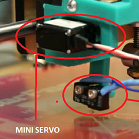
The printer from last semester does not have a temperature controlled extruder.  It also lacks the capability to cool the structure as it is being printed.  Our challenge is to modify and redesign the printer to be able to print using biological media.

Hexapod ADK board

By Mason Nguyen
ADK board tested and programmed by Chau To, Tien Dang and Mason Nguyen

ADK Board
Based on previous objective, the team is to build a hexapod using the wireless control interface. In order to achieve that goal, we need to use the ADK Mega 2560 board where it has the ability to connect to the Android phone and control it wirelessly.

mason1
ADK Microcontroller Mega25 Cappuccino Board

Description:
ADK board came with a power jack, a USB connection, an ISCP header, and reset button. Also the board can connect up fifty four outputs/inputs pins. Those pins contained four UARTs with hardware serial ports, sixteen pins inputs, and fifteen pins PWM outputs.

The team decided to use this board instead of the Uno because it can regulate up to 18 servos without the servo shield controller. Moreover, it’s easier to code compared to the Uno where it required using servo shields controller (2-16 channels Adafruit servo controller board or 1-24 channels) and Uno board also needed to use library provided from the servo controller shield to code as well.

For each Power HD servo, it has 3 pins. One pin contains a control V+ and the other contains V-. V+ pin goes to the servo and the V- pin will be grounded. Digital Pin 30 to pin 47 of the ADK is use to connect the servos. Furthermore, algorithm test will be performed to test the maximum operation of the servos being used will only be 10 as the same time.

The efficiency of a voltage regulator, defined as is an important quantity of its performance, especially when comes battery life or heat. In order to protect the board, we will be using a voltage regulator to limit the current spikes.

We concluded that the Mega2560 can support up 50 digital I/O pins so it will be enough to run our Power HD servos.

mason2
ADK Board where the power supply connected to the voltage regulator and from the voltage regulator it connected to 18 servos.

Here is the video from the servos testing!

Spring 2014 Rover Introduction

By Maxwell Nguyen

This new semester brings along a brand new team with inventive and innovative minds. The rover team will be aiming to create a brand new and improved design for the RoSco Rover.

The Rover Team includes:
Maxwell Nguyen – Project Manager
Robert Licari – Communications
Anthony Vo – Sensors, Actuator, Powertrain
Suhyun Kim – Image Processing, Computer Systems

Mission Objective:
Construct a rover that will be able to navigate through a natural set course shared by the Spiderbot and Hexapod.  The rover must be able to navigate around sprinkler and branches on the course.  The route was determined by the Spiderbot team and can be viewed below.

map
course top view

mapIllo

Course map view

The course is located in the East Wind of campus and is about 42 meters long.

Heated Bed Upgrade

By Mustafa Alkhulaitit – Project Manager

This research study is targeting the heated bed technology for 3D printers. Advantages and disadvantages will be analyzed in depth in this blog. First of all, there are many reasons why every 3D printer needs a heated bed. Heated beds are used because they dramatically improve the quality of the printed object. The quality is greatly improved because heated beds keep the extruded plastic warm and as a result, prevent warping. The main reason why a heated bed must be added is to prevent warping. Warping is a common condition caused by plastic on the edges of the part cooling down at an uneven rate when compared to the plastic inside of the part. The result is that corners warp up and deform your model.

10.bad3dprinting

Heated beds work by keeping the object warm during the whole printing process which keeps the material at or above heat-deflection temperature. Keeping the parts in the heat-deflection range ensures that the part remains flat on the print bed. There are multiple types of heated beds such as:

10.aluminumCladResistors

Aluminum Clad Resistors

    • Cheap price compared to other types
    • Handles both types PLA and ABS
    • 12V powered

Figure1. ACR Heated Bed

  • PCB Heat Bed
    • Even heat distribution
    • Simple implementation
    • Small space required
    • Lightweight
    • More expensive than the Aluminum Clad Resistors
    • Has two sides: top side is safer, while the bottom side is more effective and heats up quicker


  • Silicon Heating Mat
    • Fast heating and reliable
    • Very low height
    • Easy to install
    • Integrated thermostat

10.siliconHeatingMat
Figure3. Silicon Heating Mat


The following table shows the deflection points for the PLA and ABS:

PLA

ABS

50-60⁰C

100-110⁰C

In general, adding a heated bed platform will greatly improve reliability, which is one of our main objectives.  The only exception where we are not going to need a heated bed is that if we use Nylon as our printing material. If Nylon is used, a wooden platform is enough for the object to remain stable on the platform.

Dual Extruder Head 3D Printer

By Mustafa Alkhulaitit – Project Manager

9.duel-extruder-3d-printer

One of our main objectives is to add an additional extruder head to the 3D printer. The dual extruder upgrade will remove any shape restrictions. There are many shapes that the single extruder head will not be able to print. The dual extruder head will allow us to print using dissolvable support structures such as HIPS and PVA. Having multiple extruders allows us to have multiple filaments ‘piped in’ and ready to be used whenever the object being printed requires them, and this is where the saved time comes from. Another advantage of having dual extruders is the ability to print in two different colors by using multiple filaments.

9.Mk8_Extruders_preview_featured

Besides the advantage of dual extruders, there is a limitation for dual extruders. According to “3D printer prices” “The limitations of multiple extruders come as a result of the different extruders currently sharing the same print head. Since each extruder is locked to one another and unable to move independently, more material could only be printed if the object required a symmetrical object to be printed the exact distance apart from the original, as the two extruders are positioned.” Until the extruders can move independently, the benefits of duel extruders come only from having multiple materials readily available.

The dual extruders when operated by the RAMPS card and the Arduino Mega 2560 will result in smoother, higher quality prints. The RAMPS card is dual extruder ready and will not need additional shields or boards. The attached designs and pictures show how the design is going to look like for the dual extruders.

Our plan for the dual extruder is to make a duplicate copy of the existing extruder head. The stepper motor will not be attached to the nozzle head directly because this will take space and will make heads heavy. Instead, the stepper motors will be held in a specific way, as can be seen in the picture.

9.IMG_0704_preview_featured

Auto Bed Leveling

By Gregorio Rios – 3D Modeling

Auto leveling is the process of having a servo attached to the side of an extruder along with a switch to test several points on the printer’s bed.

8A
Fig. 1

3D Printers require their print bed to be perfectly level to the print head. If it’s not properly leveled it will not stick to the bed and may fall off, or warp. Auto bed leveling does not level the bed itself, it helps compensate for the bed not being leveled. Physically leveling is a tedious but a necessary process for 3D printing.  Having to level the bed every time you print without auto bed leveling involves making multiple adjustments: getting a corner in the right position, adjusting and verifying that other corners did not get out of alignment before rechecking.

The way that auto bed-leveling works is by analyzing several points on the bed and taking that data to calculate the plane that the print bed actually sits on. The calculations are done by modifying the software responsible for printing. The printer is then adjusted so that the printed objects are perpendicular to the bed, which is not leveled.

The only items you need are a servo and a switch. Both the servo and the switch will attach to 3D printed mounted parts. A servo allows the 3D printed arm to swing down, so that the switch can test several points on the bed. With this simple process it will make printing more proficient without too much prep work.

8B
Fig. 2

LCD/SD Smart Controller

By Jessica Salazar – 3D Manufacturing

The smart controller is easily able to connect to your ramp’s board using the smart adapter, which is included. It contains an SD-card reader, a rotary encoder and a 20-character x4 line LCD display. The benefits to using a smart controller are that you don’t need a PC to connect to the microcontroller.  The SD card is powered by the smart controller with a g-code design stored on it allowing you to print your 3D designs.

The smart controller also allows you do actions like calibration and axis movements by using the rotary encoder on the smart controller. The rotary encoder is an electro-mechanical device that converts the angular position or motion of a shaft or axle to an analog to an analog or digital code.

E3D Hot End Nozzle

By Jessica Salazar – 3D Manufacturing

A hot end usually refers to the tip of the extruder. The hot end nozzle allows plastic and other material to melt. The hot end uses materials that can stand up to ~240C heat (for current thermoplastic extrusion). With no PEEK or PTFE the all-metal hot end can withstand temperatures that surpass the thermoplastic extrusion levels.

The heated part provides highly precise extrusion. The short distance between from cold filament to molten plastic reduces extrusion and jamming providing higher quality printing. The supplied thermistor has a maximum temperature of 300ºC and compatible with most 3D printing systems.

The Bowden that we are using ships with 800mm of tubing. 

Features:

  • No PEEK or PTFE
  • Reach Extremely High Temperatures
    300ºC with supplied thermistor
    >400ºC with thermocouple (additional electronics may be required)
  • CNC Machined Parts
    High precision
    High quality surface finish
    Aesthetically Pleasing 
  • Prints almost every material (including PLA)
  • Short Thermal Transition
    Improves extrusion accuracy
    Reduces ‘blobbing’
    Lowers extrusion force
    Less retraction required
  • Easy Mounting
    Plenty of community designed mounts (e.g. Thingiverse)
    Designed to fit in 16mm Groove Mount (i.e. J-Head)

What is in the box?
Metal Parts

  • Aluminium Heatsink
  • Stainless Steel Heatbreak
  • Brass Nozzle (0.4mm)
  • Heater Block

Additional Parts

  • 100K Semitec NTC thermistor
  • 12v 40W Heater Cartridge
  • 12v 30x30x10mm fan
  • Fan Housing (Printed ABS)
  • High Temperature Fiberglass Wire – for Thermistor (150mm) 
  • 2 x 0.75mm Ferrules – for Solder-Free Wire Joins
  • Kapton Tape
  • Plastic Screws & Grub Screw
  • 2 x Pneumatic Couplings

800mm of PTFE

Bowden Extruder

By Jessica Salazar – 3D Manufacturing

A Bowden extruder is part of a printer where there’s a flexible tube guiding a filament from the extruder motor also known as the cold end is located and the nozzle also called the hot end.  The separation of these two parts while running a tube between then would make it from a traditional extruder to a Bowden extruder.

The Direct Extruder

5A
Direct extruder

The diagram above shows a typical extruder. A geared motor pulls filament, driving it into the hot-end for melting. The extruder motor is right above the hot-end making the whole part heavier and having to use more force to move and print parts. A direct extruder will often look something like this:

The Bowden Extruder

5B

The diagram above shows the look of a Bowden extruder. Having the stepper motor moved from the top makes the hot end work at faster speed. The running a tube between above is generally made of Teflon.

Pros:
– Reduces the weight of the moving components
– Hot end can be moved with less force
– Faster speeds of printing

Sasha’s New Frame

By Jessica Salazar – 3D Printing

4A

This frame is based on twelve pros designs. The printer is made of 3mm laser cut steel, making a structure very sturdy.

4B

 Pros:
– Steel is 10 times cheaper than aluminum
– Laser cutting steel is easier and cheaper than cutting aluminum
– Steel is stronger than aluminum

Cons:
– Steel is 3 times heavier than aluminum

4C

 The design of this structure was made with a lot of carvings in order to reduce weight.  These carvings, holes, tab and rounded corners where made to accommodate parts while providing a good fit.

4D


4E