Simple Control of an Arduino using an Android Phone
By Vinh-Khoa Ton, Control and Image Processing
The purpose of experiment is to become familiar with the way an Android phone communicates with an
Arduino board using MicroBridge, an Android Debug Bridge (ADB) implementation for microcontrollers.
[Insert Android-Arduino.jpeg]
How it works:
The ADB protocol can either create a new shell or use the existing shell on an Android phone to send commands, read debugging logs, and forward TCP ports and Unix sockets. The Android phone reads data from a port that Arduino is connected to through the ADB. When a connection is lost (the application crashes, the USB cable is unplugged, etc), MicroBridge will try to reconnect to the device upon redetection.
Compatibility:
MicroBridge is designed to work with Android phones with version 1.5 and above. The following phones are confirmed to be compatible: ZTE Blade, Nexus S, Samsung Galaxy S, HTC Desire HD, HTC Nexus One, and LG Eve. A quick demonstration:
http://youtu.be/cX8whgZkdzk
How to set it up:
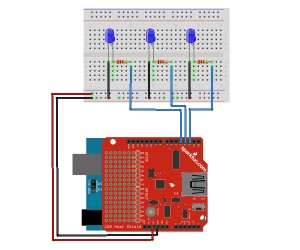
Using the schematic
The LEDs are on pins 2, 3, and 4. The USB Host Shield v2.0 was needed for communication between the Android phone and the Arduino Duemilanove ATMega328.
Some prerequisites:
Download Android SDK at http://developer.android.com/sdk/index.html
Download ADB library at: https://code.google.com/p/microbridge/downloads/detail?name=MicroBridge-Arduino.zip&can=2&q
Download Arduino code and Android app at: https://github.com/mitchtech/android_adb_simple_digital_output
A look into the Arduino code:
void setup()
{
int i;
for (i = 0; i < LEDcount; i++)
{
pinMode(i+2,OUTPUT); // Set pins as output
LEDState[i] = 0; // Init state to 0
}
// Init serial port for debugging
Serial.begin(57600);
// Init the ADB subsystem.
ADB::init();
// Open an ADB stream to the phone’s shell. Auto-reconnect. Use any unused port number, eg:4568
connection = ADB::addConnection(“tcp:4568”, true, adbEventHandler);
}
void loop()
{
// Poll the ADB subsystem.
ADB::poll();
}
void adbEventHandler(Connection * connection, adb_eventType event, uint16_t length, uint8_t * data)
{
// In this example Data packets contain three bytes: one for the state of each LED
if (event == ADB_CONNECTION_RECEIVE)
{
int i;
for (i = 0; i < LEDcount; i++)
{
if(LEDState[i] != data[i])
{
digitalWrite(i+2, data[i]); // Change the state of LED
Serial.println(data[i],DEC); // Output debugging to serial
LEDState[i] = data[i]; // Store the State of LED
}
}
}
}
We need to create a connection to the ADB streams and receive events when connecting, disconnecting, or receiving data. We initialize the ADB in the Setup function by calling “ADB::init();”.
In the Loop method, we must sequentially poll the ADB layer by calling “ADB::poll();”
These 2 calls are the minimum requirements for establishing and maintaining a connection to our Android phone. Next, we want to open a connection with the phone by calling “connection = ADB::addConnection(“tcp:4568”, true, adbEventHandler);”. The first parameter “tcp:4568” forwards local TCP port to the Arduino. The second parameter “true” indicates whether the reconnection should be handled automatically. The third parameter is a callback method which functions as an event handler, which defines what events need to be triggered. We need to implement the event handler function to receive data from the shell. This function has the following parameters: connection, adb event, payload length, and payload data. In this example, we are trying to read command data from the Android phone to control the Arduino so we need to specify the “event == ADB_CONNECTION_RECEIVE”. In this example the data package contains 3 bytes according to 3 LEDs outputs. The nested code in the if statement determines which LED lights up.
Conclusion:
The MicroBridge is a simple solution that allows communication between an Android phone and an Arduino board. With this experiment, we take a first step in getting familiar with the ADB protocol. This allows us to expand our Arduino projects with more capabilities such as remote control of our robots with a friendly user interface instead of having to upload the code manually, or utilizing the built-in gyroscope, camera, and accelerometer of the Android phone for external sensors for our robots.
Sources:
http://mitchtech.net/android-arduino-usb-host-simple-digital-output/

