Spring 2016 A-TeChToP Seizure Watch Final Document
By: Cody Dunn (Project Manager)
Robin Yancey (Systems Engineer)
Rose Leidenfrost (Electronics Engineer)
Marena William (Manufacturing Engineer)
Table of Contents
Executive Summary
Project Objective
The project objective is to design and develop a prototype for an affordable and wearable sensor suite (A-TeChToP Seizure Watch) that allows for the safe and wireless real-time health monitoring of a child. The future A-TeChToP Seizure Watch will notify guardians when the child’s bio-signals have passed below or above healthy thresholds. The device must remove the need for standard encumbering medical equipment and minimize adult supervision.
A-TeChToP Seizure Watch will help monitor children with histories of tonic-clonic seizures.
Mission Profile
A-TeChToP’s mission is to successfully monitor seizures for a child between the ages of 5 and 13 while playing on a playground for thirty minutes. The seizure device will be attached to the child’s wrist and then the child will perform specific exercises and later play freely. Data will be sent continuously to a guardian-monitored computer and, if the child displays the symptoms of a tonic-clonic seizure, the guardian will be warned.
The device must be durable enough to withstand the small collisions and mild weather changes (light rain) associated with playground play.
A more detailed explanation of the mission profile can be found at: http://arxterra.com/spring-2016-a-techtop-detailed-mission-profile/
Level One and Level Two Requirements
The level one and two requirements stemmed from the Project Objective and Mission Profile above. It was important to establish a flow down from the customer’s desires to the Level One Requirements and then from the Level One Requirements to the Level Two Requirements. The requirements may be found at: http://arxterra.com/spring-2016-a-techtop-updated-level-1-and-2-requirements/
Overall Project Design
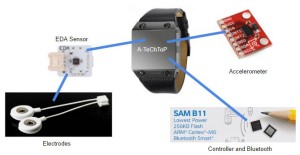
The overall design of the project features the two different types sensors seen controlled by the SAMB11, which could not fully be implemented and was partially replaced with the Arduino Pro Mini and the BTLC1000. The majority of the project was housed in a watch-like device, hence the name Seizure Watch.
Project Features
The project features two unique sensors for measuring the child’s health.
It features a modified control panel with images of the child’s orientation.
The project utilizes the new threshold widget for alerting those monitoring the Arxterra Control Panel.
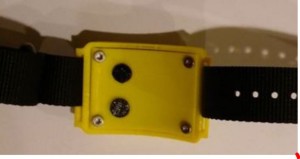
A custom watch design was built to work with the sensors.
The SAMB11 was used to decrease size.
The rest of the blog post will go into detail concerning the project features.
System Design
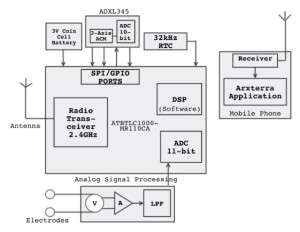
The final system block diagram is as shown below. The block diagram gives the specific sensors used and the connections between different parts of the device. The interface definition, fritzing diagram, and wiring diagram will go more into detail of how the connections are made on the Arduino, the wire placement throughout the device, and other interfacing information.
Several experiments were conducted to determine expected values of skin conductance and to verify the functionality of the sensors and the seizure detection circuit.
Experiment 1: Skin Conductance range
Experimentally obtain a range of skin conductance values from a subject. This subject simulates a sympathetic nervous system response which is what causes an increase in skin conductance by hyperventilating for a short period. Measurement of skin resistance is obtained using a multimeter connected to both electrodes. Skin conductance is calculated by then taking the inverse of the resistance and plotted to show the increase in skin conductance while the subject is displaying a sympathetic nervous system response similar to the response associated with grand mal seizures. [Level 1 req. 11]
Experiment 2: EDA sensor functionality with known resistance
The EDA sensor is tested for the range that is given in the datasheet which is from 0 – 1 M ohms. The EDA sensor is connected to a multimeter to obtain the expected output voltages from the range of known resistance values connected across the electrode input of the sensor. [Level 2 req. 1]
Experiment 3: EDA sensor functionality with electrodes connected
Electrodes are placed on the distal forearm and connected to the EDA sensor and EDA sensor output is connected to the A0 pin of an Arduino Uno to display the raw signal output from the sensor. [Level 2 req. 1]
Experiment 4: Accelerometer functionality
The accelerometer is connected to the Arduino Uno using I2C, the 3.3 V source and GND to view the output acceleration. Using arduino code, calculate the g’s in each of the three axes and the output acceleration is then viewed on the serial monitor. The accelerometer is affixed to the subject’s wrist in order to simulate how the acceleration would be measured in a wrist worn device. [Level 2 req. 5]
Experiment 5: Seizure detection
This experiment tests the functionality of the seizure detection circuit as a whole using the filtered input signal from each sensor. The algorithm compares the two signal values against threshold values of skin conductance and acceleration which characterize a grand mal seizure. [Level 1 req. 8 and 9]
Experiments 1-4 : Sensor Testing
Experiment 5 : Seizure Detection Methodology
Subsystem Design
Interface Definition
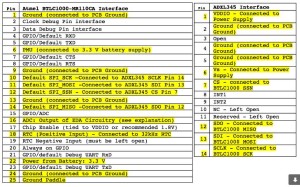
The interface diagram as shown below is the final iteration. This is how the pins on the BTLC1000 are utilized for our device. The interface definition shows which sensors are connected to which pin.
The PCB board will be produced based on the interface matrix. The connections must be close to the SAMB11, in order to conserve space on the face of the device.
The wires connected to the electrodes must be routed down to the ventral side of the distal forearm from the watch face/PCB. The wires also must not be exposed or susceptible to movement, which would distort the electrodermal signal. This will require the manufacturing of a tube or line in the wristband, through which the wire can be wrapped around the wrist.
The modified design lacks external wires.
Custom PCB Design
Electronics and Control:
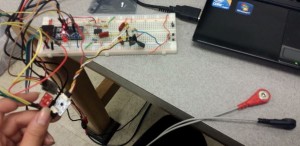
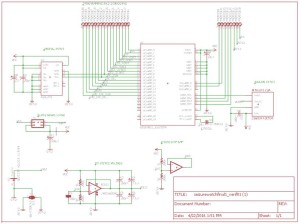
The circuit and PCB designs are different to reflect the shift of the project objective. To demonstrate the original design the EAGLE schematic was designed to integrate the Atmel SAMB11 with the ADXL345 and BITalino EDA. The final design is demonstrated by the physical breadboard which shows the ADXL345 and EDA sensor integrated with a 5V Arduino Pro mini.
Physical Breadboard (Current design):
Explanation of hardware : Seizure Detection Methodology
Schematic (original design):
Schematic specifications: Seizure Watch PCB layout
Manufacturing:
The custom PCB layout was done by the manufacturing division upon receiving the approved schematic from the electronics division with all the necessary notes. PCB details could be accessed at Spring 2016 A-TeChToP Seizure Watch PCB Layout.
As the dimensions of this PCB didn’t match the maximum dimensions according to the requirement, another condensed PCB layout was done to come up with possible dimensions for the housing ( see Spring 2016 A-TechTop Seizure Watch Subgroup Solution for Decreasing Size ).
Approved PCB Layout
Condensed PCB possible design
Hardware Design
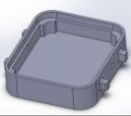
The 3D SolidWorks design had been updated in different irritations. It started with research about the different material that could be used for 3D printing followed by a housing design based on maximum dimensions (Spring 2016 A-TeChToP Manufacturing Design Studies).
The final developed design could be viewed at Spring 2016 A-TechTop Seizure Watch Subgroup Final Manufacturing
Initial watch design
Final Watch Design
Software Design
You can include a link to the telemetry code and power point in the SW System References Folder.
Subsystem Code
Subsystem code:
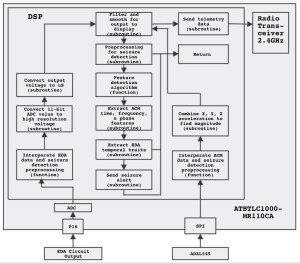
Electrodermal activity signal processing code converts the raw ADC voltage to a skin conductance value which is then passed through a low pass Butterworth filter.
Accelerometer signal processing code accepts data over I2C serial communication and acceleration in three axes is calculated in g’s. The signal is filtered by an IIR derivative filter and then used to calculate the magnitude of acceleration.
Seizure Detection algorithm compares the acceleration and skin conductance values to threshold values that would indicate a generalized tonic-clonic seizure.
Summary of subsystem software: Seizure Detection Methodology
Verification and Validation Test Plans
The verification and validation plans were made to ensure that our device satisfy the first and second level requirements. The plans list the objectives being met for that particular requirements and the steps needed properly test it. We were able to satisfy a majority of the requirements although the final integration was lacking.
The verification and validation test plans can be found in the Dropbox Folder for the Seizure Watch Systems Engineer.
Project Update
Work Breakdown Structure
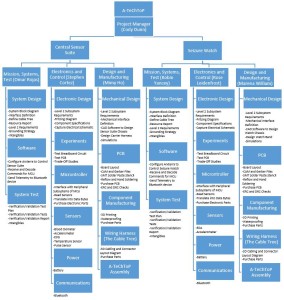
The WBS reflects the fact that the Project Manager was working on two different portions of the project. Each member’s tasks are clearly defined.
Resource Reports
The mass, power, and cost requirements were all met based on the given allocations. The detailed reports can be found in the SW Systems Engineer Folder in the Dropbox from the resources sections of this blog post.
Schedule and Burndown
The project was 85% complete at the time of the final demonstration. The major areas missing were telemetry being displayed on Arxterra due to the use of the BTLC1000 and integration of the components. Many parts have been completed separately but are lacking the final assembly.
The main area of slowdown was the fact that this is an entirely new project and the Customer wanted the group to use a device that was just recently released (the BTLC1000 and then the SAMB11).
The group had to wrap up a large portion of the work in the final weeks because several tasks were started but not completed, which gave a false sense of security concerning the completion time. The group worked very hard after a poor/mediocre CDR review to make up for lost time and complete more of the project.
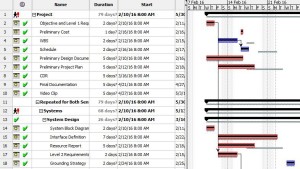
The schedule was created on Project Libre, which was only used because it is free. Otherwise, it is not easy to use. Here is a small part of the schedule to demonstrate the design that follows the WBS:
The rest of the schedule can be found in the Dropbox for the Project Manager.
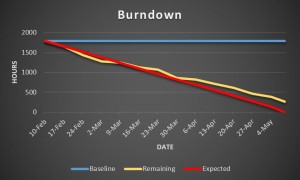
The project Burndown demonstrates the baseline work (blue), the completed work (yellow), and the expected work if the project was to be completed on time (red). The plot is in hours over time.
The Excel sheet for the Burndown can be found in the Dropbox for the Project Manager.
Concluding Thoughts
Improvements for the next generation:
- The next generation should focus on working to improve the data outputs and displays on Arxterra.
- They should also work on improving the durability of the device by printing with different materials.
- The PCB schematic and layout should be improved to work with the SAMB11.
- Lastly, the device should be waterproofed and the aesthetics improved.
- The device should be fully integrated.
Lessons learned the hard way:
- It is extremely difficult to manage two teams no matter how similar the projects are initially thought to be.
- Group members will often provide verbal updates suggesting they are much farther along in their work. As project manager, it is important to confirm the work has been completed by requiring constant demonstrations at group meetings to determine the flaws outright.
- Make sure your members have thought through the design details by asking complicated questions concerning intangibles.
- It is important to push towards prototypes early in the semester even with the mass of initial blog posts.
- Major objective changes late in the semester can create excessive amounts of work towards the end of the project.
How things should have been done differently:
- The division managers and project managers should have been in communication throughout the semester.
- More accountability should have been placed on the division managers to help complete projects.
- The group should have used a device with better documentation than the SAMB11.
A more detailed analysis of the concluding thoughts can be found at:
Resources
Final Video: https://www.youtube.com/watch?v=e5FeTj3f3-w
PDR: http://arxterra.com/spring-2016-a-techtop-preliminary-design-review/
The rest of the resources can be found in this Dropbox: https://www.dropbox.com/sh/9lg023uivp07bp8/AAAv6DZW-Dqmp9vylJc5koYqa?dl=0
The resources include but are not limited to
CDR (PDF)
Project Libre (with Excel Burndown file)
Verification and Validation documents
Solidworks File (zip folder)
Fritzing Files
EagleCAD files (zip folder)
Arduino and/or C++ Code (zip folder)

