Spring 2016 RoFi: Mechanical Design Rev.2
Christopher Andelin (Project Manager)
Mario Ramirez (Systems Engineer)
Qui Du (Manufacturing Engineer)
Andrew Laqui (Electronics and Controls Engineer)
Henry Ruff (Electronics and Controls Engineer)
Table of Contents
RoFi 3D Modeling
Qui Du (Manufacturing Engineer)
Disclaimer: RoFi’s head components may change due to the in completion of the PCB layout. In this design, I remodeled RoFi’ legs, head and feet; finally, I will assemble them all in SolidWorks.
Introduction
Over the past few weeks, my team has been using the Arduino Mega board instead of the custom PCB with the Atmega chip, therefore, I designed RoFi’s head based on the Arduino Mega board. Since we will not be using the Arduino Mega, I will design the custom PCB to have the same dimensions as the Arduino Mega so that it will fit in RoFi’s head.
I will briefly cover how I designed the new head, feet and RoFi in SolidWorks.
Hardware Design
Head Top Cover Design
In order to secure the Arduino Mega, I modeled the screw holes position off of the Arduino Mega datasheet. In SolidWorks, I modeled the Head Top Cover by drawing centerlines and by using the Smart Dimension feature.
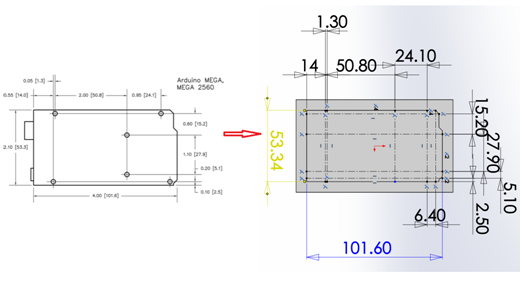
Figure 1: Screw Hole Position
Next, I determined the screw hole diameter and depth.
According to the Arduino datasheet, “all Arduino mounting holes are 3.2mm in diameter. They will accommodate M3-0.5”; I decided to use the M3- 0.5 screw for the Arduino Mega on the Head Top Cover.
Below, I provided information on the M3-0.5 screw type.
Source: http://www.spaenaur.com/pdf/sectionR/R11.pdf

Figure 2: M3-0.5 Screw
The datasheet says the diameter of the screw hole should be in the range of 3 (Ds) to 3.5mm (DA); I chose 3.02mm diameter for the screw holes in the Head Top Cover.
To determined the depths of the screw holes, I adding the width Top Head Cover and the Arduino Mega.

Figure 3: Screw Hole Depth
The best screw that is available for my design is the M3-0.5 with a length of 8mm.
The equation I used to determine screw hole depth is (screw hole depth on the Top Cover) = (screw length) – (the width of Arduino Mega) => 6mm = 8mm – 2mm.

Figure 4: Finished Head Cover
Head Back Cover Design
I made two holes on the Head Back Cover of RoFi’s head for the power and USB port.
I used the ![]() Smart Dimension feature in SolidWorks to show the dimensions of the holes.
Smart Dimension feature in SolidWorks to show the dimensions of the holes.
Note: Because we are working in 3D, to measure the distance of two lines, I made sure the two lines were placed in parallel and in the same plane. In the figure below, I added two centerlines as the two reference lines which are parallel and in the same plane which relates to the power and USB cord.

Figure 5: Power and USB Port Hole
To make it easier for me to determine the size of the back cover, I included the ultrasonic sensor.

Figure 6: Visualize Dimensions
I strategically placed the ultrasonic sensor and the Arduino Mega so that they fit comfortably in RoFi’s head. The thickness of the ultrasonic sensor is approximately 2mm and could easily hide in the head front cover; therefore the space for ultrasonic sensor is not necessary 22mm. In this design, I made the size for the Head Front Cover to be 59.34x51mm.

Figure 7: Assembly Analysis
Power Switch Design
Below is the design for the power switch and the location of the switch relative to RoFi’s head.

Figure 8: Power Switch

Figure 9: Power Switch Location
RoFi’s Hat Design
RoFi’s hat is used to hold the Android phone and is larger than RoFi’s head. The advantage of RoFi’s hat is that it allows the designer to only redesign the hat to fit a new phone without having to redesign the whole head.

Figure 10: RoFi’s Hat
In Figure 10 you’ll notice that I designed the hat to be larger than the phone because I want to avoid friction that might scratch the phone.
Periscope Holder Design
Figure 11 indicates the position of the camera relative to the hat.

Figure 11: Camera Location
Figure 12 shows the dimensions of the periscope.

Figure 12: Periscope Dimensions
Figure 13 is the periscope holder that encases the periscope.

Figure 13: Periscope Holder
Finally, I placed the periscope in a location that allows for proper viewing.
Figure 14 shows RoFi’ hat including the periscope holder.

Figure 14: Hat
Battery backpack design
I used the same techniques for designing the periscope to design the battery backpack and body riser.

Figure 15: Battery Backpack and Body Riser
Head Overview
Figure 15 shows the final product of RoFi’ head containing all the components.

Figure 16: Head Overview
Figure 17 shows the exploded head view with all the components.

Figure 17: Exploded Head View
Leg Design
To design RoFi’s legs I imported the 1501MG servo into SolidWorks from the manufactures website. I found there was a prototype of the 1501MG servo on grabcad.com which is available for download. I downloaded the servo and took measurements in SolidWorks and compared it with the measurement of the datasheet.
1501MG servo prototype measurements in SolidWorks:

Figure 18: 1501MG SolidWork Dimensions

Figure 19: Datasheet Dimensions
Figure 20 compares the prototype dimensions with the product datasheet dimensions.

Figure 20: Servo Dimension Comparison
Figure 20 indicates there is a 0.3 – 0.5mm difference between the product datasheet and the prototype. I chose to use the product datasheet dimensions because it is slightly larger and can accommodate the smaller servos if needed.
Figure 21 shows the servo band which secures the servos in place.

Figure 21: Servo Band
I used a protractor and ruler to measure the printed parts, and I corrected any flaws in my SolidWorks model.

Figure 22: Knee Measurement

Figure 23: Corrected Loose Servo Arm
Foot design
To minimize the mass of RoFi’s feet, I made holes in the bottom of the feet. Figure 24 shows the final product of the new foot design.

Figure 24: Foot
Leg Overview
Figure 25 shows the complete view of RoFi’s legs with new feet.

Figure 25: Legs
Leg diagram
Figure 26 shows the leg diagram.

Figure 26: Leg Diagram
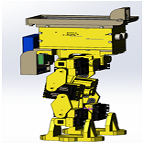
Completed Design
Figure 27 shows the completed design of RoFi.

Figure 27: Completed Design
Sources for part dimension verification:
Atmega ADK: https://www.arduino.cc/en/Main/ArduinoBoardMegaADK
Samsung s6: http://www.gsmarena.com/samsung_galaxy_s6-6849.php
Batteries: http://www.valuehobby.com/gforce-2600mah-tx.html
Servo 1501mg prototype downloads from: