Spring 2018 3DoT Hexy: Final Arduino Code
By: Kris Osuna (Electronics and Control Engineer)
Verified By: Eduardo De La Cruz (Project Manager and Manufacturing Engineer)
Approved By: Miguel Garcia (Quality Assurance)
Table of Contents
Introduction
The purpose of this post is to share the links for the 3DoT Hexy Code and explain the structure for use in the future. There are two separate codes to be explained. AutoHexy does not use the 3DoT firmware and does not run through the Arxterra app. Arx_Hexy_Automatic does use the 3DoT firmware and was run with the Arxterra app. The 1-to-4 I2C on our custom PCB only had one working channel for some reason, so we used the Adafruit TCA9548A 1-to-8 I2C multiplexer breakout board.
Related Requirements
Level 1 Requirements
- The robot will need to navigate remotely through a custom-built maze (built by AoSa image), memorize the path it took, start over, and autonomously travel through the path it took.
- The robot shall avoid collisions if it encounters other robots while navigating through the maze. This involves detecting the robot, retracing steps back, and moving to a room that allows the other robot to have a safe passage.
- The robot shall use a v6.43 3DoT board.
- The robot shall demonstrate the capabilities of the 3DoT micro-controller for DIY hobbyists.
Level 2 Requirements
- The robot shall use a single RCR123A 3.7 V, 650mA rechargeable Li-ion battery to power the 3DoT board, which will power the drivetrain and all attached peripherals.
- The robot shall use 3 UV sensors connected to a custom PCB.
- The robot shall use a HC-SR04 ultrasonic sensor to handle robot avoidance.
- Ultrasonic sensor shall have a range of 0.5-meter radius to detect and respond accordingly to other robots.
Code Layout AutoHexy
Setup and define – We are using a dual motor driver that needs to have its pins defined. The Arduino Leonardo was used intermittently due to malfunctions of the promicro, so changes in pin definitions had to be made. pingPin is used for the ultrasonic sensor. LeftEye and RightEye are declared on digital pins to be controlled. We are reading from three sensors so each must be declared. tcaselect is used to identify the channels in the I2C.
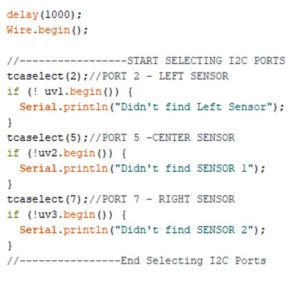
Setup – Since we used an eight channel I2C the specific channels that will be used need to be selected and checked for data transmission. If there is no data transmission on the selected channel the program stops here.
 Figure 2: Check that selected channel on the I2C are receiving information
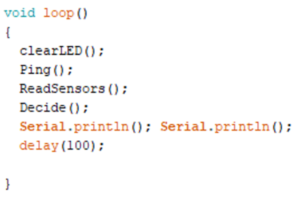
Main Code – The main loop calls the functions
Figure 3: Main loop calls the functions
Functions:
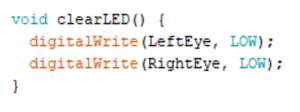
clearLED ()
Function turns off the LED eyes. Figure 4: Turns off the eye LEDs
Ping ()
This function measures the distance and the only change from the manufacture code made was to detect a certain range. When the robot detects an object 10 to 25 cm away the robots turns the LEDs on and stops the robot from moving until the object leaves. When the object leaves the LEDs turn off and the robot begins walking. Figure 5: If an object is detected in the 10 to 25cm range 3DoT Hexy will turn on its eye LEDs and stop moving until the object is removed
ReadSensors()
Figure 6: This function reads the IR values for the channels being used
Decide ()
This function goes through the line following possibilities. The first check is to keep going straight when only the center sensor is on the line and it should go straight. Second check is when the robot is drifting to the right and the left sensor is on the black the robot turns left until the center sensor goes over the black line. The third check runs when the right sensor is over the line and turns right until the sensor get back on the line. The forth check is when the robot is at an intersection it was going to be implemented with the virtual maze but I was unable to implement it in time.
 Figure 7: Run through the options of what to do based on the IR values
Code Layout Arx_Hexy_Automatic
The code layout is similar to AutoHexy, but it incorporates the 3DoT training and firmware. I tried to set up a custom command for setting the Ping function but I was unable to get the code to function correctly.
Figure 8: Detect Handler was supposed to have the robot run through the maze autonomously when detect custom command was called.
Figure 9: The blink custom command was used to test arxterra app connection and was going to be used to celebrate completing the maze.
Libraries Required
Conclusion
I was unable to get the line following code to function correctly on the arxterra app. The line following on Arduino only worked ok but due to the sensors not fitting correctly in their spot, consistent values were difficult to obtain. The sensors kept moving positions and angles. The blink custom command shows that the handle is correct and is going through, but Detect command does not work for some reason. Our team did not have a dedicated hardware and a dedicated software team member which lead to extra work. I believe if we had another team member we could have gotten the code working.
Resources
- 3DoT Arduino Help
- Link to Code: Hexy


